|
Welcome
To My German Equipment Alterations Page One
Helmet Alterations
Gloved Hands
Boot Alterations
Boots & Gaiters
Puttees
Equipment Alterations
Dust Effects
Gas Mask Canister
This page I made up because I have quite a few methods
of making alterations to German kit and equipment on various pages, so I have
decided to assemble them in one place here. Because it has got to the stage,
where even I am losing track of what I actually do have on my website now. Some of these various tips I have
learned from numerous fellow modellers, plus some I have tried myself as
experiments. Although I have used German pieces here, I am sure that the same
techniques can be applied to most other figures.
Helmet Alterations
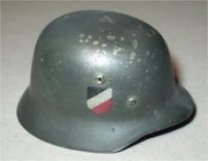

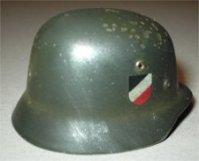
The helmet is metal and is I believe from the Jakob Blau DiD figure,
but I am afraid that I got carried away and I don't have a before picture for
this section. To get the chipped effect on the top I put the helmet shell into a
plastic bag with some small woodscrews, I sealed it and then gently shook it to get the
damage on the top. I then rubbed a pencil on some sandpaper to get
powder, and then I dipped my finger in it, and lightly rubbed it all over the
helmet, I then wiped over the helmet with a soft cloth to get a slight shine, a
bonus was that it
also darkened off the decals to make them look old.
With the edges to get the chipped effect here, I used to my model knife blade to
scrape along the edge to simulate wear. I then brushed over the helmet with some Tamiya Gunmetal
powder to get a variety of metal shading. This was when I realised that it was
just a little too shiny so I brushed over with Tamiya Mud powder to get a
slightly dirty and dusty look and to dull the shine slightly. To finally finish
the helmet off, I went around the helmet rim with a pencil to get
a shiny Gunmetal edge, I also did this for the ventilation holes and the rivet
tops.
I also went over the helmet with a Brown pastel chalk I used for
the equipment, and as shown in the two pictures above right I have been
able to get a dust effect where the rim starts. For this I just rubbed the
pastel chalk into the fold, then I just gently wiped it off by going from the
top to the bottom of the helmet. This then left the dust in the fold as shown.
Note: Don't wipe around the helmet as it
will remove the dust effect.
Note from Pzrwest - Remember they would
also have scrapes and dings even on the decals. Despite orders to remove decals
at different times, helmet decals were still being applied either singly or as
pairs right up to the end of the war. Some helmet makers continued to apply them
despite the orders.
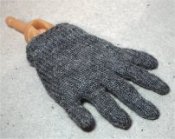
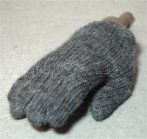
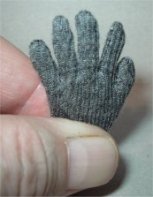
Gloved Hands
One thing that I had made my mind up about regarding
my figure's, are that it had to have the fabric gloved hands
rather than the plastic type of hands. And this is shown below about how I fit
the gloves to the hands on my figures.
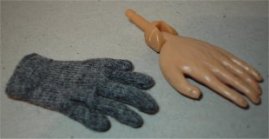
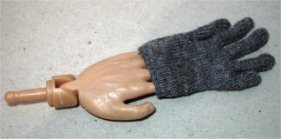
In the pictures above from the left, this is a DiD flexible hand
and a fabric glove, next I feed the four fingers into the glove pulling it down
slowly until I can get the thumb inside the glove as well.
Note: Sometimes I have to squeeze the fingers and thumb together
to get them all into the glove. Once they are all in, I then spread the thumb
and fingers out as shown above right to get each one lined up, and I then pull
the glove down over them.
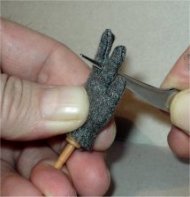
Then as shown above I gradually feed the thumb and fingers into
the glove, and as shown above I use a pair of tweezers to press down between the
fingers to get them into the glove fully. The next picture shows how I hold the
bottom of the glove and the peg for the wrist joint, and I gently tap the pin on
my desk, as this gently forces the hand further into the glove. And with a
combination of this and the tweezers, I can finally get the fingers all the way
into the glove. Note: If you use the
tweezers to pull the glove down over the fingers, make sure that you do not use
any pointed one's, because it can cause the glove to split.
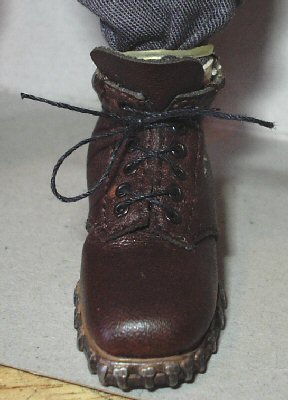
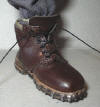
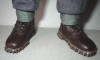
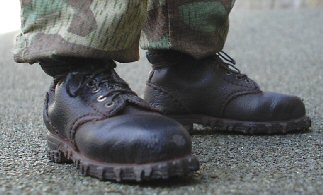
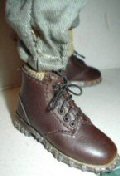
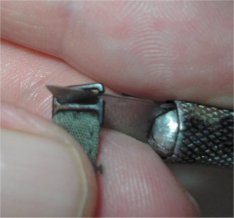
Boot Alterations
Toys City Gebirgsjager Boots
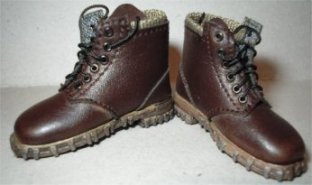
The Toys City boots shown above left are compared
to the DiD boots in the centre. The Toys City one's are made of a softer
'pleather' type of material and they press down better onto the leg, so that I
can get a tighter look around the ankle. This helps me to get the same look with
the cloth items, as the moulded plastic Dragon boots and puttees.
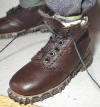
Note: Also with the laces from the boots
wound around the boot tops before tying them off, this also helps to get the
tighter look to the puttees. In the picture above right, I have given the boots
on my figure a coat of some acrylic Model Color 540 Matt Medium, to both dull
them down and to take away the new look that they have. I also painted over the
metal cleats on the sole with some Gunmetal paint to
make just those shiny.
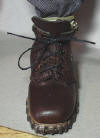
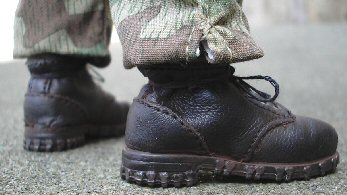
With the footwear that I wanted to use with my
Cable Layer figure, I again used the Toys City Gebirgsjager boots as shown on
the right as they are softer than the DiD boots and they take the pastel chalks
well. I have included in the picture a pair of new boots on the outside, with
the pair I have altered on the inside. With this figure I not only wanted the
boots to look old and used, I also decided to have some scuff marks on the toes
as well.
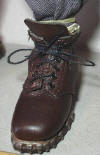
I did this by folding a small piece of sandpaper
in half so that it caused the cuts in the leather, and I sanded gently to cause
the marks. I also sanded the toe slightly to add the scuff and wear marks. I
again repainted the metal parts on the soles of the boots with the enamel
Gunmetal paint, and then used a Light Brown pastel chalk powder to add a dust
effect to the boots.
I made up a mix of White and Light Brown pastel
chalk mix, which was then drybrushed over the top to bring out the edges and add
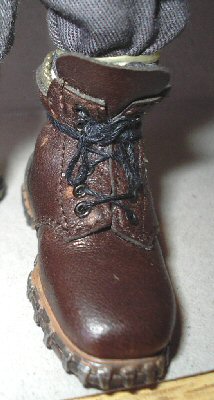
some highlights. Note: With all of the boots I am currently using
for my figures, I replace the laces with some similar sized Black thread. The
purpose of this is that I can lace the boots up, and still have enough lace left
to wrap around the boot tops, and tie a bow as shown below.
Boots Update
One thing I have meant to do for a while is a step
by step, about how I laced up the Gebirgsjager boots. And in the pictures below,
from the left to the right show how I do it. Pictures
1. & 2. show how I
have replaced the laces with some longer thread, this then allows me as in picture
3. to tie a bow in the lace. In the picture
4. I have tied
another bow this is to keep the lace tight.
1.
 2.
2.
 3.
3.
 4.
4.
 5.
5.
 6.
6.
 7.
7.

Picture 5.
shows how I have made the loops in the bows smaller, by putting each loop in
turn back through the lace at the side of the boot, and then pulled tight
towards the knot. The purpose of this is that the loops are now getting smaller,
and as shown in pictures 6. &
7. once the puttees are in place the loops
are more in scale and the knots are hidden.
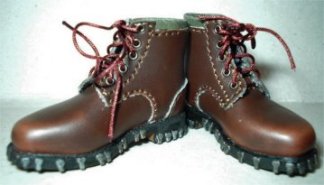
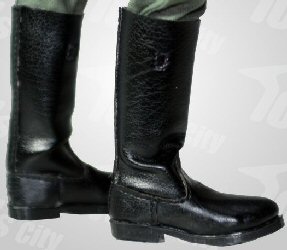
DiD Gebirgsjager Boots
Below are a pair of DiD Gebirgsjager boots that
have had the same treatment done to them, as the Toys City boots above.
The pictures above show the boots before and after
I have painted over them with the acrylic Model Color Matt Medium paint. I have
found that this paint is very good for dulling down the new shiny look they
have, plus it dries both clear and with a matt finish. So I don't have to
worry about matching the paint colours of the item that I am re-painting.
Important note: I have also added a scuff
mark to the front of these DiD boots, but I do advise being very careful
doing this with the boots. Since the 'pleather' material is a lot thinner than
the Toys City boots and it tears very easily, so if you try this be very gentle
with the sandpaper. Other
boot changes I
have done.
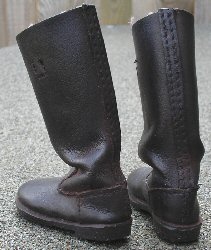
The pictures above show how I have used the Brown
pastel chalk to add a dust effect to the boots, this is applied with a flat
brush to get the chalk into the edges and sole cleats. I then use a large fan
brush to blend it in, and also to remove some of the dust from the flat parts of
the boots. I then use a dry tissue to carefully wipe over all of the flat parts
of the boots, to remove some more of the dust so I only have the dust detail as
shown.
Toys City Jackboots

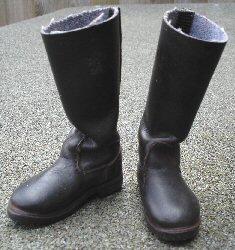
With these pictures I have changed the above boots
to lose the glossy shine that they have, the first picture is when they are new,
the second picture after I have repainted them with first some Black artist's
acrylic paint, and then a wash over with the Matt Medium paint. The third
picture above is after I have given them a drybrush with some Brown pastel
chalk, the last picture shows how I have rubbed the chalk into the material
joints and the sole edges. I then gave the boots a wipe over with a clean dry
tissue, to leave only the dust where I wanted it.
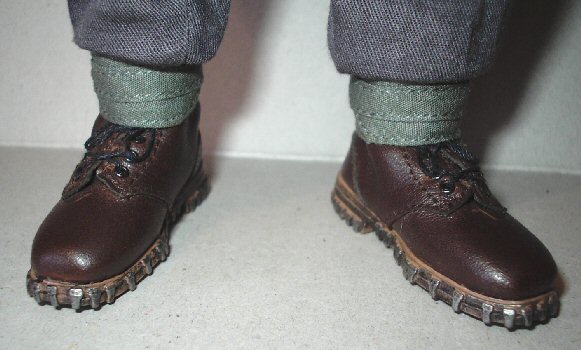
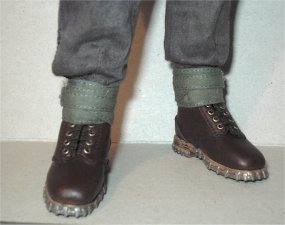
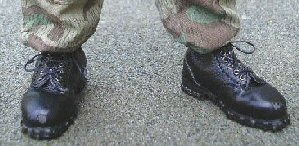
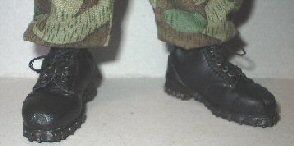
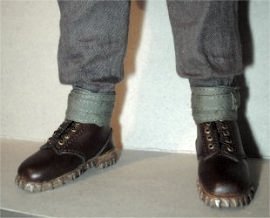
Boots & Gaiters
8.  9. 9. 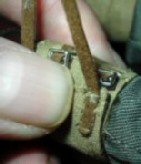 10. 10. 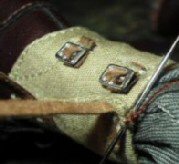 11. 11.  12. 12.
This shows how I fit the gaiters on my German
figures. And as shown in Picture 8. i have tied the laces as tight as I could,
also I have tied the trouser bottoms as tight as I can, so that all the slack
has been taken up which help when I fit the gaiters. In picture
9. it above shows the gaiter placed
around the boot, which is pulled tight on the gaiter material and not by
the straps. Note: Because as I have found
that if you pull the straps too hard they will break. So to make sure that I can
get the gaiters tight, I pinch them together at the top and sew a couple of
stitches in place as shown in picture 10. making sure that they cannot be seen from the front. The
point of doing this is that the tightness of the gaiter is held in place by the
thread, and not by the fabric straps.
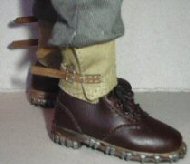
And as shown by picture
11. above, I have
done up the straps by making sure that I press the gaiter together at the top
and bottom when I am doing this, so that there is less chance of the straps
breaking. And in picture 12. shown above right I have bloused the trousers out
over the top of the gaiters. Note: I always
leave the straps long as shown, just in case I have to remove the gaiters for
any reason and I usually cut these shorter after I have finished the figure.
Puttees
The Toys City puttees themselves proved to be a real
headache for me, with working out how they go together. But once I realised that
the buckle part comes apart as shown below left. It was just a case of wrapping
them around the boot tops and then carefully parting the buckle, so that it
could be pushed behind the last puttee strap.
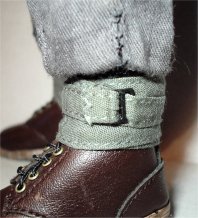
With the puttees as shown above, I could not work out how they
went together until it was pointed out to me that the buckle has an opening as
shown above left. Note: This buckle I
believe is plastic, so I have had to be careful handling them in case I break
them. The next pictures show how I have wrapped the puttees tightly around the
boot, and then opened the buckle and gently pushed it behind the thin strap to
keep it all in place.
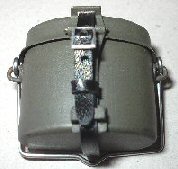
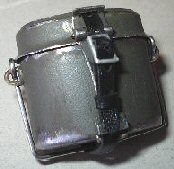
Equipment Alterations
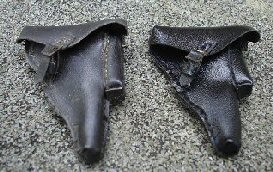

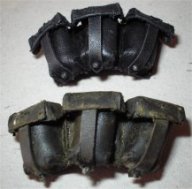
These pictures above show how I have repainted some of the other
equipment I have for my figure's. The DiD ammunition pouch in the picture above has been painted, with
a new un-painted one above it. The 'leather' pouches I also filled with
some tissue to bulk them out, the holsters above are I believe again made by
DiD.
I first painted them with some Model Color 540
Matt Medium to remove the glossy look to them, I then used a Brown pastel chalk
which I ground up to a powder, and brushed it into the edges and gaps.
I then used a White and Light Brown pastel chalk
mix which was drybrushed over the top to bring out the edges and add some
highlights. The picture above right is of I believe a DiD 'pleather' holster
and the ammunition pouches, which has this time had a repaint of some Black artists
acrylic paint instead of the Matt Medium paint as an experiment to both lose the shine and also age the items. I also again gave
them a drybrush with the Black/White paint mix, to add the highlights on all of
the edges. This has added some detail to it, but I think a flick over the items
with some Grout powder after the figure is assembled may add a bit of a lighter
highlight effect.
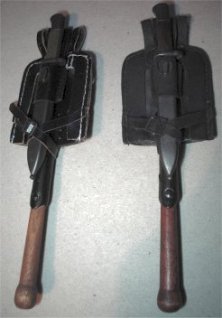
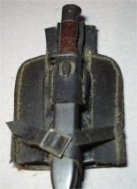
The picture on the right is the DiD shovel and I think a Dragon
bayonet, these again have been repainted with the un-painted items on the left.
The shovel I feel had to have a repaint as the white thread was really bothering
me as it just stood out too much. With the painting I found that I had to use a
slightly thicker mix of the acrylic paint and the water, which I had to let dry.
So that when I touched up the missed parts, the new paint had something to stick
to. It has come out a bit flat even after a drybrush, so I may try a
very light Grey drybrush on the threads to hopefully highlight them to bring
them out along with the edges. The wooden handle has had a treatment of painting
it with a wood dye and then some shoe polish, and I think it has added a
nice darker and aged colour and effect to it.
 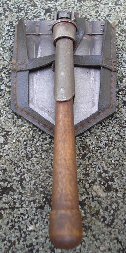
With the DiD shovel above I have done the same as
I did for the ammunition pouches, with a new cover next to the altered one. The
middle picture is of the shovel in place, with the handle was rubbed between my
fingers which had been dipped in the Brown pastels. The DiD metal mess tin was
just rubbed over gently on the edges with some sandpaper, to get some wear
detail on it.
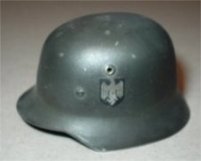
Dust Effects
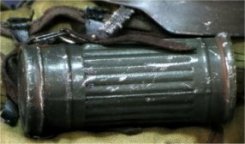 I had another close look at the figure made by
matiascg
and I noticed the excellent brown dust effect that he has inside
the edges of the gas mask canister as shown on the right. As I have always
admired how some far better modellers than me manage to get this effect. And I
as usual, I got to wondering if I could try to replicate that effect on the
shovel and bayonet for my figure. Since the more I looked at it as it is, I just
could not get over how flat it looks, even after a drybrush of paint. I had another close look at the figure made by
matiascg
and I noticed the excellent brown dust effect that he has inside
the edges of the gas mask canister as shown on the right. As I have always
admired how some far better modellers than me manage to get this effect. And I
as usual, I got to wondering if I could try to replicate that effect on the
shovel and bayonet for my figure. Since the more I looked at it as it is, I just
could not get over how flat it looks, even after a drybrush of paint.
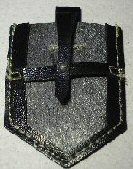
So in the pictures below as an experiment I used a Light Brown pastel chalk to
'write' over the threads, edges and the strap edges of the shovel and bayonet as
shown below left. Note: My main reason for
using the pastel chalks was that unlike paint, if it went wrong I could just
wash most of it off. With the middle picture below I have used a dry soft tissue
to wipe over the shovel and bayonet, and I was surprised at how it has left the
chalk in the recesses and it has re-coloured the threads as well. Plus I has
also aged the parts even further than the paint did, plus with wetting the
tissue slightly, I wiped over the flat middle part of the shovel case to remove
more of the chalk dust. This has had the effect of revealing the black paint
more, which has made the threads and edges stand out even more.

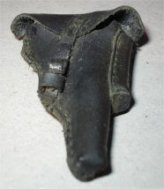
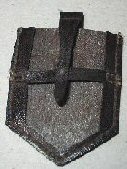
In the third picture above right I have tried the same method
with the pistol holster, and to me it has transformed it from an almost flat
black item to a well worn piece of equipment. The last picture above right is
one of the ammunition pouches with the pastel dust on it, compared to the other
one above it that has just had a drybrush of paint on it.
Gas Mask Canister
With this I tried the same method as I did on the helmet, but I
found that the canister is made of a brass coloured metal under the paint. So to
get the chipped and scratched effect I wanted, I have had to use a fine pointed
paint brush to paint the edges with some acrylic Gunmetal paint.

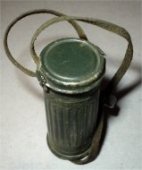
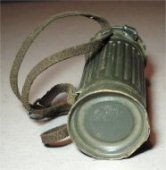
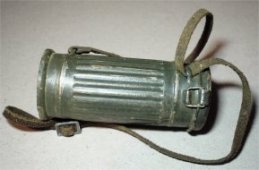
The other three pictures above show how I have got the dust
effect into the recess and folds of the canister, this was done by rubbing the
pastel chalk along the edges, so that it left the dust in the gaps and edges.
This was then again gently wiped off to leave the effects as shown above. I also
wiped the chalk over the straps, and I then rubbed them between my fingers to
both rub it in and leave the dust on the edges.
This section is continued on
Page 2
Links
Gebirgsjager Cap Insignia -
http://patriot.net/~jstevens/gebirg137/rank_capinsignia.html#edelweiss
Gebirgsjager Waffenfarbe colours -
http://patriot.net/~jstevens/gebirg137/rank_colors.html
Service Medals -
http://patriot.net/~jstevens/gebirg137/rank_medals.html
Gebirgsjager Rank Insignia -
http://patriot.net/~jstevens/gebirg137/rank_ranks.html
RogueJK for his excellent help with my future German figures, as he has given me a lot
of information.
Heeresbergführer for all of the superb pictures and the
detailed help with my
mountain figure.
Patrick (Nomad65)
for the time he gave to me in answering my questions, and for the very highly
detailed insignia.
matiascg for his
very kind permission to use his picture for reference.
Pzrwest
for helping to explain about the helmet and the M43 green backing to the
edelweiss insignia
Many thanks to
Tom
from
www.mp44.nl for his kind permission to use his pictures for reference |