|
Welcome
To My German Equipment Alterations Page Two.
Mess Tin Shoulder Bag Bread Bag
M43 Cap
MG Case 'Y' Strap Map Case
Gebirgsjager Backpack
Gebirgsjager Gaiters
Gebirgsjager Trousers Repainting DiD Boots
Repainting
a briefcase
Belt Buckles Soldier Story Cap
German Insignia
German Equipment
Dusty Uniforms
Boot Changes
Weathering Weapons
Mess Tin
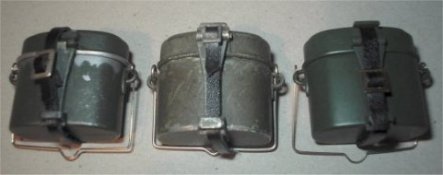
The mess can's above are for comparison purposes,
on the left is a Dragon one as it comes from the box, the centre one is the DiD
type from my figure, and the one on the right is the Toys City version again
straight from the box. Note: Out of all of
these I much prefer to use the metal DiD mess tin with my figure's. Because with
a little work with some sandpaper, I can make the scuffs, wear marks and damage
look a lot more realistic, than I can ever do with paint.
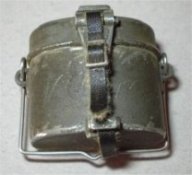
The picture above centre has been touched up with the
pastel chalk making sure that it gets into the gap above and below the raised
lip, I also took the strap off and covered it in the chalk, which was wiped off
to leave it on the edges, I then put the strap back on and then gave it a final
wipe over. The DiD metal mess tin as shown in the last two pictures above right,
show a new DiD mess tin next to an altered one. For this it was just rubbed over
gently on the edges with some sandpaper, to get some wear detail on it.
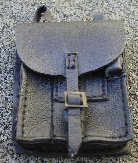
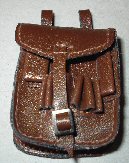
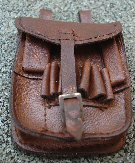
 Shoulder Bag Shoulder Bag
The picture on the right shows the alteration's
that I have done to the DiD shoulder bag, with a new bag on the left and the
changed one on the right. The first thing I did was repaint the bag and strap
with some
Daler-Rowney Burnt Sienna 221 artists acrylic paint, the purpose of this is
that the paint is almost the same colour of the original bag.
So I now had the strap edges the same colour as
the bag, once this was dry I then went over everything heavily with a Dark Brown
pastel chalk. I then got a damp tissue and rubbed the chalk into the bag, making
sure I got it into the edges and the stitching, as well as the strap edges. I
then used a dry tissue to wipe off what was left, and when the bag finally dried
off, the colour had changed to the one on the right.
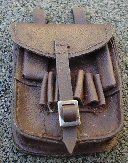
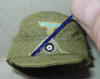
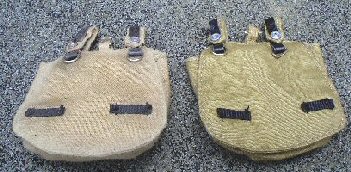 Bread Bag Bread Bag
The DiD cloth breadbag shown right, had some Light
Sand Tamiya Weathering Powder rubbed into the edges to lighten them, also to
make the whole bag look a bit more worn.
I also repainted the 'pleather' parts on the bag
with some of the Model Color 540 Matt Medium to remove the glossy look to them.
Again a new bag is alongside as a comparison.
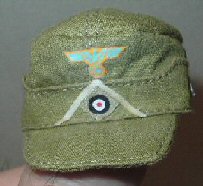
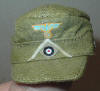
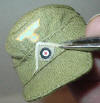
M43 Cap
Another item that I forgot about was the cap that
I have shown on the right, as this was an experiment I did where again I have
used the green cloth backing under the Heer M43 cap insignia. I done this
because I read somewhere about how some Gebirgsjager troops
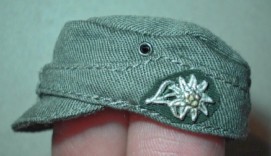 did this
to the badge, to show off the Edelweiss insignia
better. did this
to the badge, to show off the Edelweiss insignia
better.
This was done the same way as the backing for the Narvik shield on my Heer Officer page. The
hardest part of doing this with the M43 cap, was the cutting around the Edelweiss badge with my
model knife to remove as much of the double sided tape as possible.
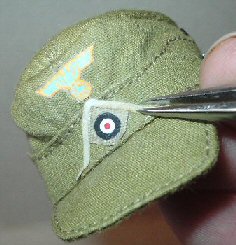
Note: I found that if any tape is sticking
out on the edges afterwards, I just gently pressed it under the insignia edges
with the point of my model knife.
Note from Pzrwest - With the Gebirgsjager badge as
shown on the right, the Austrians had the green badge backing and the Germans no
backing from what I read.
Page Update
I have been recently been buying some of the items
as shown here that have been made by Toys City instead, and even though they are
made of a softer and thinner 'Pleather' (vinyl type of material). I have been
getting the same kind of results as I have done with the DiD items. But I have
found that to lose the glossy look of the material, they work better after a
coat of the Black artists acrylic paint rather than the Matt Medium. Since it
gives me a better base for the pastel chalks to stick to, as it is now a rougher
surface.
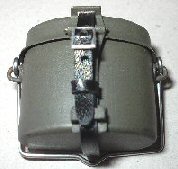
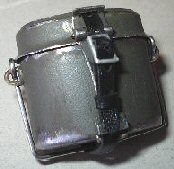
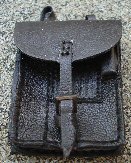
MG Case
These pictures are of how I have altered the DiD
MG accessory case, this item like the holster and ammunition pouches are made of
a 'Pleather' (vinyl type of material). And I do prefer to use items like this
with my figure's, rather than the harder plastic one's.
1.
 2. 2.
 3. 3.
 In
Picture 1. above this is the original new case as it
came from the boxed figure, Picture 2. is after I have repainted it
with some Black artists acrylic paint. When that was dry I then gave it a wash
over with the Model Color 540 Matt Medium, to dull it down further. To add some
highlights to the case and to bring out the stitching, in Picture
3. I then gave it a light
drybrush of a Black/White pastel chalk mix. In
Picture 1. above this is the original new case as it
came from the boxed figure, Picture 2. is after I have repainted it
with some Black artists acrylic paint. When that was dry I then gave it a wash
over with the Model Color 540 Matt Medium, to dull it down further. To add some
highlights to the case and to bring out the stitching, in Picture
3. I then gave it a light
drybrush of a Black/White pastel chalk mix.
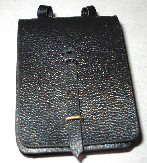
'Y' Strap
This is a DiD 'Y' strap and it has had the same
weathering treatment done to it to make it look older, that I have done to my
other 'pleather' parts. I altered it to remove the new look to it by mixing some
Black acrylic paint and some Matt Medium together to get the dull colour to it,
I also painted over the cloth material parts as well.
Once it was dry I scraped the paint off of the
connecting rings and I then gave it a light drybrush over the top and the edges
with some Tamiya Light Sand weathering powders. Which has helped to both age the
strap as well as highlighting the edges and the threads.
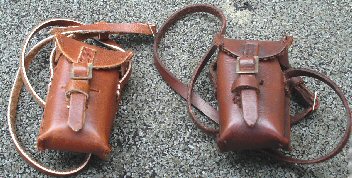
Map Case
These pictures are of how I have changed the DiD
Map case on the left below, the method for the Black case is the same as the way
I worked on the MG case above. I also did the same to the other case.
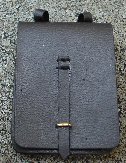
With the Brown case below I found that I had to
use the same method that I used for the DiD shoulder bag, but the paint I used
for this map case was some
Daler-Rowney Burnt
Umber 223 artists acrylic paint. But with this map case I had a slight
accident with the paint, as I did not clean my brush properly after using the
Black paint.
So it has come out a bit patchy on the strap, plus
also a slightly darker Brown than I wanted. So I had to repaint some of the case
with the Brown paint again, to remove the blotchy look it has. To add some
highlights to the case and to bring out the stitching and the edges, I then gave
it a light drybrush of a Brown/White pastel chalk mix.
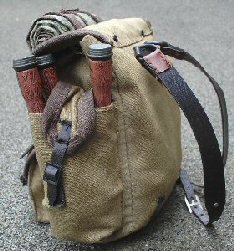
Gebirgsjager Backpack
This section is about how I have altered the Toys
City Gebirgsjager backpack, the first thing I did was to use the Model Color 540
Matt Medium acrylic paint to lose the shine on all of the straps.
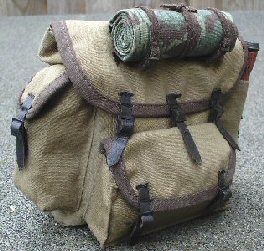
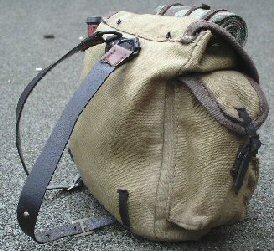
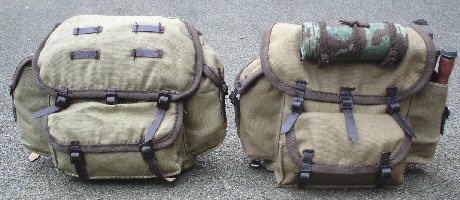
I then wanted a slightly different colour to the
backpack, when compared as in the picture on the right with a new one.
Note: The new pack is on the left.
To do this I rubbed some
Brown and White pastels onto my sanding pad, mixed it together and put my finger
into it a lightly rubbed it into the material to get the slightly different
colour as shown. I then gave the whole bag a light brush over with a large dry
fan brush, to get rid of any loose pastel chalk.
I then got a cotton bud and the Tamiya Light Sand
weathering powder, and then lightly rubbed over each of the seams and edges of
the pack to lighten them slightly. This can be seen in the pictures above, so it
gives the impression of the whole bag being dirty, but the seams and folds
around the pouches are lighter because the dirt has not got into them.
The bag then was given a light brush over again
with the large fan brush, to blend all of the colours in together. The stick
grenades in the side of the backpack were made by Dragon and to darken them, I
gave the wooden parts a rub over with some Dark Tan shoe polish. This was then
left to dry, and I just gave them all a light rub over with a clean tissue.
Gebirgsjager Gaiters
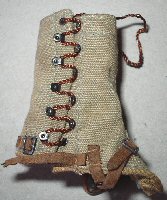
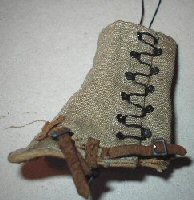
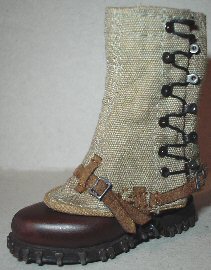
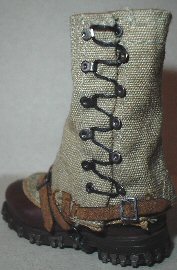
With the DiD gaiters that I wanted to use with
one of my kitbashes, I found that I could not get them as tight on the leg as I wanted,
and I found that the problem is that they only had one thread for the lacing at
the top as
shown above left. So I replaced the thread as shown in the next picture, but for
the lace here I used a longer piece of thread. Note:
I have found to get the thread though the eyelets easier, I put some superglue
on the each of the thread ends, I then wiped it on a cloth and left it to dry.
Then I put one end of the thread through the
eyelet at the bottom of the gaiter, and pulled it up loosely inside the gaiter.
And I then used the other end to lace up the outside as shown, and after putting
this through the eyelet at the top I now have two thread ends inside the gaiter
to tie off. So now I can put the gaiters on the figure, and I can also pull the
threads on the outside tighter to make the gaiter look more realistic.
Gebirgsjager Trousers
I recently bought some Gebirgsjager trousers loose, and they are from the Dragon
Edvard
Borsheim figure. And upon checking them on my latest figure I found them to be
well made, and I have found that the
buckle on the bottom of the trouser legs really does work, plus it will help me
to tighten up the trousers very nicely under the Toys City puttees.
Important Note: But, be very careful in
tightening up the buckles, because as shown above the vinyl strips are very
fragile, and as in the picture above right, I have tightened the trouser
bottoms as I wanted, but the straps broke on me. Note:
I doubt very much it is fault with the product itself, the fault most likely
lies with the person (me) pulling too tight on the strap which caused it to
break. Apart from that I will be definitely be buying some more of these
trousers, as it saves me from either sewing the trouser bottoms together, or
using the dental
rings to get the leg bottoms tight.
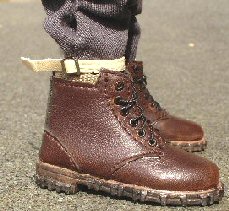
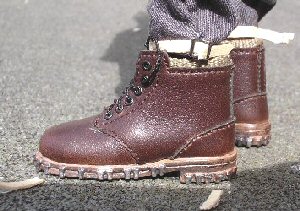
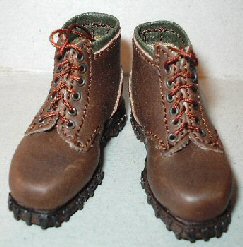
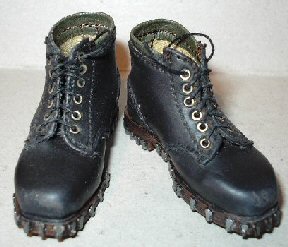
 Repainting DiD Boots Repainting DiD Boots
I bought the Brown DiD boots shown on the right
for an experiment that I had in mind for changing the colour of them. Because
when I looked around the online shops and eBay for a pair of Black gebirgsjager
boots, not only did I discover that they can be hard to find, the postage
charges on some of the Black boots cost a lot more than the boots themselves.
So I obtained a pair of the Brown one's, and with
some Daler Rowney Cryla Acrylic No 036 Mars Black paint I then went ahead and
gave the boots a repaint.
With this type of paint I find that the thicker
consistency spreads better when mixed with water, plus it soaks in better on the
edges of the vinyl material that the boots are made from.
Note: The only problem I have found with this paint is the cost.
I have also found once the boots are dry, that the paint gives them a nice flat
dull look
 which can help the
pastel chalks to stick better to them. Also the paint does not crack or peel off
when I press down on the top of the boots. which can help the
pastel chalks to stick better to them. Also the paint does not crack or peel off
when I press down on the top of the boots.
In the picture on the right, these are the boots
after I have finished the repaint, but before I have added a drybrush of some
pastel chalks to them.
I have also replaced the laces with a slightly
thinner thread, as to me this looks more in scale.
I have also given the metal
cleats on the sole a repaint of some Gunmetal acrylic paint. And I have used
some fine sandpaper to gently remove the paint from the lace eyelets. The next step that
I would do with these boots, is
paint them over with some Model Color Matt Medium paint to dull them down a bit
more, and then I would add some
weathering to them, to make them look older rather then the new look
here.
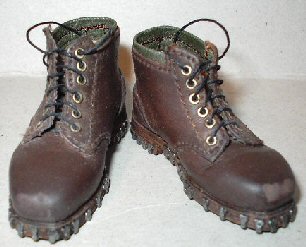
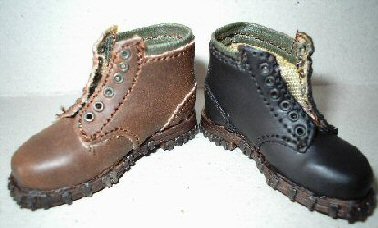
The boots as shown above are from the left a pair
of new DiD boots from the box, the centre pair are after being repainted Black
and the last pair of boots on the right, have been repainted with
Daler Rowney Cryla Acrylic No 223 Burnt Umber paint.
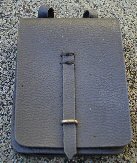
Repainting a Briefcase
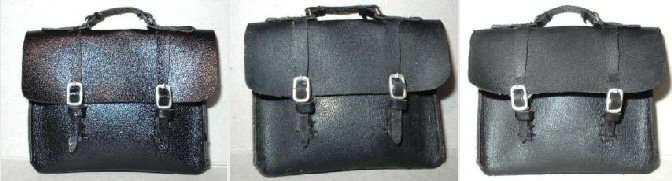
The briefcase above is made by DiD and it has had the same weathering
treatment done to it to make it look older, that I have done to my other 'pleather' parts.
From the
left the case is brand new, I then rubbed over it with some fine sandpaper, and
on the top flap rounded edges and straps I rubbed the material from behind to
thin it slightly, this allowed me to curl the flap up to make it look worn.
 Note:
Do not rub too hard with the sandpaper just in case the material
starts to tear. Note:
Do not rub too hard with the sandpaper just in case the material
starts to tear.
I then painted it with Model Color Matt Medium 540
acrylic paint, in the next picture I have given it a drybrush with some Tamiya
Light Sand weathering powder, making sure that I highlight the edges.
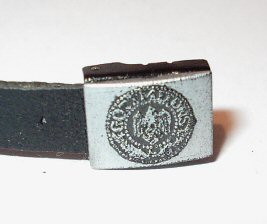
Belt Buckles
The belt and buckle for
this example was made by Toys City, and I have found that have the best detail
to allow me to do this. I have tried it with both the Dragon and DiD belts as
well, but it depends on how well detailed the buckle is in the first place.
To bring out the detail I
gave the buckle a wash of some Black acrylic paint, and when it was dry I wiped
over the top of it gently with a soft tissue. It took a couple of attempts to do
this, and the end result is that the paint is left in the buckle detail as
shown. I then drybrushed over the belt strap with some Light Sand Tamiya
Weathering Powder, to bring out the vinyl detail.
Soldier Story Cap
1.
 2.
2.
 3.
3.
 4.
4.
 5.
5.
 6.
6.

This cap had to have some changes made to it for
my Gebirgsjager medical soldier kitbash, because for the time period the white
chevron on the front was not worn, plus the colour of it is wrong as well as it
needs to be Blue for medical staff. 1. Shows
the new cap as it came from the boxed figure. 2.
Shows an experiment I did with some double sided tape to try to re-colour the
chevron, all I did was paint the sticky side with the paint, and then I cut it
into strips as shown above. If I was going to use this I would then peel off the
backing and then place it over the top of the White chevron.
3. This shows
what I did for the cap with my figure as I wanted to remove the chevron
completely. I used my fine pointed tweezers to pick and pull at the chevron,
making sure that the cap was held flat with my finger inside it. Luckily, I
managed to get most of it off, and also the centre badge in one piece.
Note: The badge I left aside to make sure
that I did not ruin it. 4. I then got a
piece of tissue which I twisted to a point, and dipped it into some acetone. I
then gently rubbed over the remains of the chevron to remove the glue marks. I
had to do this more than once, because the acetone evaporates quite quickly.
Note: Keep the acetone away from the top
swastika badge, just in case it gets damaged.
5.
This again shows the new cap, alongside 6.
which is the other finished cap which has had the centre badge re-applied back
onto it.
Which was firstly put onto some double sided tape,
cut to shape, I removed the backing and then placed it back onto the cap again.
I then gave the whole cap a drybrush, of some Light Sand Tamiya Weathering
Powder to get a flat overall colour.
Information about the caps and the chevrons
Note From RogueJK -
You'll also want to repaint the chevron on the cap to something other than
Infantry white. Jager green would be the most likely, but if you're wanting to
represent a member of the 5. Gebirgs-Division's organic mountain artillery
regiment (red), mountain anti-tank battalion (pink), mountain recon or signals
battalion (yellow), mountain engineer battalion (black), or medical or supply
battalion (blue), then paint it the corresponding waffenfarbe color to match
their shoulderboards.
Note From
Heeresbergführer
-
If you are doing a Gebirgs-Sani from the 5th
Gebirgsdivision in Italy (1943 or later) wearing a tropical cap, then you need
to take off the Waffenfarbe chevron on the cap. The chevron was deleted from
tropical caps in 1942.
Note From
pzrwest -
Although the order to remove the soutache in
1942 they still continued to wear them and even the manufacturers continued to
apply them till stocks ran out of the soutache braid (also known as Russia
Braid). So if you can't remove the braid you can leave it and still be correct.
That being said if you can remove the braid, but it does look cool on the cap an
could signify an "old salt" as veterans were called.
This section is continued on
Page 3 |