|
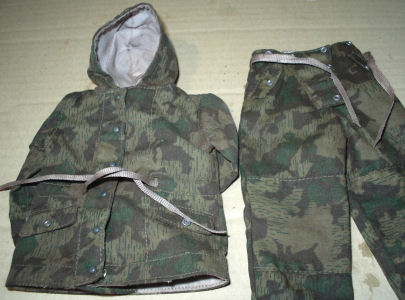
Heer Winter Suit Weathering
After trying my other experiments with weathering a
Heer smock to get an overall distressed and discoloured look to my uniforms. I have given a new Dragon
Kurz Heer winter uniform, a complete brush over with the same water and chalk pastels
(not oil pastels).
 Update:
Pastel Chalk Colours Update:
Pastel Chalk Colours
As an update, a very good point was raised by a
fellow modeller, about the colours of the pastel chalks I am using to do the
wash on the clothing. And I have added the following, hoping that it will help.
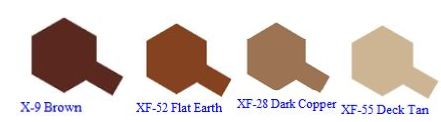
If I use the paint chips on the right as an comparison example.
From the left X-9 is about the thick mix colour
that I have on the sanding pad, for the smock and winter suit that I have
mentioned earlier. And by adding more water to the mix, the colour is then
changed through to the lighter brown colours. Until it gets down to virtually
clear if you then add the pastel mix to the water instead.
The same works by adding clear water onto the pastel mix on the smock at about
XF-52, so that the water spreads the colour about to get a lighter effect. Then
with the tissue pressed onto the smock, to remove the excess water and pastel,
the colour can then be altered down to a lower shade by adding more clean water.
Or darkened in patches, by adding more of the X-9 colour. I found that you can
vary the effect you want, such as heavy dirt on elbows by using a slightly
thicker mix of water and pastel chalk. Or as I did a lighter overall colour, by
rubbing the pastel chalk on a sanding pad. Adding water to it, the more water
the lighter the effect.
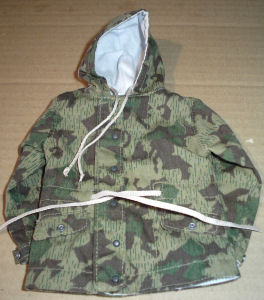
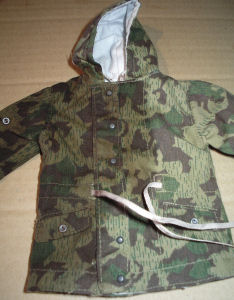
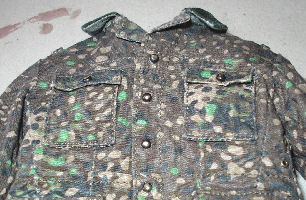
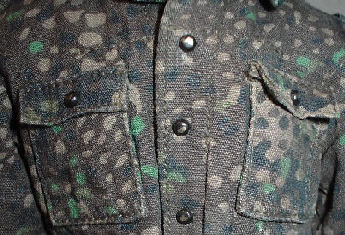
Jacket
I have applied the same pastel wash to this uniform, by grinding up some Brown pastel chalks on my
sanding pad. Then after applying some water to the pad, I applied the pastel/water mix to the smock with
a large brush. Varying the mixture between some slightly thicker pastel mix into the stitching, collar, elbows, cuffs and bottom edge, and a sort of thin
pastel/water mix for the main part of the uniform.
1.
 2. 2.
 3. 3.
Picture
1. is the jacket as I got it loose in it's new condition, Picture 2. is after I have
started the pastel wash on the left, with the right side untouched to show a comparison between the two. As I applied the wash, I pressed down on the smock
with a tissue to remove some of the water and pastel chalk, as I found that the colour was getting too dark in places. I also found that if I used clean water on the
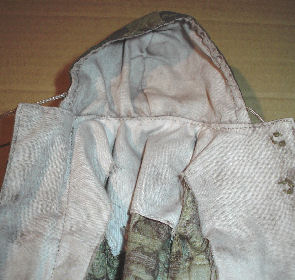
smock, it helped to remove some of the chalk. Picture
3. shows how I have put the pastel wash on the white parts inside the jacket, but as shown it is a bit too much when compared to the untouched inner
hood.
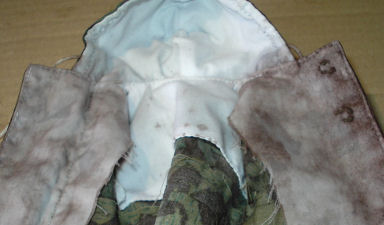
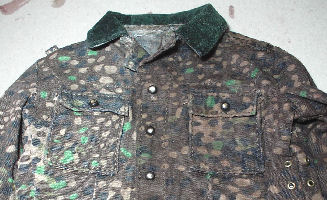
4.
 5.
5.
So after the photo was taken I washed these parts under the tap to remove a lot of it, picture 4.
shows the result of this. For the inside of the jacket and the white parts, I used a lot of water with the Brown pastel chalk, so that it just discoloured the
inside of the sleeves and the inner hood. Note:
The only problem with putting parts of the jacket under the running water, it removed some of the pastel chalks from the outside, so I had to go back over it
again with the slightly thicker pastel/water mix. Picture
5.
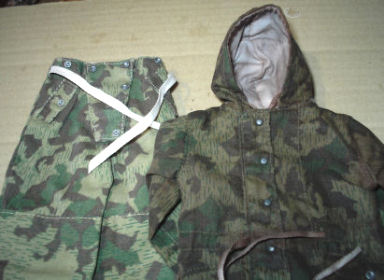
above is of the finished jacket, sitting on top of
the new trousers to show just how much the colour has been changed.
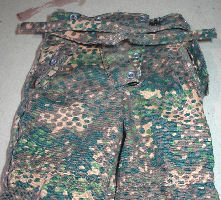
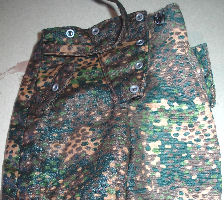
Trousers
6.
 7.
7.
 8.
8.
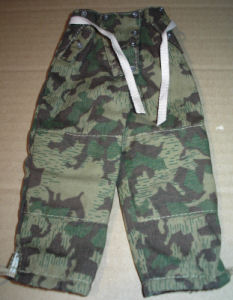
With the trousers in this set I have given them exactly the same treatment as the jacket. The new one's are in Picture
6. with the same pair in Picture
7. after a pastel wash on the left side to compare with the un-treated right side.
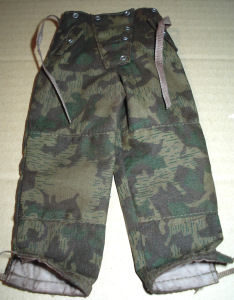
Picture 8.
shows the trousers after I have finished with the pastel wash. The bottom of the trouser legs were given the same wash as the ends of the sleeves.
The wash was of a slightly thicker water/pastel mix, to discolour the white insides. I then used a brush to apply some plain
water over this to remove some of the colour, so that I ended up with the result as shown.
The picture on the right shows the finished uniform after it has dried, with the discoloured white inner hood. I also found
that if I make a slightly thicker water/pastel mix and brush it onto the ends of the cuff, trouser leg bottoms and the edges of the hood, it leaves a very nice
dirty effect. That can be thinned down to the desired effect with clean water, and by pressing down on the area with a tissue.
SS Uniform Pastel Wash
Pastel Wash
9.  10.
10.  11. 11.
With the uniform here and the pastel method as
described above, I am now using a Toys City SS adapted tunic and a pair of Dragon SS pea dot uniform
trousers, both came from my Ruins kitbash. Picture 9.
is the new Toys City SS tunic, Picture 10.
is
after I have given the right hand side of the tunic a pastel wash. I also did the same with the
new Dragon pea dot trousers. In the picture on the
right, one leg of the trousers has been pastel washed on the left hand side, to show the comparison of the altered
against the new pair in Picture 11.
Although the items are of a similar type of pea dot camouflage,
the benefit of both items is that they are made by different manufacturers. So
that the trousers are of a lighter colour to the tunic, and that even after the
pastel wash. I will still get the difference in colours that I am always looking for between both items, rather than one
overall matched and even colour for the uniform. Once I had done the pastel wash
I then put the uniform back onto the figure while it was still wet, so that it
could dry and shape it to the body of the figure.
Weathering Powders
 With the pastel chalks it adds a darker effect and
colour to the basic uniform (Lowlights), so to add a lighter effect to bring out the edges of the materials
(Highlights). I have used some Tamiya Light Sand weathering powders, drybrushed over the posed uniform With the pastel chalks it adds a darker effect and
colour to the basic uniform (Lowlights), so to add a lighter effect to bring out the edges of the materials
(Highlights). I have used some Tamiya Light Sand weathering powders, drybrushed over the posed uniform
As shown in the pictures above the darker pastel
chalked uniform is in Picture 10. And as a comparison in the picture on the right, I have given half the uniform
on the right hand side a drybrush of the powders. The difference is only
slight, as all I am trying to do is add a faint dusty highlight to the uniform edges.
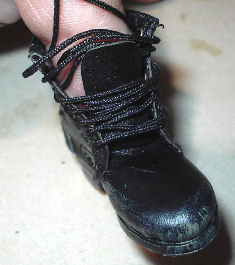
Soldier Story Boots & Gaiters on a DiD Body
I bought some Soldier Story German boots loose as
an experiment as I liked the look of them, and I have found that they are well
made and nicely detailed. I also found that the 'pleather' material is a lot
softer than some other boots I have, which makes the lacing up of them a lot
easier. As shown below they can fit with some effort onto the feet of an early
DiD figure.
12.
 13. 13.
 14. 14.
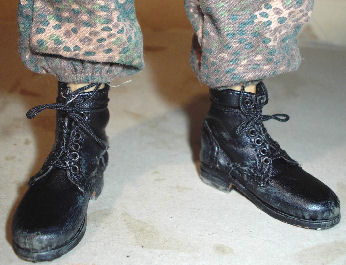
To get them on the feet I have in Picture
12. loosened the laces quite a way, so that
there is space to fit the DiD foot. I then placed the foot into
the boot, and with a lot of effort I finally got it fully into the boot.
Note: The DiD foot fills the boot completely, which makes the fitting of the boot difficult, but as shown in
Picture 13. it can be done if you are
careful. In Picture 14. I have the pair of boots on the figure, and I am most impressed because once the laces have been
tightened up, they have a very nice tight in scale look to them around the foot
and ankle. Note:
When tightening the laces take your time, as well as pinch in on each side of the eyelets at the same time, to get the
tight look that I have.
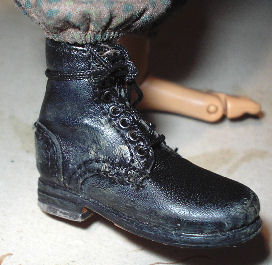
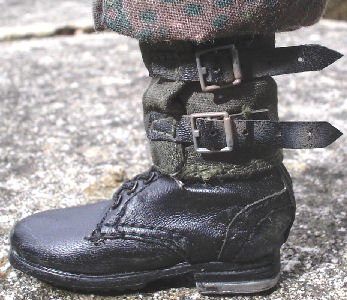
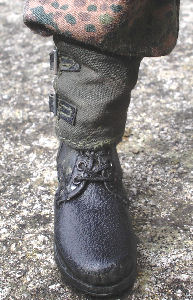
Soldier Story Gaiters
15.
 16. 16.
 17. 17.
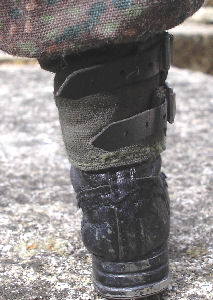
The pictures above show the Soldier Story German
gaiters on top of the boots, I fitted these the same way as the gaiters shown
here. Picture
15. shows the gaiter after it has been
pulled tight around the boot, and then sewn in place so the threads take the strain and not the buckle straps. Picture 16.
is the front of the boot with Picture 17. of the back, both showing how tight I have got the gaiter.
Note: In Picture
15. I have deliberately sewn the gaiter together so it looks scruffy,
and the gaiter creases up. When finished I then pushed the gaiter down onto the
boot to add more creases, I then added a drybrush of some Light Sand weathering
powders to highlight the crease tops.
The last thing that I do when I have finished the figure, is to cut the strap
ends of the gaiters back a bit, because as shown in Picture
17. they are a little bit too long.
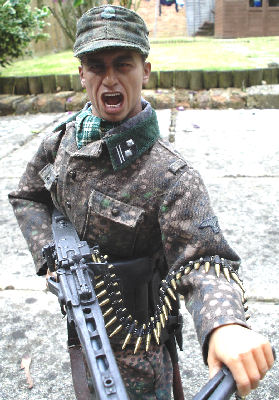
DiD Metal Ammunition Belt
With a kitbash I have been putting together with a Toys City MG42 machine gun
and a DiD ammunition belt, in Picture 18. I
have found that the ammo belt will not hang right coming out of the gun and then
hanging over the figure's arm. Because as I was told there are limitations
between making an item in 1/6th scale with 1/1 materials, as explained by
The_Dutchman below in italics.
In reality the rounds are closer together so the MG42 ammo belt is less
flexible.
Although your ammo-belt is a good representation, the proportions are off, which
is understandable as not everything can be exactly scaled down.
18.
 19. 19.
 20. 20.
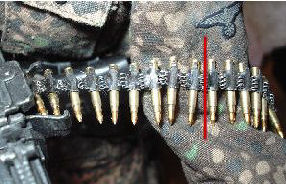
So to get the lay of the belt to look right, in Picture
19. I have applied a tiny drop of Cyanoacrylate glue with a pin, onto each of the links in between each of the bullets. Up to
where the red line is in Picture 20. after
that the belt is as it came from the box, so that the weight of the links wraps
around the arm. The result of this is that the ammo belt now lays straight coming out of the gun, and then
gently twists so that it looks like it laying naturally over the arm.
Many thanks to everyone for the excellent information on this forum post -
MG42 &
belt feed.
|
