Please note the additions below
regarding fitting the reserve parachute and the Mae West Vest.
This is an
alteration to this figure as it has been standing on my shelf for some months
now, and with the spare Corbin Black parts that I have. I decided some changes
had to be made to it, especially with the boots to start with. Also, the headsculpt
has been bugging me, because I never did repaint on it, and it just has to have
to have a base as well. Any changes that I have made to the figure are
labelled
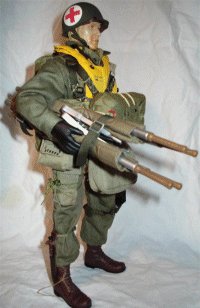
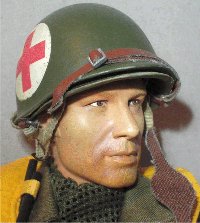
with an update. This figure came about because I could not buy the
bbi
Will Bailey figure, and as I really wanted a WW2 US paratrooper medic, I had to
make it up from parts. Luckily, I had just done three trades and from the parts
I got I had the pieces I needed for this figure.
I am not sure who the basic figure is, as I got it from John, but
I believe the uniform is from the Frank Laird figure, I believe that some of the
other equipment is also from the same figure. The medic helmet and stretcher are
from the
bbi
figure, which I got from Alan (Winch) and was the main parts that I was after. As
without them I would not have been able to make this kitbash, so getting those
parts alone were worth that particular trade. As to be honest I was desperate
for them, as I could not find them available separately anywhere.
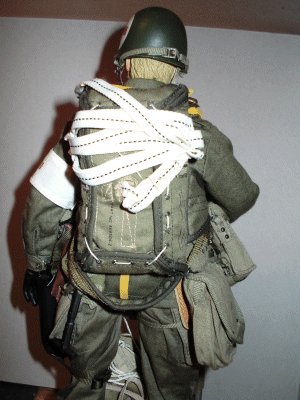
Figure Update
These are updated pictures about the stages of how I put the
packs on the figure; these can be used for reference together with the details
below.
I also decided to use a scarf on this figure rather than the
shirt I used earlier. One of the major changes that I have to do, is change the
inside of the bbi helmet for the DID one.
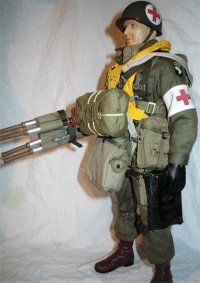
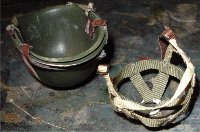
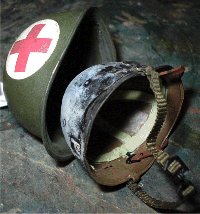
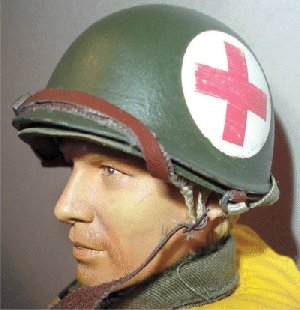
Helmet Update
Below, is the bbi medic helmet taken apart, and I have just found
out that the outer bbi helmet shell is slightly smaller, than the DiD inner
shell. To get around this, I put the DiD shell into some boiled water to
make the plastic softer, and then pressed it fully into the bbi helmet. This is
shown with the third picture below, and in the process the canvas straps
came off which actually came in handy later. Another problem I found after doing
this is that the liner was not level to the edge of the outer shell. So to get
around this, I trimmed the inner edges with a knife and then sanded it to bring
it level with the outer helmet.
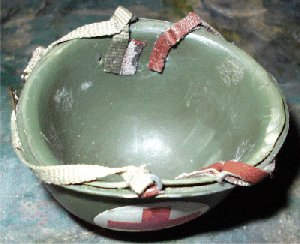
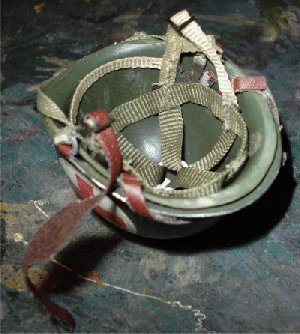
The next thing I had to do was to cut off the straps from the
inner shell and reposition them, to make all of them level with the smaller
outer shell. Once these had dried, I then just put the canvas straps back into
the helmet and positioned them so that they looked right as above right. Other helmet
changes I have done - Helmet.
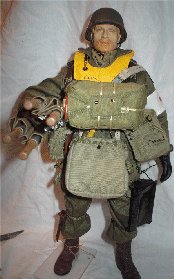
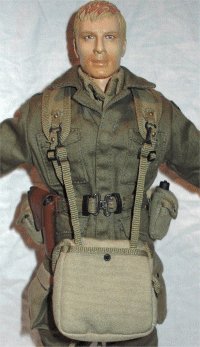
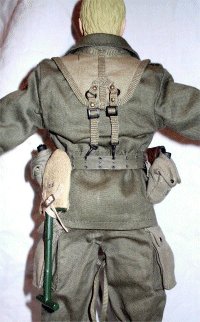
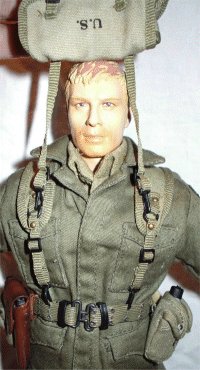
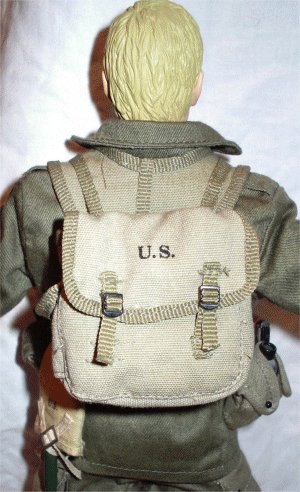
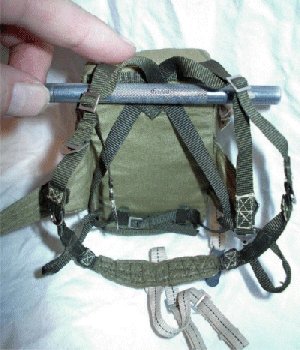
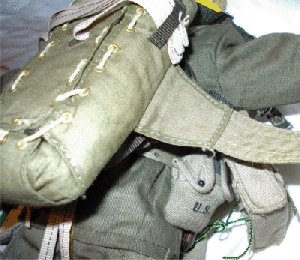
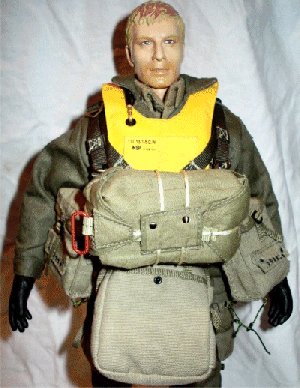
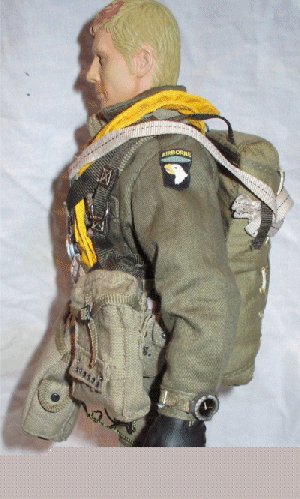
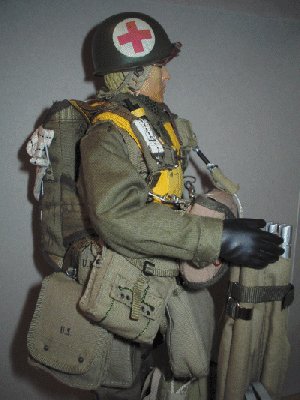
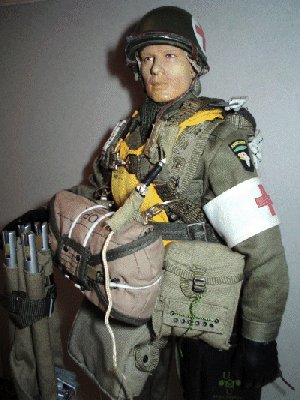
Figure Assembly
The
pictures above show the figure with the belt equipment added as well as the
webbing, in the second picture it shows
the musette bag. This was connected to the webbing by the two short straps that
came with the bag, and once they had been adjusted. I found that I could
actually flip the bag onto the back of the figure, exactly as I have seen in the
Band of Brothers film.
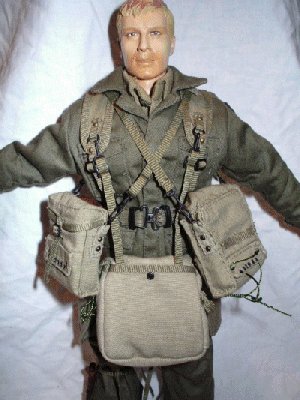
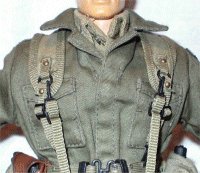
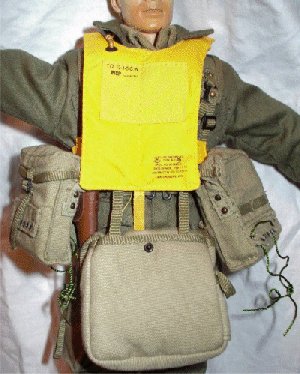
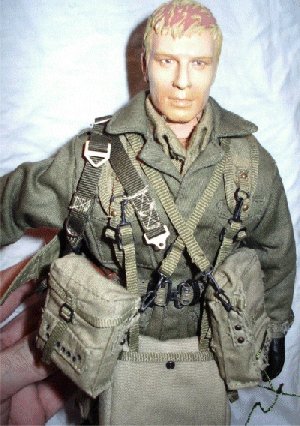
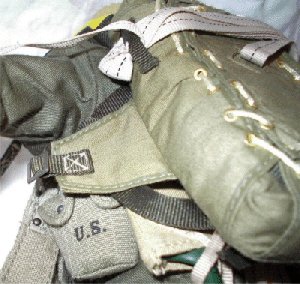
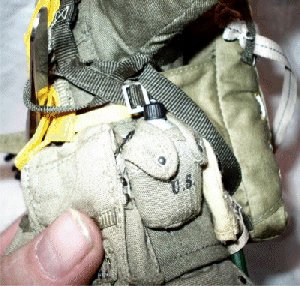
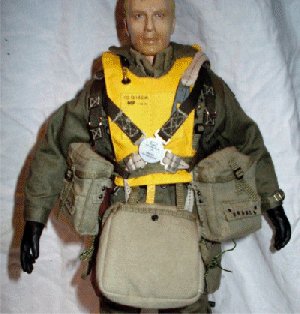
This picture right shows the figure with the two medical packs
added to him, (not sure which figure these came from) and it was at this point I
started to think to myself. Just exactly how am I going to get all of the other
kit on the figure, let alone trying to get the parachute on!
Because when I saved some pictures of the Will Bailey figure, that I was using
for reference, I realised that that figure only had one medical pack over the
shoulders.
Not the two that I wanted to use on my figure. So as I was at
this stage of the assembly and I really wanted the figure, I decided to press
ahead and then cope with each problem as they arose.
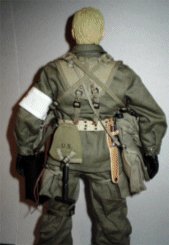
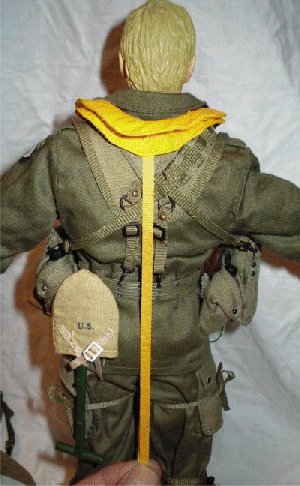
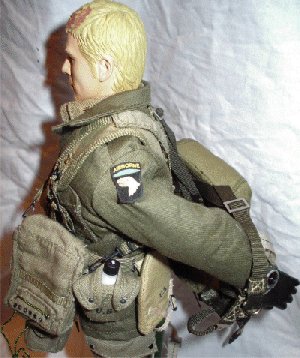
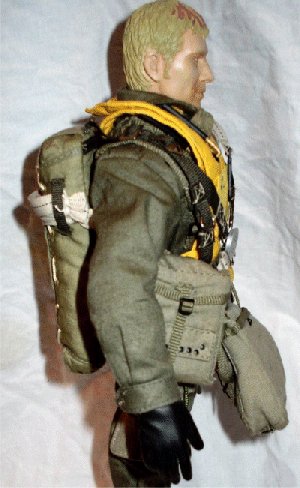
One of the major problems I had as I went to put the parachute on
the figure, was that the medical bags stood out from the body of the figure,
because of the two water bottles and shovel that are on the belt. And even
though the medical bag straps were at full adjustment, they still hung in the
wrong place for what I wanted to do. Note:
The clips for the medical bags are made from plastic, and if you
pull on them too much they open up, and could break if put under too much
strain. Because of the packs not hanging right, I had to strip the figure back
down to the belt again. Then rearrange the water bottles, so that the packs hung
closer into the body. Once I had done that I then tried to see what the figure
would look like with the parachute on, and after I started to think that I had
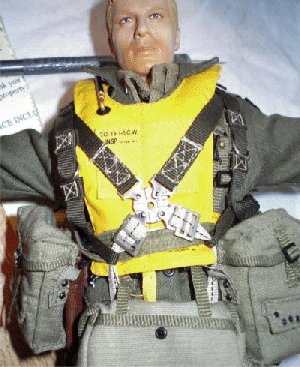
cracked the whole thing. I suddenly realised that I had forgotten to put the Mae
West vest on...
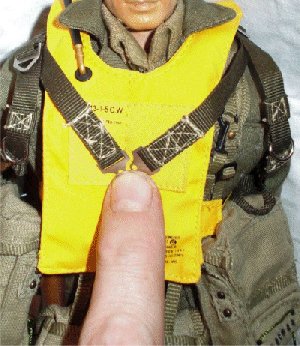
Note: If you are using a Mae
West vest with the paratrooper figure, this goes on before the parachute and the
parachute harness straps go over the top of the Mae West vest.
I apologise for not adding this section before, but I was
informed incorrectly that the vest went over the parachute. And after it was
explained to me how the equipment was worn, I have had to change my figure
around. So that the Mae West vest is now under the parachute harness.
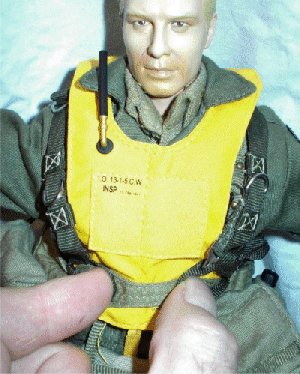
Plus I have also learnt from fellow modellers, that the straps
did indeed go over the vest. Because thinking of it after it had been explained
to me, you would want to ditch the rapidly waterlogging parachute as fast as you
can before it dragged you under. And at the same time try to inflate the vest as
well to try to keep you afloat, plus try to ditch all the heavy equipment that
you were carrying.
Mae West
Vest
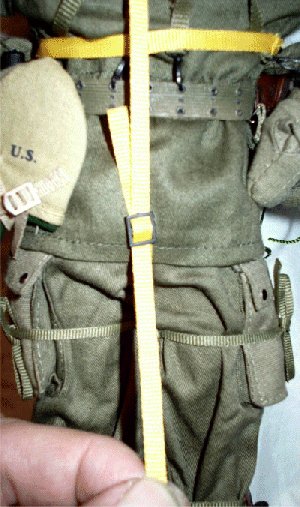
Parachute Fitting
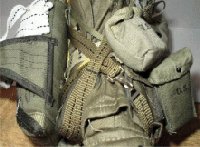
Reserve Parachute Attachment Update
After adding the updates for the Jeb and Corbin
parachutes, I was wondering about an update for this figure's parachute.
Although with this figure I have not shown a reserve parachute fitted, I did
actually use one but I have not yet got around to updating these pictures.
The reserve parachute clips fit the same as the
other chutes onto the harness loops as shown on the right
A, and the belly band goes through the back of the reserve
parachute to hold it in place. Then it goes across as shown in the rest of the
tutorial, and then connects up with the buckle on the side. In the same picture
I have marked B, this is to show that the
rear reserve parachute loops have to go either side of the centre lock.
The information as supplied in this topic on the
Sixth Army Forum about how to connect a reserve parachute to a harness -
Hooking up
a parachute Made me look at the errors in my tutorial here, and it was in
that topic, that I got to thinking about this type of parachute with a reserve
fitted to it. A very helpful piece of information in that post
came from USMCPrice, and I have copied it below. As I feel it explains
this much better than I ever could, about the reasons for connecting the reserve
chute to the belly band.
The pictures above show the belly band going through the spare
parachute loops and what it looks like finished.
He also explained in detail
about why the reserve chute is connected to the belly band.
I've never jumped a T5 but I have jumped a T7,
T10 and MC1-1 and they are all rigged with the belly band through loops on the
back of the reserve. I am sure the T5 would have had to be rigged this way also
because the two hooks connecting the reserve to the main parachute harness would
not be sufficiently strong to support the weight of the jumper and his
equipment. When the reserve is deployed it suspends the jumper from his abdomen,
belly up with his body parallel to the deck, without the belly band that's a lot
of weight and force placed upon two small hooks.
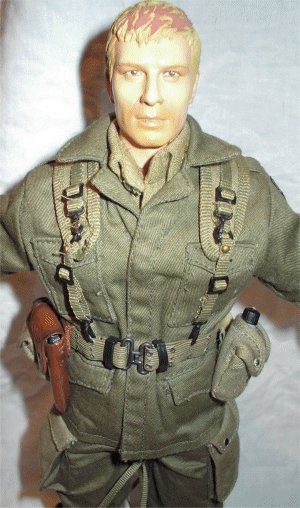
These parachute fitting instructions are for the DML
Frank Laird, or the DiD
Ricky Foster one.
Note:
See the
Frank Laird page for additions on how to fit this parachute.
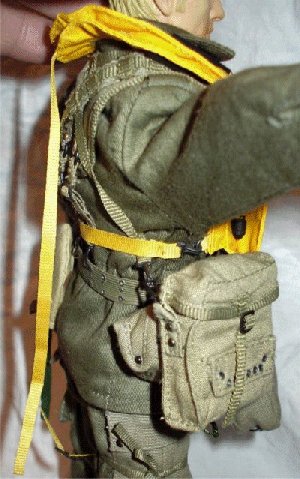
And I thought that the Soldat 2 was a trial to put together, this
is really getting to be a test of my patience, and if you try something like
this. I recommend that you do it, with no family members around. As I did lose
my temper with the figure on one or two occasions. The pictures above show the
stages for fitting the vest, in the second picture from the left above, I have
the fastening over the top of the medical bag strap. I had to change this later
on, so that it went under the strap, because it kept on causing the medical bag
to come apart.
The pictures above show the DML Frank Laird parachute that I have
used for my figure, the picture on the left shows my model knife through the
straps that go over the top of the figure's shoulders. The middle picture shows
the first arm through the harness, and the front coupling in place, as I would
use it later. The third picture shows as I have put the other arm through the
harness.
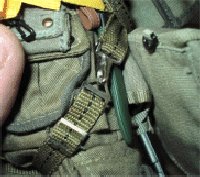
The pictures above show: Picture left, the harness on and the
front lock straps checked to see if they fit in place, the middle picture shows
the belly band from the R/H side, and the right hand picture the belly band from
the L/H side.
The pictures above show: Picture left, the side harness loops
brought to the front, and to keep them in place I have had to use my tweezers,
to check for the adjustment of the harness and to re-arrange the other
equipment's straps. The middle picture shows the loop from the side, and how I
have had to change the medical packs straps. The R/H picture shows the belly
band done up, and the medical strap now over the top of it, as this kept popping
off every time I did up the belly band. Note:
See the update above for fitting the reserve parachute.
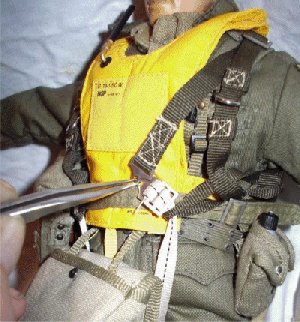
The pictures above show: Picture left, the side harness loops
have been brought to the front and held in place to test for any obstructions
from the kit on the belt before I bought up the lower straps.
The second picture shows the straps at the rear which go through the figure's
legs; the metal buckles had to be adjusted right down onto the buckle clips for
them to reach.
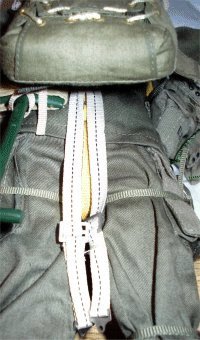
The next picture shows the straps brought through the legs and
then hooked through the loop. This had to be done for both sides, and it
involved a lot of fiddling about with both the adjustment and the medical pack
straps. So that they both met for the centre lock, as shown on the R/H picture
above, because of the tension on all of the straps. There is no way that the
lock as supplied by DML would have worked, so my alteration on the lock had to
be made, so that all of the straps were held in place, this is shown on my
centre lock repair PDF.
The L/H picture above show the top part of the centre lock
fitted, this is just about holding the straps in place, as the plastic thread of
the hole in the lower half has almost stripped it self out. This is because as I
was fitting and adjusting the kit and the parachute straps, the top part became loose and the straps that fit into the lock kept
falling out.
Note:
This REALLY did test my patience, but then thinking about it, I
suspect that DML never designed the lock to be used in the way I have as above.
These parachute fitting instructions are for the DiD
Corbin Black
one.
Note:
See the
Jeb page for additions on
how to fit this parachute.
This is the parachute that comes supplied with Corbin Black, and
I have to admit it is a work of art. Note:
Although the clips are metal, I had to use a knife blade to open up the gap
enough to get the connections made. At the same time making sure that I did not
open it too far, so the clip and connection kept coming apart. If this does
happen as did with me, I then used some long nosed pliers gently, to close the
gap again.
This parachute is similar in assembly to the DML Jeb figure, and
I have made a PDF about how to fit it on my
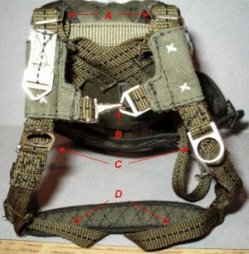
How To page. References for the images below are - A
- Shoulder strap adjusters, B
- Centre chest lock, C
- Reserve parachute connectors, D
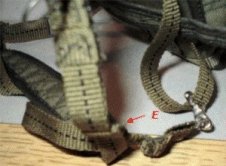
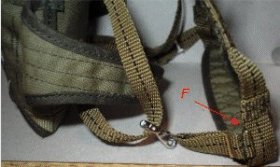
- Straps that come up through the legs, E
&F-
Show the leg straps threaded through the other strap to connect up. Note:
See Step 4 of the Jeb tutorial for a more detailed explanation.
Note:
Be careful with the with the white metal clips, as these have to be opened up
slightly, so that the clip will go together. Take care doing this, because if
you open it too wide or bend it too many times it will break. And to me there is
no way that I can think of getting a replacement for it. This goes for the spare
parachute clips as well. The pictures below show the straps mentioned above
threaded through and connected up.
The picture left is of the left hand side of the figure, and the
benefit of the metal clips really come into their own here. As the chute and
straps can take a lot more pulling about, to get them to fit. Note:
Still be careful about how you do pull it all about, because something may still
break or bend. Note:
Beware of the metal clips and edges, because when you do grip them too hard, you
may end up cutting a finger instead. Note:
Be careful of dislodging one of the excellent Lift Dot Fasteners, because if you
do I doubt you will ever find it.
Note:
The marks on the figure's head that you may have seen are from me having to cut
away the hair, so that I can fit the bbi helmet to the figure. I would like to
thank John for most of the parts for this kitbash, Terry for some of the other
parts I added to the belt, and Alan for the parts that to me made me make this
figure.