|

Welcome To My Alert Line Head
Onto A DiD Body Adapter Page.
Other Head Adapters
Very Hot Bodies 1
Very Hot Bodies 2
Very Hot Bodies 3
This page is again a continuation of my other pages based on the various body types, and they can be adapted to fit other
companies heads or bodies together. For this page, I am using the new Advanced DiD body, which does not come with a headsculpt. And I wanted to see if I could
use an Alert Line headsculpt on the body.
1.  2. 2.
 3.
3.  4.
4.
Picture 1.
shows the neck adapter of the DiD Advanced body, the supplied adapter which is too small to fit
tightly inside the Alert Line neck. Picture
2. is the Alert Line adapter, which is too big to fit onto the DiD body
neck post. (Note: The damage
to the adapter was caused by me, with some other experiments that I tried,
before I came up with the idea of combining the two adapters as one piece).
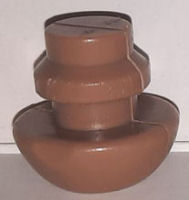
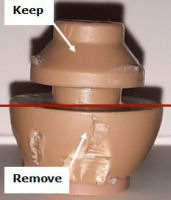
In Picture 3.
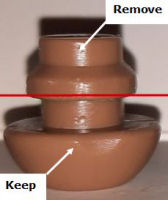
is the Alert Line head, placed next to the DiD neck post which is smaller. And in Picture
4. the Alert Line adapter has
been placed next to the DiD neck post, to show just how much larger it is.
Neck Post Alterations
So the only way I can see that I can combine the two adapters, to fit the head onto the body, is in Picture 3.
I cut off and kept one part of the Alert Line adapter at the Red line (including
the stub), that would go into the neck post. I then did the
same to the DiD adapter in picture
4. And again this time,
I cut it at the Red line shown, to also keep the stub in place, so that it makes
sure of the height of the adapter and that it will fit into neck of the Alert
Line head.
3.
 4. 4.
 5.
5.  6.
6.
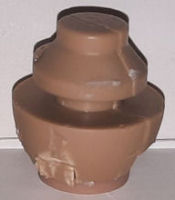
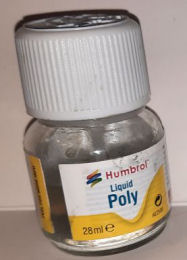
I will then have to glue both parts I need together, using the
original Humbrol Liquid Poly glue as shown in Picture
5.
As I have found that with this type of plastic, it is the best glue to use. As I
brush it on the separate parts until it starts to melt the plastic. Then once the
two pieces are slightly soft enough, I then push them
together, making sure that they are both level and central. which then creates a far better bond.
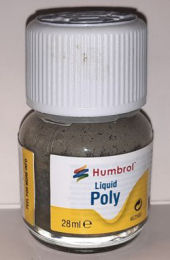
Plus, if I also then use
some of the Liquid Poly 'mix', in Picture
6. which has some pieces of melted plastic
added into it, to make a kind of liquid plastic. Around the edges of the joined
parts when dry, this glue combination will make a lot
stronger bond of the items once dry.
(Note: This was
then left aside to dry fully overnight).
As I have found with my models over the
years, that by using this combination of glues together. Once it has all
completely dried, the new adapter is as strong as they were as the original
items.
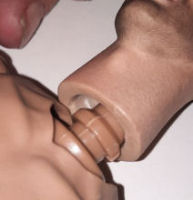
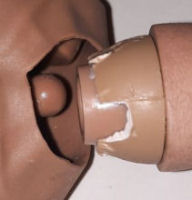
New New Neck Post
The only problem I can see with doing this is, is making sure
that the parts to be glued together, are both flat and level by sanding them.
And making sure that the parts going together are centered. So that the head
will sit properly on the neck post. Picture
7.
is the new adapter in place,
in Picture
8.
the headsculpt has been added.
7.
 8. 8.

Looking at this solution, I think I have
finally found a way to use any company's headsculpt, with any other company's
separate body. And I will no longer have search around, for a particular adapter to
unite a different company's head and body.
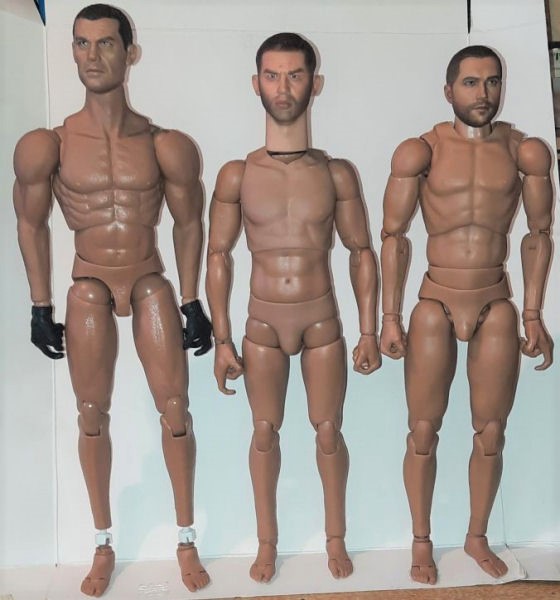
With the bodies I have here as shown above, I am
trying to get a difference in height and also build with the figures. The body
on the left is a 30cm muscular body (maker unknown), that I bought and I have
also added some extra white ankle pegs to raise the figure's height.
The middle figure is the DiD Advanced body, with the Alert Line
head + adapter used. (Note: I
will have to see how the clothing fits onto this body, because at the moment the
neck seems to me to be too long.
The figure on the right, I believe is a standard Coomodel Narrow
Shoulder body, with an adapter to fit a DAM headsculpt. |
