|
This text is from the
Trigger
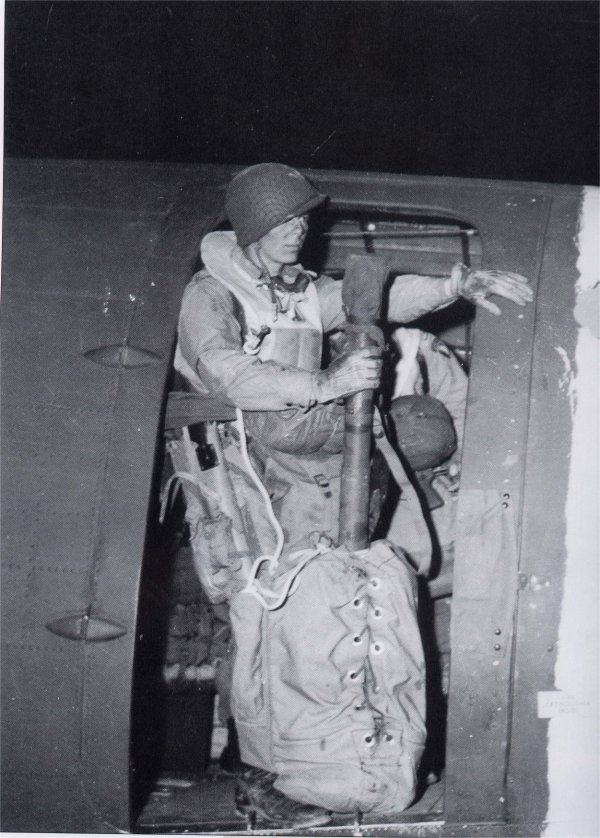
Time website regarding the picture below right.
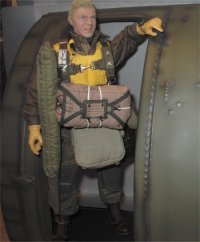
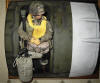
This daredevil, Dick Knudsen of F/506th jumped into France
with a Brit-made leg bag containing his bazooka rocket launcher.
When his chute opened, he didn't have time to release the bag
before hitting the ground. Upon landing several hundred yards from St Mere
Eglise, he broke his pelvis. Knudsen laid unaided in no man's land for several
days before being discovered and evacuated. photo c/o Charles Young 439th TCG
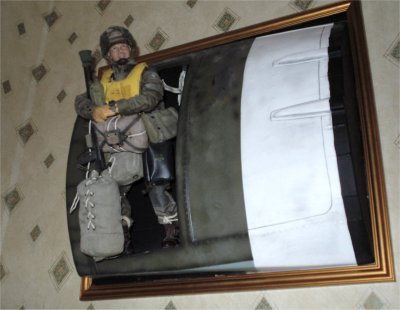
 This
page is my kitbash based on the picture on the right, and it came about after
being given the DML C47 doorway by Sean (Into the Blue) many thanks. I
was surprised to say the least when it arrived in the post, and I thought that I
would never be able to use it. But then I found this picture and a kitbash idea
formed in my mind about how I would. And it was not until I mentioned it to
Terry (The Bhoy), did he come up with the idea for the doorway being
mounted in a frame and then onto the wall. This
page is my kitbash based on the picture on the right, and it came about after
being given the DML C47 doorway by Sean (Into the Blue) many thanks. I
was surprised to say the least when it arrived in the post, and I thought that I
would never be able to use it. But then I found this picture and a kitbash idea
formed in my mind about how I would. And it was not until I mentioned it to
Terry (The Bhoy), did he come up with the idea for the doorway being
mounted in a frame and then onto the wall.
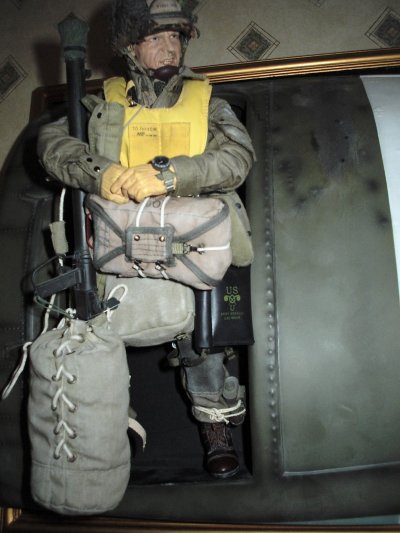
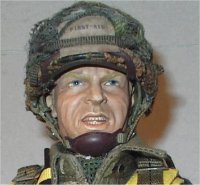
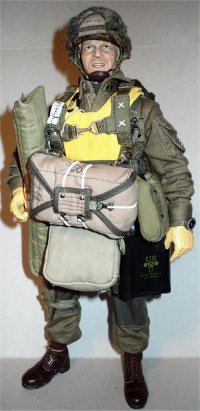
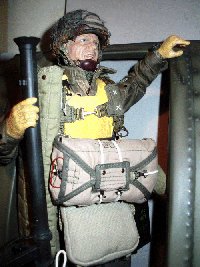
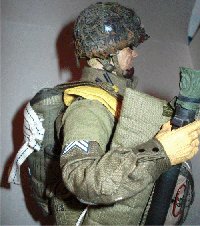
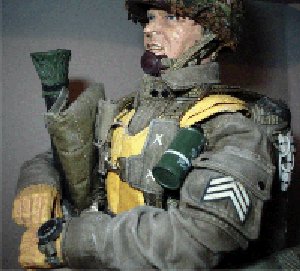
The headsculpt for this figure is the DML Bobby Dalton one, which I repainted
including the eyes which took about 5 attempts to get right. The uniform is from
Corbin Black along with the parachutes and gasmask bag, the rifle bag is from
the DML Frank Laird figure, the and bazooka shells bag is from DML, the gloved
hands are from a bbi figure I think.
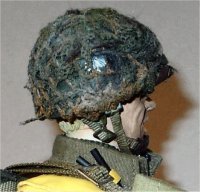
The helmet is from DML, with a bbi inner helmet fitted inside with the elastic
straps cut off and replaced with webbing straps. I also fitted a helmet net and
a first aid pouch plus some jute strips which I repainted to camouflage it.
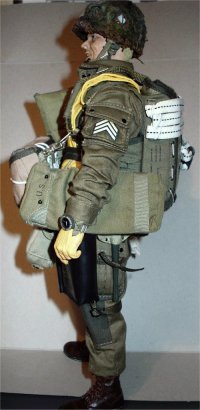
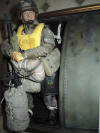
The pictures above show four views of the figure, which is a real hotch potch of
various parts to get the figure I wanted. The uniform was assembled the same way
that I have done with my Corbin Black figure. The worst part of it all, was
working out what went where. The order for it all was belt and webbing straps
with the attached equipment, the gas mask bag held by the belt and tied around
the leg, the bazooka shell bag went over the head, the Mae West vest and finally
the parachute.
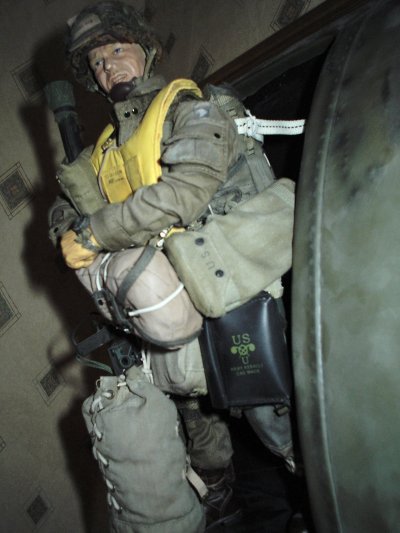
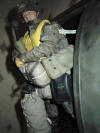
Again as with the Corbin figure, I had to move around some of the belt kit and
the bazooka bag to get the straps on the parachute done up. It was at this point
I wanted to see what the figure looked like in the doorway, this is when I
realised I had a problem... The figure won't fit....
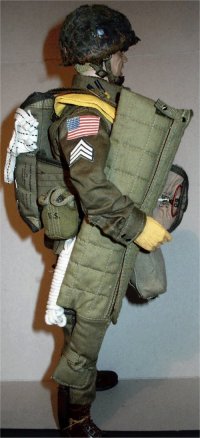
After I had said words like.. gosh, flip and oh dear... (but a bit stronger). I
realised that now I had no alternative, but to try and pose the figure as if he
has just left the aircraft. As I still have to fit the British drop bag and the
bazooka to the figure. So an idea I have come up with is using fishing line
around the waist, to hold the figure in place in the doorway, which will be
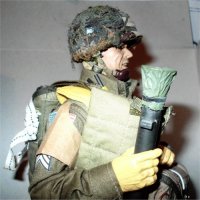
mounted onto the frame. I got hold of the British leg bag that I was after for
this kitbash, which then allowed me to place the bazooka inside it. This now
made me realise just what I put myself in for, as I really have to plan just how
I am going to pose this figure.
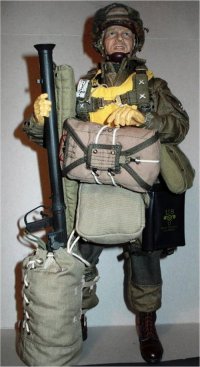
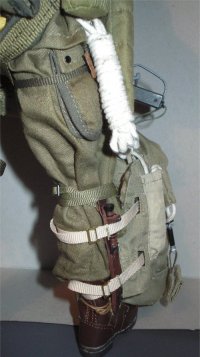

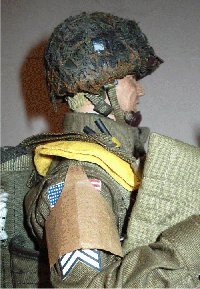
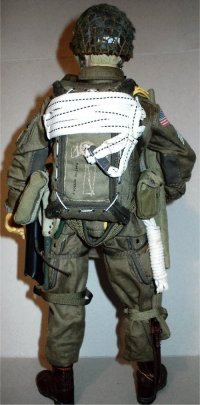
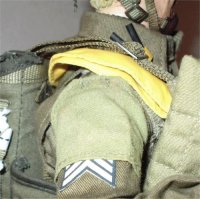
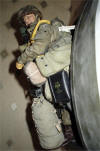
One of the things that are missing from this figure that I wanted to add is a
gas brassard armband. I made this from brown paper cut to size, with double
sided tape holding the joints together under the arm, with a thin strip of the
tape under the part that goes towards the epaulette. The purpose of this is to
keep the brassard in place, with the figure's arm bent. The other missing thing
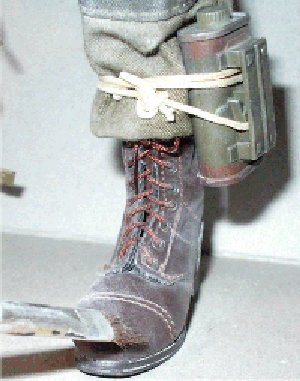
I have added is a Hawkins mine, which I have got hold of and tied onto the
figure's leg.
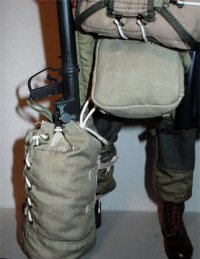
Bazooka Cover
This is one item that I have kept putting of until now, as in the picture above
of the soldier he has a cloth cover over the top of the bazooka. In the pictures
below you can see the stages of how I made the cloth cover. The picture below
left, shows a square of tissue paper folded down around the bazooka end. Which I
then painted with a PVA & water mix and then tied a piece of thin string around
it. The purpose of this is, that as the PVA dries the string will pull in the
tissue making realistic folds.
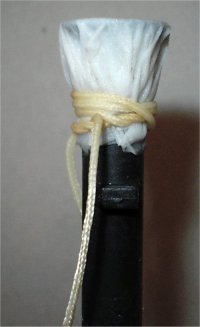

The second and third pictures show the tissue after is has been painted, with a
strip of tape applied around it to look like it is holding it in place. Because
I used enamel paint to cover the tissue, I have had to give it a coat of
Dullcote to dull down the shine.
Update
I have just had two excellent pieces of kit sent to me today by Ray Cranmer (raycxr2),
and the parts have just amazed me. One of them is a US cloth brassard, this is
something that I never thought I would ever see again, as this to me is like the
equivalent of the Holy Grail. Because I have never seen it for sale or trade
anywhere since the Soldat 2 figure came out.
The other part is the Hawkins mine, this I have attached to
the figure's leg and now I am classing the para figure as fully loaded now.
Many thanks Ray you are a true
gentleman and fellow modeller. 
I have been trying recently to get a picture frame for the doorway. But the
problem that has arisen as a result of measuring the outer edges of the doorway
frame. Is that it is about 16 inches long by 13 inches high, which is not a
standard frame size. So the only alternative I have now, is to have a frame made
up so that the fuselage body sits inside the frame. Which of course now is a
matter of cost, as I have to take the fuselage body to the shop and then choose
which type of frame I want.
Update
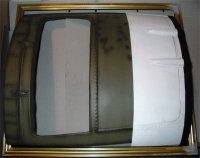
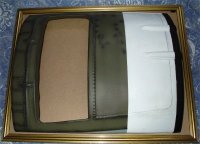
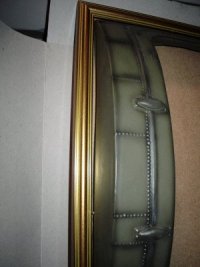
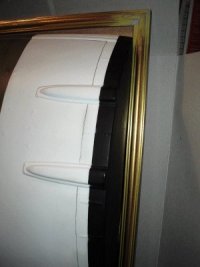
I have finally been able to track down a frame that is near to the size I
wanted, without having to pay out a fortune for a specially made one. The
picture above left is as it when I got it, and it is slightly over sized on the
length, but on the other picture on the right. I have cut it down so the length
of the doorway fits in snugly. But for me to do this and then put the frame back
together again, I have had to use superglue and model filler for the corners. I
am not worried about this problem, as the frame is made out of resin, so once
the filler has been sanded smooth and the frame repainted, I should not really
notice any differences.
The other thing I have to do is cut the back board down to size, and then fix
some black card inside the shape of the doorway on the back. Then fix the
doorway to the whole frame. I also have to make a card insert for the floor of
the doorway, as there is a slight gap between it and the back. Regarding the
figure, I have been using grout and pastels to age the uniform, this is
explained in my
Dusty Uniforms page.
This to me has added an extra effect to the figure, as it was really bugging me
that the he looked so clean. But, one thing to remember about this figure is,
that he is fresh from the airfield in England. So I have only lightly dusted up
the uniform and equipment. Compared to how he might look after a couple of days
in the field, where he might have a torn, dirty and dishevelled uniform.

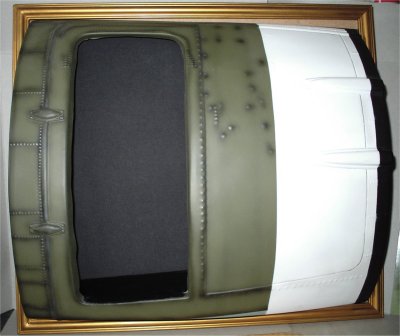
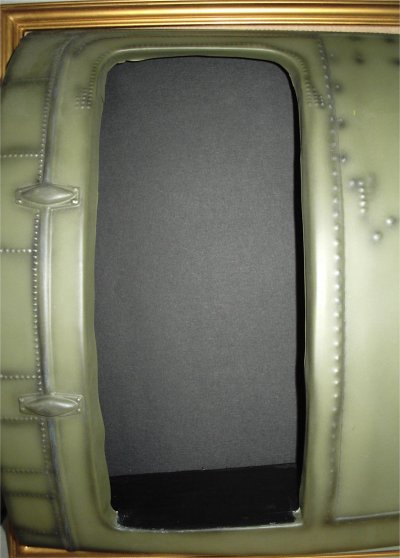
These are pictures of the doorway and the frame together, the above left picture
shows the doorway placed into the frame. The other pictures show the left side
(middle picture) and the right side of the doorway against the frame sides.
All I have to do now is put some kind of wire across the door, to hook up the
static line to. Then paint the frame some kind of colour, not sure what yet to
cover up the filler and sanded areas. And fix the doorway to the backing, and
then paint the gap inside black.
Update
I have just had an idea about how I am going to fill the space, between the
doorway and the frame back. The only problem is I have to find the item... What
I want to do is use a colour photograph of a WW2 US paratrooper or two, that are
standing in the doorway, without touching the doorframe. Ready to step forward
to take the place of my figure that is in the process of parachuting out. So as
a result of this little gem of an idea, I have now had to e-mail just about
everyone I can find, hoping to find a suitable photograph. (I am pinning my
hopes on some of the US airborne re-enactors, as they are exactly what I am
after).
Latest Update
I have sent numerous e-mail's, posted on forums and filled in a couple of online
forms, but unfortunately I think my quest for the background picture for this
diorama may be to avail. As I have some feedback, but nothing has come back so
far of a colour picture that I could use. I must say though, that I have had
some offers of help regarding the errors that I have built into the figure. And
as I post this update I am awaiting a reply to one of them, and I would like to
say that I am very grateful to the people who take the time to contact me
regarding my figures.
Note: I have today been contacted by a
gentleman regarding my figures, and from the help he has offered me, I have
found out I have in-correctly fitted the Mae West vest. As it should be under
the parachute straps, not as shown over the top of them. So, I have to change
the vest so it is under of the parachute straps not on top of them. Plus, this
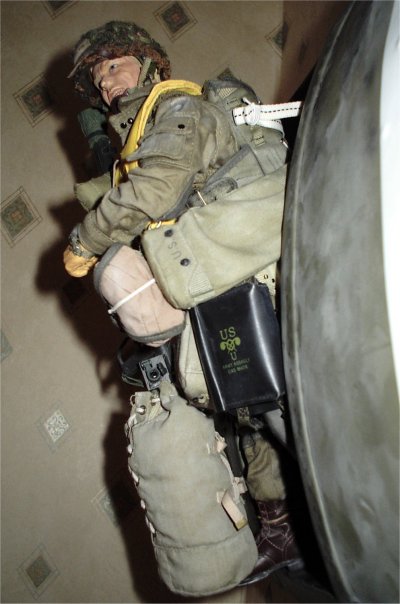
needs to be done on my .30 cal gun crew team as well. The picture on the right
is wrong, but as I have now finished the kitbash, I am somewhat reluctant to
change the position of the parachute straps.
Update
I have had some help back with my request for paratrooper figures, but
unfortunately I could not use any of them, as they were just not the right one's
for what I want. So, I have had to go with a plain black card inside the
doorway. I just cut out the marked shape from the sheet, and stuck it down with
double sided sticky tape.
The floor of the doorway was made from the card that came with it as a stand, I
just cut it down to size so that it fits between the doorframe. I removed some
of the thickness of it at the front, so that it looked in scale on the bottom of
the doorway. I also made some marks and cut the card down, so it butts up
against the frame backing. This I stuck down in place and fitted the whole
plastic part back into the frame to check it had all lined up.
All that needs to be done now, is to make some holes in the frame backing,
thread the fishing line through them and around the figure to hold it in place.
Once I have that set with the pose, I will fix the plastic doorway onto the
frame backing permanently and tie the figure in position.
Update
I made the holes in the back of the frame that I wanted, then cut some thin
fishing line. Tied that onto some thin string behind the frame to stop the line
pulling through the frame, threaded the fishing line through the hole and around
the figure. The holes and the fishing line can be seen in the picture on the
right. It is just beside the sergeant stripe on the figure's arm.
This is where I suddenly realised that although I can feel the thread, at times
I can't see it! I tied it around the figure to see if it would support it and I
found out that I would have to double up on it to get the strength I wanted. As
when I bought the fishing line I went for the thinnest I could get, which was a
10oz line. And thinking about it now, I wish I went for a thicker one, as it is
almost impossible to tie a knot in it...
I have also fixed the doorway to the frame itself, and I am just waiting for the
glue to set so I can finally finish off this diorama.
Finished at last


I have finally finished the figure and the doorway, and to be honest it has not
been a labour of love. If fact doing the last bits to get it finished, nearly
made me throw the whole lot out. As I had to get some more fishing line, as the
one I was using was not strong enough, so I had to get myself some 4lb line.
Then thread it through the backing around the figure, around his legs and then
through the backing again, this had to be done twice. Then before tying off the
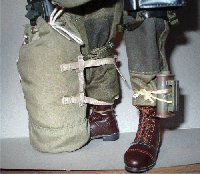
ends, I had to get the pose right and then secure the line ends. The drop bag is
not tied to the leg, and is held in place by the fishing line. In the bottom
picture above left, you can just see the line that goes around the leg. And in
the picture above right, is how it looks on my wall above my desk.
Many thanks to Sean for the doorway,
Terry for the frame idea and
Ray for the
brassard and Hawkins mine.
|