|
Welcome
To My German Cable Layer Backpack Page.
This
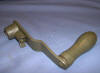
page is about how I have changed the Dragon Will Kahler signals cable reel
backpack. My main reason for the changes was that although it is a well made
item, I found after looking at the reference pictures I have included at the
bottom of the page. The moulded plastic tool pouch just looked completely wrong,
so I did a search with the help of some fellow modellers on the Sixth Army Group
forum for a 'leather type' of pouch as a replacement.
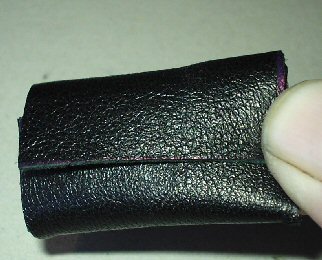
 And after searching around on both eBay and most
of the online 1/6th dealers, and even buying some pouches to see if they would fit. I
have had to finally make my own leather bag for the frame, out of some soft thin
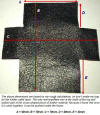
leather off cuts that I bought. The picture on the right, shows the rough
calculations I ended up using to make the bag. The main one's are the width of
the bag as that has to be 40mm, and the overall height which is 70mm for the
flat piece. Because when it is folded up it has to fit into the frame with a
height of between 25mm to 30mm. And after searching around on both eBay and most
of the online 1/6th dealers, and even buying some pouches to see if they would fit. I
have had to finally make my own leather bag for the frame, out of some soft thin
leather off cuts that I bought. The picture on the right, shows the rough
calculations I ended up using to make the bag. The main one's are the width of
the bag as that has to be 40mm, and the overall height which is 70mm for the
flat piece. Because when it is folded up it has to fit into the frame with a
height of between 25mm to 30mm.
Making The Pouch and Support
Pad
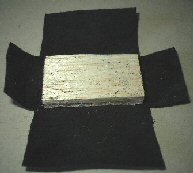
The pictures below show how I used a square piece
of balsa wood to make the shape of the bag itself, which I placed as shown below
left inside the material. I then folded the material around the edge to make one
side of the pouch. Note: Making sure that
you have the height of between 25mm and 30mm with the top flap folded over. This
was then sewn together to make the assembled side, this was then repeated for
the other side. Once both sides have been sewn together, the spare material for
the sides as shown in the middle picture below can be trimmed to size.
 With the
finished bag I have as shown below, I made it so
that the top flap goes through the lower of the two cross bars on the frame
that the bag fits onto. I then
placed
a small piece of tissue paper into the bag to bulk it out slightly. I then put
the front flap for the bag where the buckles would go, through the gap between
the two cross bars, to see just how much of the I had to cut off the bottom of
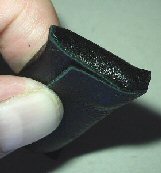
the front flap. So that it would rest on the centre of the bag. In the picture
on the right, I have just folded the bag up before sewing the sides together, to
show what it would look like. With the
finished bag I have as shown below, I made it so
that the top flap goes through the lower of the two cross bars on the frame
that the bag fits onto. I then
placed
a small piece of tissue paper into the bag to bulk it out slightly. I then put
the front flap for the bag where the buckles would go, through the gap between
the two cross bars, to see just how much of the I had to cut off the bottom of
the front flap. So that it would rest on the centre of the bag. In the picture
on the right, I have just folded the bag up before sewing the sides together, to
show what it would look like.
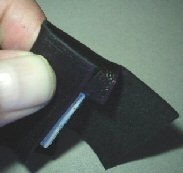
I then took the bag off the frame again to sew
some thin pieces of leather to the bottom of the bag for the buckles, I then
painted it, as I wanted it brown and not black. And the only paint that I found
I could use that stayed on the leather was some Daler-Rowney Burnt Umber acrylic
artists paint, as it is quite a thick paint although I did have to use a small
amount of water to dilute it. Once that was dry I then put the bag carefully
back onto the frame, and then cut two more thin strips of leather for the top
parts of the buckle straps.
Note: This is
where I have cheated a little with this, because I don't have the skills to sew
these in place. So I fastened the buckles together and I glued the straps in
place with some
Cyanoacrylate glue.
Another item I made for the cable layer based on
the reference pictures below, was the leather back support pad. I am afraid that
I did not take the measurements for this as I made it. But the size of the pad
itself is 40mm high by 35mm wide. And I do remember cutting out a piece of
material 80mm long by 35mm wide, which I then folded in half and sewed the sides
together. I then placed a small square of tissue paper inside it to pad it out,
and I then sewed the top part together. This again was painted and when it was
dry I sewed it to the fabric material at the top and bottom to keep it in place.
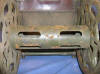
Finished Tool Pouch and Support
Pad
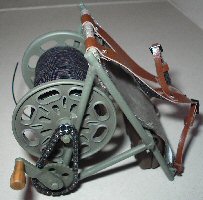
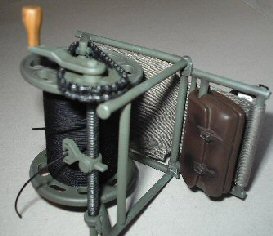
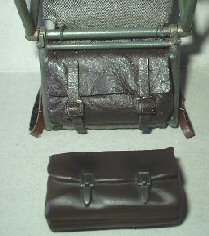
The three photos below show both the tool pouch
and the leather back support that I have also made. In the first picture below
left, this is how the cable reel looks as it comes supplied by Dragon. In the
second picture, I have placed the moulded plastic pouch that I removed from the
frame, under the leather tool pouch to show the comparison. The third picture is
a close up photo of the leather tool pouch, which just fits inside the outer
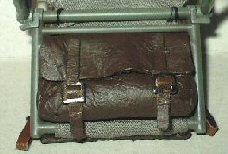
part of the frame.
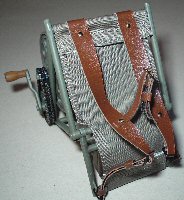
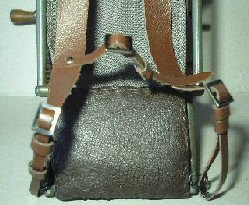
The pictures below show a close up of the leather
support pad, which I have rather badly sewn onto the green fabric material to
keep it in place. The other picture shows how the tool pouch fits inside the
frame and it is held in place by the top flap which has been put between the two
cross bars at the top.
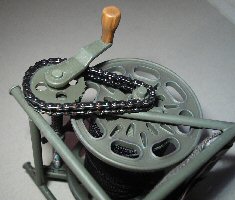
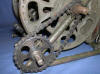
Weathering Of The Cable Layer
To lose some of the toy effect look that the reel
has, I have as shown below used a combination of acrylic paint washes and the
Tamiya Weathering powders.
Note: I found that by using cotton buds to
apply the powder, I had a lot better control over just where I can apply it.
 In the first picture above on the centre screw
thread, I used some Rust powder to fill in the thread detail, and on top of that
I have then used a combination of the Silver and the Gunmetal powder to add some
highlights to this area. The next pictures above and on the right, show how I
have used a combination of some of the same Burnt Umber paint that I used on the
leather parts, but this time I diluted it down heavily with some water and used
it as a wash on the reel, frame and the chain detail. This was then carefully
wiped off to leave the darker colour inside the details. In the first picture above on the centre screw
thread, I used some Rust powder to fill in the thread detail, and on top of that
I have then used a combination of the Silver and the Gunmetal powder to add some
highlights to this area. The next pictures above and on the right, show how I
have used a combination of some of the same Burnt Umber paint that I used on the
leather parts, but this time I diluted it down heavily with some water and used
it as a wash on the reel, frame and the chain detail. This was then carefully
wiped off to leave the darker colour inside the details.
Once that was dry, I then used some of the Mud
colour to help to dull down the plastic look of the frame, I then gave the edges
of the reel, chain, frame and the handle edges a light wipe over with the
Gunmetal powder to bring out the details. After that I then used some of the
Silver powder very lightly to get a slightly shiny worn edge to the reel, it's
mounting points and the top parts of the chain. I also added this to the toothed
parts of the cogs. Another thing that I had to do was to brush over the cable
itself with some of the Black weathering powder, this is because while doing the
other steps I mistakenly got some of the Gunmetal and Silver on it.
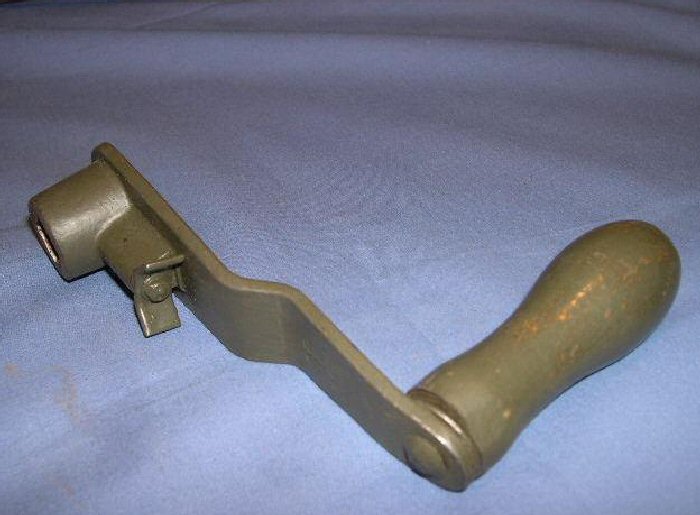
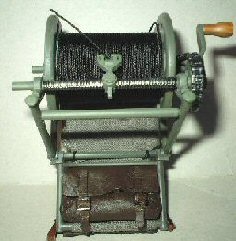
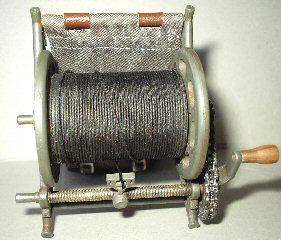
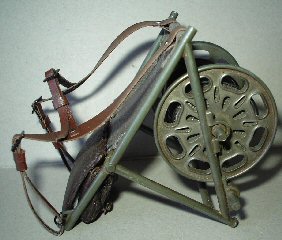
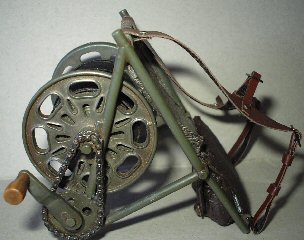
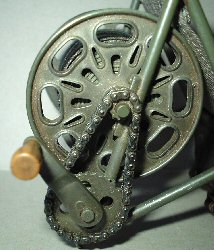
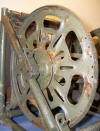
Cable Layer Reference Photos
I found these pictures of a full size German WW2
cable reel, and I have put them here for reference purposes, because I found
that they came in very helpful when I was making the leather tool pouch and the
pad. And I would like to thank
Bunker Militaria and the owner of these pictures, for their very generous help
in allowing me to use them here on my webpage.
_small.jpg)

_small.jpg)
_small.jpg)
_small.jpg)
_small.jpg)
_small.jpg)
_small.jpg)
_small.jpg)
 _small.jpg)
_small.jpg)

Continued on Page Two -
Cable Two |


.jpg)


.jpg)
.jpg)
.jpg)
.jpg)
.jpg)
.jpg)
.jpg)
.jpg)
.jpg)
.jpg)