|
Welcome
To My Carry Kitbash Page One.
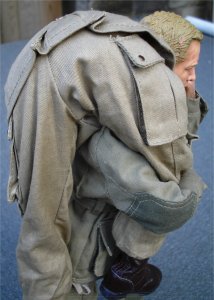
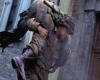 This kitbash I have been planning for quite some
time, based on the screenshot from the film Band of Brothers. And it was
only recently, that I have decided to have a go at trying to recreate it in
1/6th scale. But
what has kept putting me off making this pair of figures was getting the pose
right on the figure being carried. As I just could not get the casualty to look like he is
just about hanging on to the other soldier. This kitbash I have been planning for quite some
time, based on the screenshot from the film Band of Brothers. And it was
only recently, that I have decided to have a go at trying to recreate it in
1/6th scale. But
what has kept putting me off making this pair of figures was getting the pose
right on the figure being carried. As I just could not get the casualty to look like he is
just about hanging on to the other soldier.
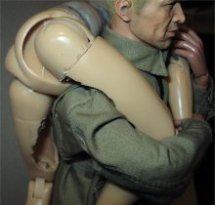
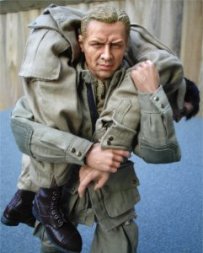
In the four pictures below I have been
experimenting with the poses, with the limited movement of the casualty figure
as the model comes made from the factory. And what I have found is that the
casualty body will have to have some body modifications carried out on it, so
that I can get a better pose. Also I have found out how quickly the joints on
the figure doing the carrying will loosen up with the extra weight.
I knew that I might have to use something to keep
the pose, but I did not realise just how much work would be involved with this
figure as well.
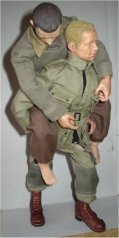
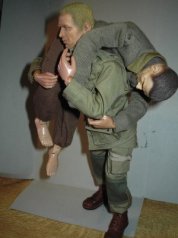
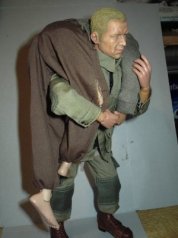
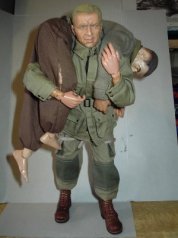
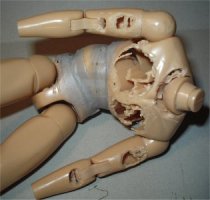
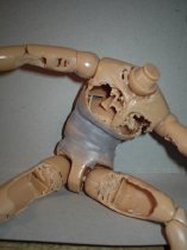
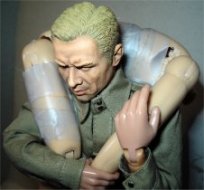
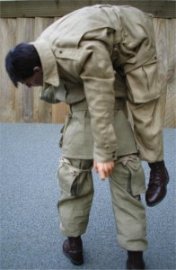
Figure Body Alterations
The picture below left shows the alterations that
I have had to do to a standard DML body, to try to get the pose right for the
casualty. The first thing I did was to remove the chest area, so that the figure
would sit better on the other figure's back. I also removed some of the plastic
on the top of the front pelvis area and the bottom of the chest area, this is to
allow more movement when the figure is bent over. Plastic was also removed under
the arms so that they would allow more movement in the shoulder, I also did the
same for the inner arms at the elbow.
Note: How to
do this is shown on the pages I made of 1stlooey's body modifications -
Body Changes &
Body Changes Part 2
1.
 2. 2.
 3.
3.
 4.
4.
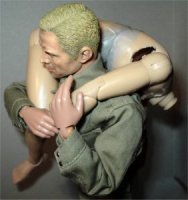
The Pictures 1.
to 4. above, show how I have used
some strong plastic tape to 'set' the pose that I want for the figure. With this
pose it was a lot of trial and error to get the body set in position, and I
found that I had to twist the chest slightly to get the upper body right.
5. 
 6.
6.
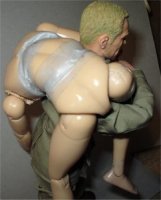
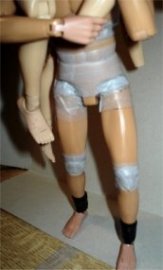
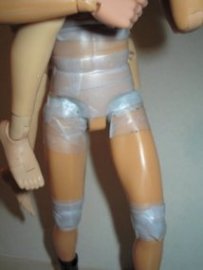
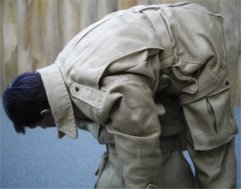
 Another
part of the body that I had to alter, was inside the top of the thighs in
Picture 5. as these
were slightly restricting the way the figure sat on the shoulder of the other
figure. Now the pose and the position are just how I wanted it to be, and it was
only then that it dawned on me, that the cavities in the figure just don't look
right in Picture 6. And it was then that I remembered about the excellent kitbashes as made
by
egonzinc on the forums. And with his very generous and excellent help, he
explained that he used some cotton to fill the gaps to bulk out the cavities,
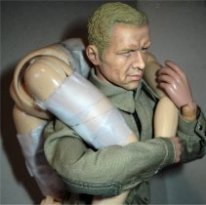
and that it still allowed the pose to be held. Another
part of the body that I had to alter, was inside the top of the thighs in
Picture 5. as these
were slightly restricting the way the figure sat on the shoulder of the other
figure. Now the pose and the position are just how I wanted it to be, and it was
only then that it dawned on me, that the cavities in the figure just don't look
right in Picture 6. And it was then that I remembered about the excellent kitbashes as made
by
egonzinc on the forums. And with his very generous and excellent help, he
explained that he used some cotton to fill the gaps to bulk out the cavities,
and that it still allowed the pose to be held.
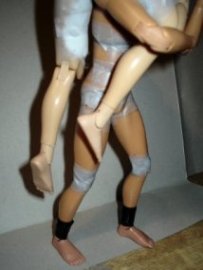
In the pictures both above and right, I have used
the idea by egonzinc and it is a superb one as the whole pose of the
figure is improved. With the cotton wool I have filled the cavities so that it
is slightly raised outside of the profile of the body, I then used some tape to
keep it in place making sure that it is not tight over the top of the cotton, as
this allows it to spread out slightly making the leg look like it has not been
altered. With this method I have been able to get the
figure higher up on the other figure's shoulders, which has also helped to get
the centre of gravity of both figures more into the centre line. Which has
helped to pose the figure doing the carrying even better, as he now does not
fall over as much anymore.
7.
 8.
8.
 9.
9.
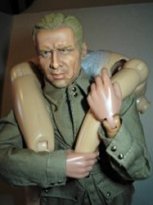
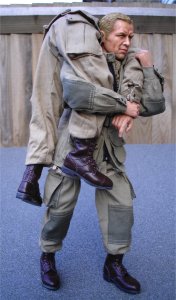
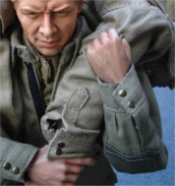
These Pictures 7.
to 9. are of the soldier carrying the
casualty, and how I have taped up the joints to hold the pose. Particular
attention was taken to tape up the waist and the top of the legs, as this is
where most of the loose movement occurred. I also taped the top chest area so the shoulders
are slumped forward, this is to also emphasise the weight of the casualty.
Note: With the
top of the legs I made sure that some of the tape was pushed securely into the
ball joints, then once the legs were set I taped over the top to further secure
them in position. I also used some tape on the ankles to strengthen them, making
sure that I still had the movement of the feet.
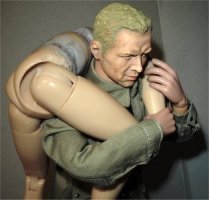
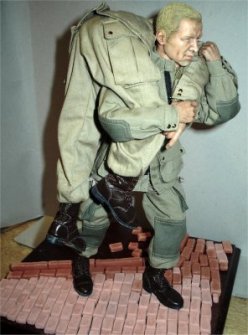
Figures & Uniforms
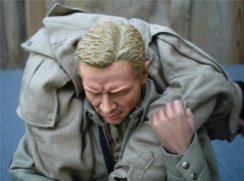
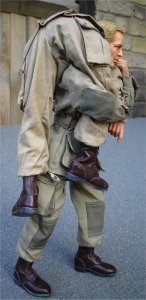
I took these pictures outside to try to show the
colour differences between the paratrooper uniforms, as the casualty is wearing
a Did Albert Ross one and the medic has a Newline re-enforced M42 uniform. Also
both figures have the DiD hands and the corrocan boots, I prefer to use these
hands for this pair of figures as I can get a better gripping pose from them.
As I had exactly the pose I wanted when the
figures had no uniforms on, but once I clothed them I found it harder to get the
pose right. And by accident I found out that if the medic is holding the
casualties wrist, it helps to pull the figure into his shoulder better. Also the
other hand on t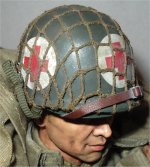 he
medic can grip the clothing as well, as I pulled the hand apart slightly,
bunched up the uniform and then let the hand close up over it, I then just
pushed the pin back into the arm. he
medic can grip the clothing as well, as I pulled the hand apart slightly,
bunched up the uniform and then let the hand close up over it, I then just
pushed the pin back into the arm.
Figures & Equipment
With the medic figure and the red cross helmet, I
was going to use a DML outer shell I have in my spares box with a DiD inner
shell. But after looking at the DiD helmet I have, I then decided to try to have a go
at making the Red Cross decal myself for it. Below right is an image of the
decal I made, and with this it has to be printed
off onto some white decal paper, sealed and
then cut out using the circular line as a guide.
Decal Links -
Decals,
Decals,
Decals,
Decals.
Note: Remember printers cannot print White. Also don't throw away the un-used sheet, as the
spare white parts can be used to make the helmet
rank
symbols.
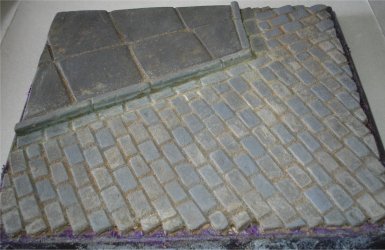
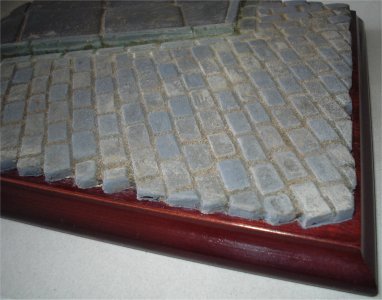
Diorama
Base
The base for this pair of figures is on my
Cobblestone page. And in the
picture below right I have placed the figures onto
 it,
to see just how it looks and if I have got the cobblestone sizes right. It was
only really then that
it dawned on me just how much work I have given
myself with this kitbash. it,
to see just how it looks and if I have got the cobblestone sizes right. It was
only really then that
it dawned on me just how much work I have given
myself with this kitbash.
 Now that I have the base finished I can now get on
with the figures, the picture above right shows how the tape and the Maskol has
helped to protect the base edges. Now that I have the base finished I can now get on
with the figures, the picture above right shows how the tape and the Maskol has
helped to protect the base edges.
An experiment that I have tried with the base and
the figures is shown on the right, because I have a lot of clay left over I
decided to make a few extra bricks and have them in a pile in one corner, along
with some pieces of balsa wood. As I want to get rid of the
Dead Space areas on
the base, so the brick pile and the helmet may help me with this. Although
getting the balance right between them, keeping the cobbles on show and still
having a path for the figure's may take bit of working out.
Another idea I am going to try once the bricks
have dried off fully, is to break some of them up with a hammer, to create the
small brick pieces for the rubble pile.
Because of how this kitbash and diorama has seemed
to have grown from what I originally wanted to make, I have had make a second
page of how I am making this kitbash.
This is continued on Page
Two
Many thanks to Ed (1stlooey)
for the help with this kitbash and allowing me to show how he did his body
changes.
And to Eduardo (egonzinc)
for his very detailed help with how he made his British airborne figure kitbash.
And Paul (.308)
for his very helpful assistance with making the base.
Top of Page
| 
