|
Welcome
To My Kleinfunksprecher d “Dorette”
Radio Page One.
This page was made because I am always looking out
for something different with my figures, and after I saw the excellent figure
made by a fellow modeller
mustangman, I found out that the German single man radio unit was available through
Panzerwerks.
The picture on the right is the finished radio as advertised on their website. What I also liked about this model is that the radio unit is in a kit
form, and that it would have to
be both assembled and painted, the same as the units in the
Dragon
Torn.Fu.d2 radio kit. So with this figure I have now completed the
collection that I wanted, of a single
British, US and now a
German radio man.
The Radio Kit by Panzerwerks
Below are pictures of the pieces as supplied by
Panzerwerks, and I am amazed at how detailed the items are especially as they
are cast in resin, as I have very little experience of this material in 1/6th
scale. I did find some forum topics about the Panzerwerks model
here and
here which I have found very helpful.
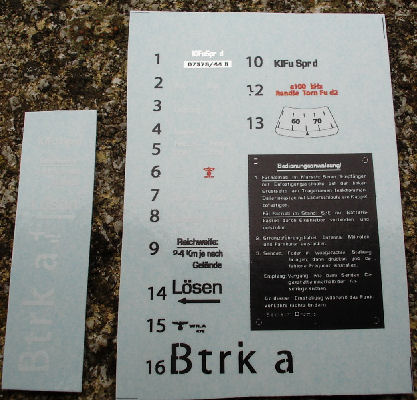
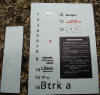
Picture 1. is the first page in PDF form of the
instructions from Panzerwerks on assembling the radio, as they have to be
downloaded from the website. Picture
2. is the second page in PDF form for
assembling the radio aerial. I did notice on the first page it talks of having
to use a piece of metal from a soda can, to make an item for the radio unit. So
to try to help explain this I have the photos below about how I have had to make this
particular item for the radio.
1. 2.
3.
2.
3.
 4.
4.
 5.
5.
 6.
6.
 7.
7.
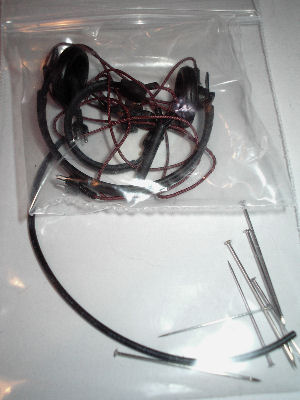
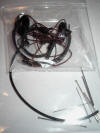
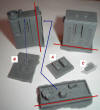
Picture 3. is
of the radio units pieces before I have removed the excess resin material,
Picture 4. are the headsets that were
supplied in the kit which were made by Dragon, along with some metal pins that
will have to be cut down to make parts for the kit. There is also a small length
of wire, I believe is to be used to connect both units together, as well as
a long piece of brass rod to be used as the aerial. The best way to describe
Picture 5. is that these are the almost
microscopic decals that came with the kit. Pictures 6.
& 7. are some more pictures of the completed
radio.
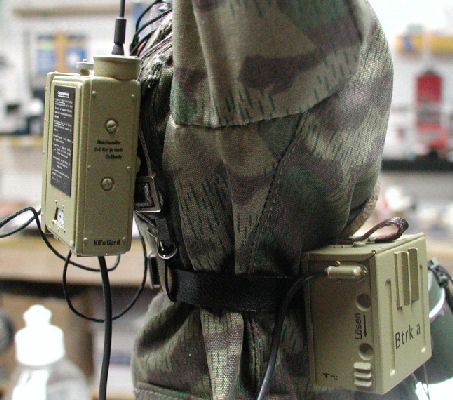
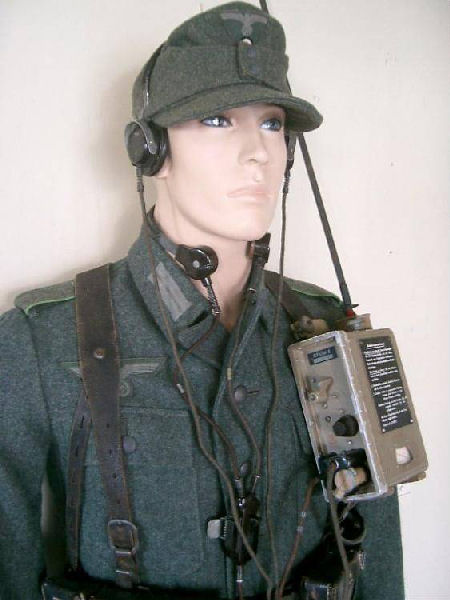
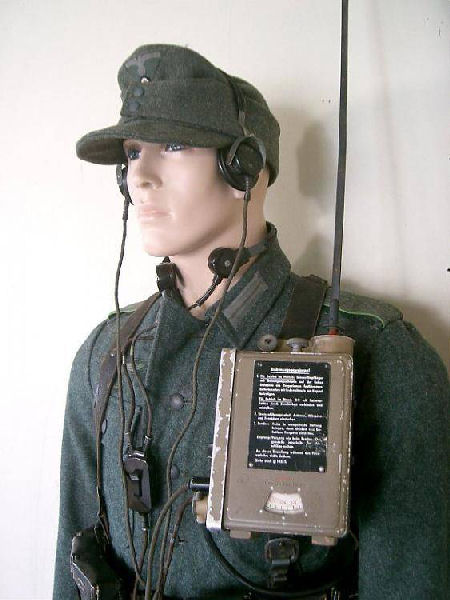
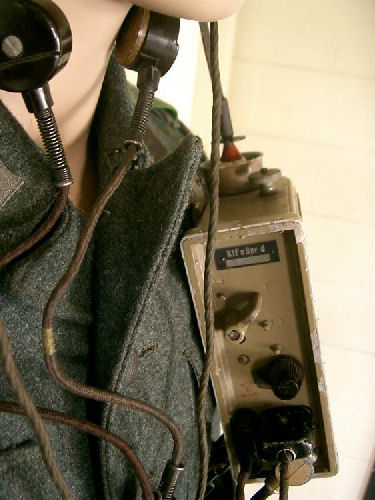
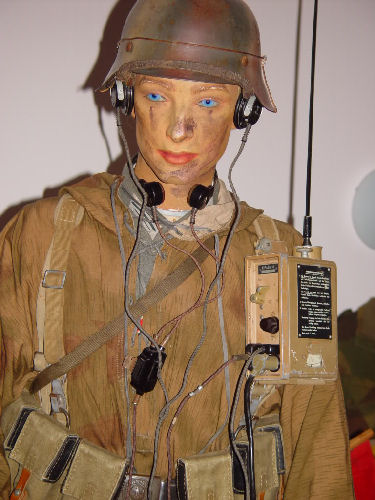
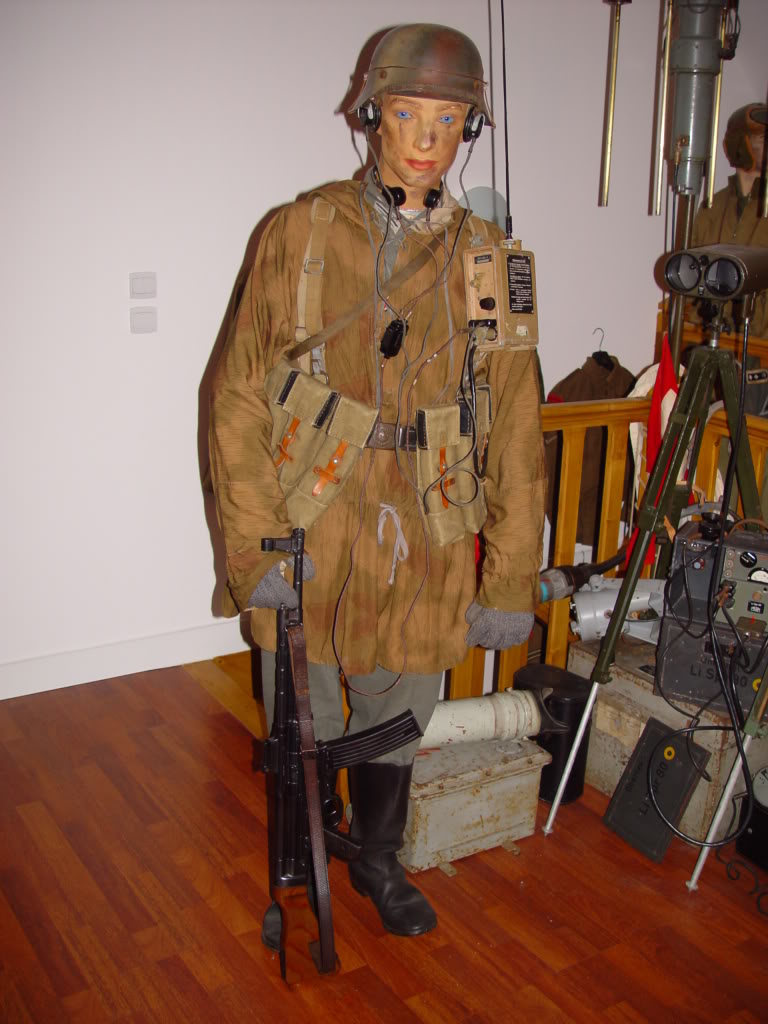
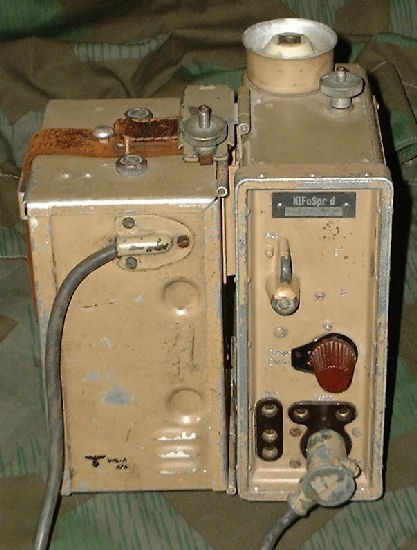
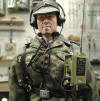
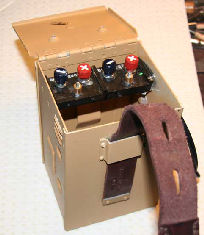
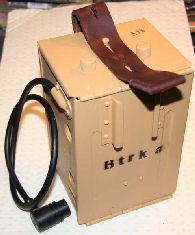
Reference pictures of the
radio.


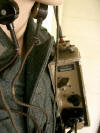

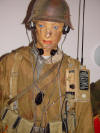
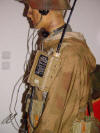
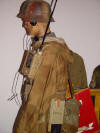
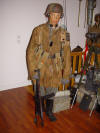
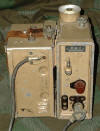
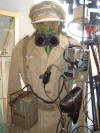
What I did find with this kit is that there were no
images with it regarding what the real radio looks like, so I have had to do
a little research to get some reference images. And I found some of the images above on the Wehrmacht-Awards forum. I have been able to use these images here for
reference material for my radio kit, with the kind permission of
Rob at Fieldgear.org, Funksammler,
Uniformer and
oberjaeger. Plus I have found that this
combined with the help from the Panzerwerks instructions, as well as the help
from mustangman who has already assembled the kit, I have been able to work out
how the units go together.
I believe that the radio units were painted either
Black or German Yellow, so to make my model like the images above I have found
that the paint colour Dunklegelb is - Tamiya XF - 60.
 I also had some superb help from Pete
(mustangman) in
Italics below from in answer to my
questions: I also had some superb help from Pete
(mustangman) in
Italics below from in answer to my
questions:
Regarding the assembly of the resin parts, will super glue (Cyanoacrylate) work
with them?
The cyano type glue is what I used and it worked fine. The tiny decals will
most likely be the hardest part of completing the kit. The parts will come with
extra material just from the casting process. I trimmed mine close with a razor
saw (small hobby saws) and then rubbed the part on sand paper to get it to its
final shape. Also when doing this on the face of the radio (the part with the
switches and plugs) be careful not to sand thru the back ( I almost did as I got
a little aggressive with the sanding) so learn from my near disaster!
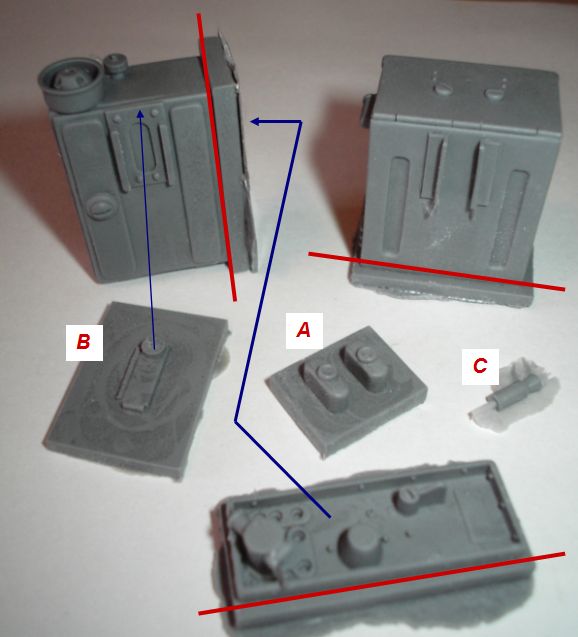
My
questions about the resin parts
1) Yes the large part is the radio unit and you
have the correct part identified to go on the front. Yes you have to remove the
material that you have marked with the red line. I used a hobby saw to remove
most of the material and then laid sandpaper on my work bench and than hand
sanded to remove the remaining material. This allows you to get the part matched
up and keeps them nice and flat. I did the same procedure for all the material
removal that are marked in red.
2) yes the item on the top right is the battery box.
Item A what are these and where do they fit on
the radio or battery unit?
3) Item A are the electrical plugs that go into
the face of the radio. You can use these in place of the ones that came with the
headphones and throat mic. I made mine functional by drilling out the holes in
the radio and inserting brass tubing. Than drilling out the plugs (item A) and
inserting brass rod. You don't have to do this, but I believe the ones in the
kit may fit the radio better.
Item B, is this the part that is angled and
fits on the top edge of the radio unit.
4) Item B is the clamp used to hold onto the Y
strap. Yes you have to remove the extra material. This is just for looks, the
radio unit is held on to the Y strap with one of the pins.
Item C, is this the part that goes on the
bottom of the aerial with I assume a hole drilled through it, so that the brass
rod can go right through it and into the top of the radio unit?
5) Item C you are correct on.
In the instruction sheet and in Section 1. it
mentions about using one of the supplied pins to fit it onto the radio unit, and
then put the head through the 'Y' Strap. Is this all that holds the radio unit
onto the 'Y' strap? As it does not look like it may take the weight of the resin
radio unit.
6) See above, but yes this is all that holds the radio on and no issues.
In Section 2. it mentions about the leather
strap that has to be made, I can understand the back part and fixing it to the
resin battery box, but I am curious about where the other end goes? Does this go
onto the pin fitted in Section 4.?
7) The strap on the battery box is like any other German equipment. The strap
goes around the belt and the hooks over the pin on the bottom to prevent the
strap from pulling thru, sort of like the K98 ammo pouches, same concept.
Assembly of the radio kit
Before I started with the kit, I found out about the safety problems that can
come from working with resin -
Resin Dust Hazards. I also found out that it is best to wash the resin parts
in warm soapy water, to remove any mould release agent that may be on them. As
it can affect the paint when it is applied.
Radio
Unit and Battery Box
8.
 9. 9.
 10. 10.
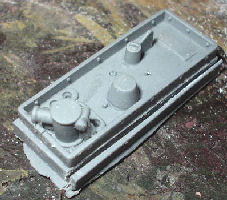
Picture
8.
shows how much dust I have made just
from cutting and sanding the excessive resin off of the radio and battery box,
Picture 9. is the front face of the radio
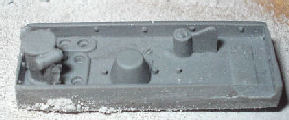
controls, which has also had the excess resin cut off. Picture
10. shows how I have sanded down the sides
level, but I have accidentally broken the bottom corner as it got a bit too
thin. Note: I have saved the piece and I
will glue it back in place. This front part gets glued onto the side of the
radio box as below. I have had to use some of the Poly Glue 'Mix' (31)
to fill the gaps in the sides. Which was when dry gently sanded smooth.
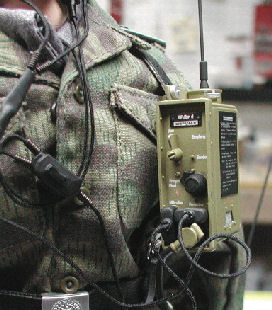
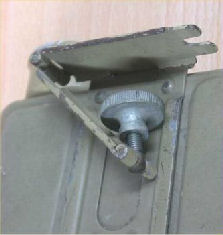
'Y' Strap Restraining Clamp
To help me to assemble the main radio unit I have
used the image from the
Fieldgear.org page, as it has some very good pictures of the unit.
The hardest part was working out how the radio
unit fitted onto the 'Y' strap, as it looks like the clamp opens up, the strap is
placed between the plates, the clamp is then locked to hold the radio in place.
After some thought about this item, I have decided to try and make a clamp of sorts from
some thin aluminium. Picture 12. shows how I
have cut a piece of aluminium to twice the length of the resin clamp piece, so
that it can be folded over with the ends fixed together. So that I can pass the
'Y' strap through it, the aluminium is then glued onto the top edge of the radio
unit as described in the Panzerwerks instructions in Section 3. I have also used
some stretched sprue laid on the edge to represent the hinge part.
11.
 12. 12.  13.
13.  14. 14.
In Picture 12.
I was going to glue the ends but I found that the super glue would not
hold the ends together, so I have had to drill a hole in them and put a plastic rivet
through, I then melted the ends of it to hold it all in place and gently sanded
the ends flat as in Picture 13. I also carefully
drilled and sanded the slot and cut the screw head off of the resin part, and in
Picture 14. I glued it
in place on the clamp I made.
Note: With the
weight of the resin parts I could not rely on the clamp I have made supporting
the radio unit alone, so I have fitted a cut down pin as shown in the Panzerwerks instructions Section 1. So that weight is
held instead on the 'Y' strap with this pin, which I have glued in place as
shown in Picture 13.
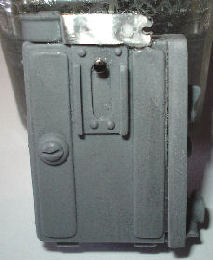
Battery
Box
15.
 16. 16.
 17. 17.
With the battery box I have used some of the
images from this website -
Battery, as the page has some very good images of how the strap connects to
the box. And from Pictures 15. &
16. above I can see how the bracket needs to
be fitted to the back of the box, to hold the leather strap in place. Also a
piece needs to be added to the end of the strap, so that it cannot pass back
through the bracket. Then it looks like the strap goes behind the soldier's
belt, over the top of it and it is held in place with the pin on the top of the
box.
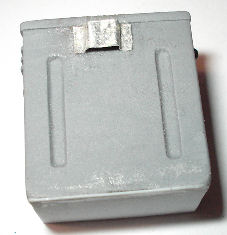
18.
 19. 19.
 20. 20.

Pictures 17. &
18.
show the base of the battery box that I have tried to sand flat, but I was
getting too near the vents on the side as I could not get it level, so to make
sure that I got the base flat. I have glued some oversized thin plastic sheet
onto the bottom, which I have gently sanded to the box profile. I then put on
some Poly Glue 'Mix' (31) to
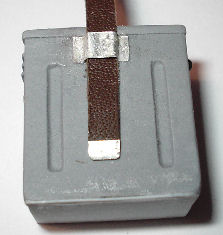
fill the gaps on the edges. Picture 19.
shows how I have had to make the restraining clip out of an aluminium can to
hold the leather strap, as explained in Section 2 on the Panzerwerks
instructions sheet. Note: I have made the
bracket so that it is just slightly wider than the leather strap, so that the
strap can move up and down, but it cannot come all the way through because of
the metal end on the strap.
In Picture 19.
I have also cut a piece of the same aluminium can to make the metal clip on the
bottom of the leather strap. This was cut to the width of the strap and double
the thickness I wanted, so that I could fold it over the strap end and glued to represent
the end piece as in Picture 18.
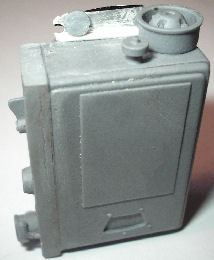
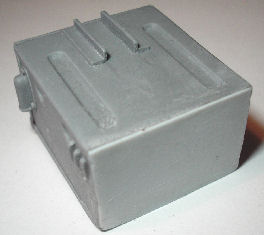
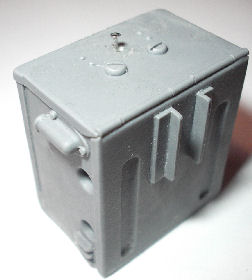
Picture
20. also shows how crisp the detail is on the
resin parts, because the boxes can be linked together by sliding the radio box
into the rails on the battery box. Note: It
has to be slid together from the bottom to the top. Picture 20.
also shows the battery box and the head of the pin to hold the leather strap. as
shown in the Panzerwerks instructions Section 3. I have first drilled a very
fine hole in the case, I then glued a cut down pin in place on the top of the
battery box. Picture 23. is the leather
strap and in the picture on the
right I have also drilled some holes in the leather strap, so that I can fix the
strap to the pin.
Continued on Page Two -
Dorette Radio Page 2
Radio Reference Pages
Reference Information and Pictures of the radio
Unit - Dorette Radio Unit
Pictures of the radio Unit -
Radio
(Many thanks to
Heersbergfuhrer
for the link to this page)
Radio Instructions -
Radio (Many thanks to
craigob
for the images on this page)
Pictures of the radio Unit -
Radio
Pictures of the radio Unit -
Radio
Pictures of the radio Unit -
Radio
Pictures of the radio Unit -
Radio
Pictures of the radio Unit -
Radio
Pictures of the internals of the radio Unit -
Radio
Pictures of German handheld microphones -
Microphone
Pictures of German handheld microphones -
Microphone
Thanks to
Panzerwerks for all of the help and for such an excellent model kit of the German radio.
I would like to thank mustangman for all of his
excellent help with this model kit.
Also to
Heeresbergführer for the picture.
I would like to thank Sixty Driver for his help with
how the radio was used.
Also to
Fieldgear.org, Funksammler,
Uniformer and
oberjaeger for their kind permission to use the above images for me to work
from. |