|
Welcome
To My Gebirgsjager Medic Page.
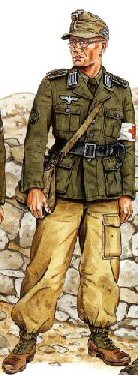 This kitbash is of a Gebirgsjager medical soldier,
a figure that I have been meaning to put together for quite a while, but until
now I never seemed to have the time to do. Mainly because I did not have a
decent reference picture until I had the one on the right as supplied by Patrick
(Heeresbergführer). This kitbash is of a Gebirgsjager medical soldier,
a figure that I have been meaning to put together for quite a while, but until
now I never seemed to have the time to do. Mainly because I did not have a
decent reference picture until I had the one on the right as supplied by Patrick
(Heeresbergführer).
And from this picture I have decided to create
this kitbash, based on what I have in my spares boxes which is a combination of
the trousers on the soldier second from left in the front row. With the leg
pockets on the trousers of the fourth man front row, and with the jacket from
the first guy in the front row on top of it. As usual with me, I have also
eventually found in my reference books the picture on the far right, which gives me
a better idea of what the combinations of uniforms would look like together.
Body
This kitbash is based on an experiment I have
done, where I bought myself three of the Figures Home loose bodies. In the
pictures on the right I have put it alongside a Dragon body for comparison,
A is the Dragon body and
B is the one from Figures Home. I have done a
review of these bodies and my findings are here -
Review.
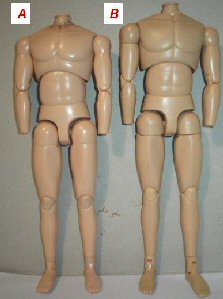

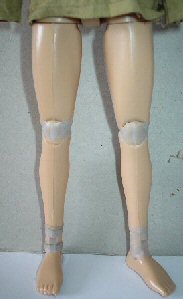
I have found that with the body that I am using
for this kitbash, I have had to tighten up the knee and ankle joints a bit with
tape as shown on the far right, as I found that the ankle joints become loose which causes
the figure to fall over. Overall I am happy with the Figures Home bodies, but I
will have to bear this weakness in mind for the future.
Headsculpt
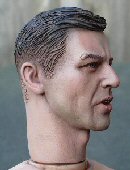
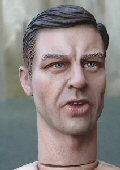 
This headsculpt is again a DiD one, but I forget
now which figure or pack it came from as I got it loose sometime ago. The number
on the back of it is D77, and according to the
Heads Database it is the
head that was in the
DiD
Deluxe Accessory pack with the German
helmets.
As it is shown here I have already given it a
pastel wash and drybrush, so unfortunately for this kitbash I don't have any
pictures of the head as it came from the manufacturer.
 Fist Hand Fist Hand
With this kitbash like my Pioneer figure I wanted
to hold a satchel, but the normal hands to me just did not look right as the grip was
not tight enough. So I have again used a fist hand that I bought loose, I have a
PDF I made here,
showing how I have used these hands on my figures.
Firstly the peg for the arm had to have the wide
end at the top sanded off so that the peg is straight, a hole had to be very
carefully drilled in the fist so it could hold the bag strap. And both the fist
and the other DiD hand I am using had to be painted with some Flesh acrylic
paint, so that they both match. Plus they both had to have a Brown pastel wash
applied to them before use.
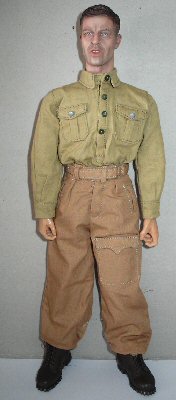
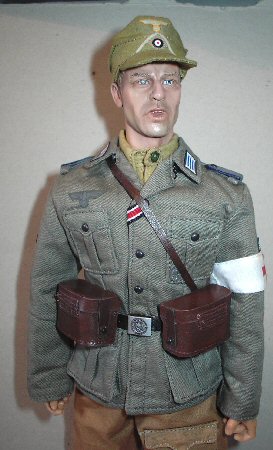
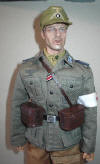
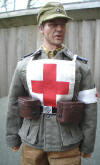
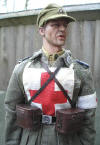
Uniform
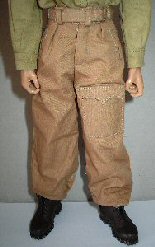
The uniform for this kitbash is based on a
Gebirgsjager soldier in Italy, mainly because I wanted to use the Brown
Luftwaffe trousers from the Dragon Martin Kleist figure. I also received some
excellent help I have had from my fellow
 modellers to a
question I raised on a forum about this. modellers to a
question I raised on a forum about this.
And from this picture I have decided to create
this kitbash, based on what I have in my spares boxes which is a pair of
trousers from the Dragon Kleist figure.
Which is a combination of the baggy trousers on
the soldier second from left in the front row. With the leg pockets on the
trousers of the fourth man front row, and i want to use a jacket like the first
guy in the front row on top of it.
As usual with me, I have also eventually found in
my reference books this picture on the right, which gives me a better idea of
what the combinations of uniforms would look like together.
In the pictures below the tunic is also from
Dragon, but as to what figure it came from I don't know as I got it in a trade,
all I know about it is that the collar can be clipped back into the open
position. The shirt is also made by Dragon, again I got this in a trade so the
figure it came from is unknown. In the pictures below I have used some CVI
insignia for the collar, and also for the medical badge on the cuff.
 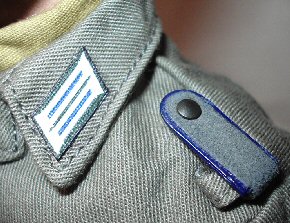

The shoulder boards I repainted as I did not have the one's that I
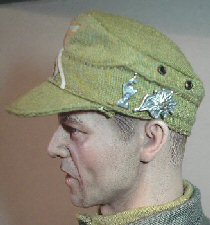
needed. Another item that I am using with this figure is a
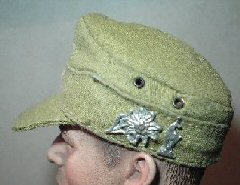
tropical cap made by Soldier Story, which has had the gebirgsjager insignia as
made by Nomad65 added to the side of it. Note:
I will have to research a bit more about the cap badges, as I am not
sure at the moment if the 5th Gebirgsjager
regiment wore both of these.
Cap
Badges Position Update
 I have just had some answers back on the Sixth
Army Group forum from RogueJK,
Heeresbergführer
and pzrwest, about the question I posted on
there about the
cap badge positions. And I have been very kindly supplied the picture on the
right to help me, which has answered all of questions about how the badges were
worn on the cap. Also some additional information about the chevron on the front
of the cap as below. I have just had some answers back on the Sixth
Army Group forum from RogueJK,
Heeresbergführer
and pzrwest, about the question I posted on
there about the
cap badge positions. And I have been very kindly supplied the picture on the
right to help me, which has answered all of questions about how the badges were
worn on the cap. Also some additional information about the chevron on the front
of the cap as below.
Note From RogueJK -
Those semi-official divisional badges were
generally worn behind the Edelweiss badge. So switch positions, and you'll be
good to go.
You'll also want to repaint the chevron on the cap to something other than
Infantry white. Jager green would be the most likely, but if you're wanting to
represent a member of the 5. Gebirgs-Division's organic mountain artillery
regiment (red), mountain anti-tank battalion (pink), mountain recon or signals
battalion (yellow), mountain engineer battalion (black), or medical or supply
battalion (blue), then paint it the corresponding waffenfarbe color to match
their shoulderboards.
Note From
Heeresbergführer -
If you are doing a Gebirgs-Sani from the 5th
Gebirgsdivision in Italy (1943 or later) wearing a tropical cap, then you need
to take off the Waffenfarbe chevron on the cap. The chevron was deleted from
tropical caps in 1942.
Note From
pzrwest -
Although the order to remove the soutache in
1942 they still continued to wear them and even the manufacturers continued to
apply them till stocks ran out of the soutache braid (also known as Russia
Braid). So if you can't remove the braid you can leave it and still be correct.
That being said if you can remove the braid, but it does look cool on the cap an
could signify an "old salt" as veterans were called.
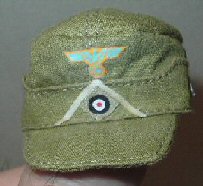 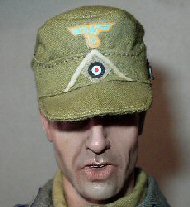
Note: The
first two pictures above show a new Soldier Story cap with the chevron on it, the
next one is after I have removed it, and the last picture shows the badges in
the correct positions. How I did this is on my
German Alterations 2 page.
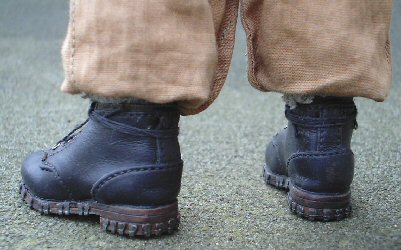
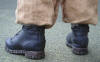
 Boots Boots
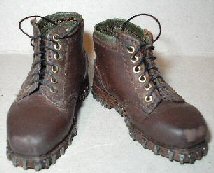
The boots I have used for this figure are a
re-painted pair of DiD boots, this again was an experiment by me. To see if I
could get the boots looking different from the colour they were from the
manufacturer. I have a section on my website about how I did this
here.
The pictures on the right show the boots after
I have painted over them with the acrylic Model Color Matt Medium paint. I have
found that this paint is very good for dulling down the new shiny look they
have, plus it dries both clear and with a matt finish. So I don't have to
worry about matching the paint colours of the item that I am re-painting. I also
carefully added a scuff mark to the front of the boots with some sandpaper.
Important note: I have also added a scuff
mark to the front of these DiD boots, but I do advise being very careful
doing this with the boots. Since the 'pleather' material is a lot thinner than
the Toys City boots and it
tears very easily, so if you try this be very
gentle with the sandpaper.
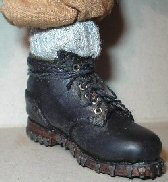 With
the boots I was going to use the Brown pair, but in the end I have gone with the
repainted Black pair of DiD
boots as
shown on the right. The main reason for this is, that when I looked on
my shelf most of my Gebirgsjager troops have the Brown boots, so for this figure
I decided on the Black one's instead. So as shown on my
Boots Alteration page
I repainted a pair of the Brown boots Black instead. With
the boots I was going to use the Brown pair, but in the end I have gone with the
repainted Black pair of DiD
boots as
shown on the right. The main reason for this is, that when I looked on
my shelf most of my Gebirgsjager troops have the Brown boots, so for this figure
I decided on the Black one's instead. So as shown on my
Boots Alteration page
I repainted a pair of the Brown boots Black instead.
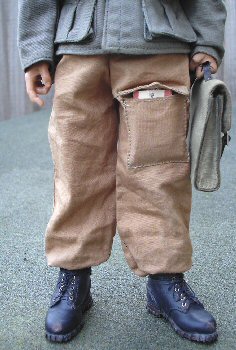
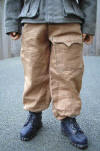
Also with the boots and trousers I could not make
up my mind about them either, so instead of puttees or gaiters I have used a
pair of socks to
blouse the
trouser bottoms over the top of the boots.
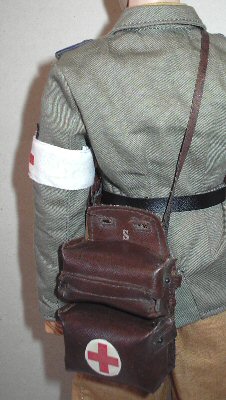
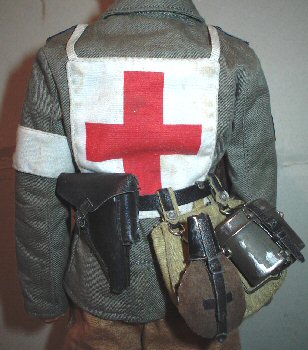
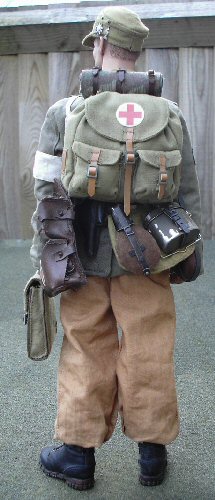
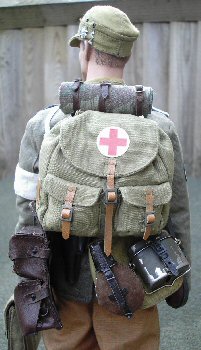
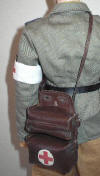
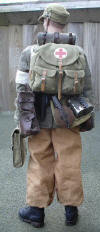
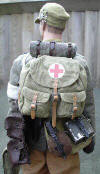
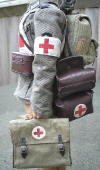
Equipment and Weapons
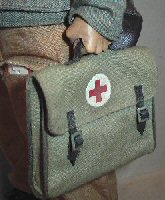
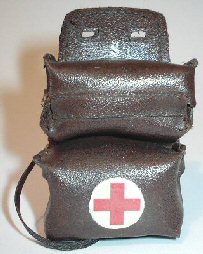
The four pieces shown above are made by Dragon for
their German medical figures. The first pack was repainted with some
Cryla Rowney Burnt Umber No 223 artists acrylic paint, and then 24 hours
later I rubbed it over with some Dark Tan shoe polish. This had two results that
it lost the toy plastic look it had, plus the polish allowed me to shine it up a
bit to bring out the vinyl detail. I then applied a Red Cross decal to the
front, and drybrushed over the whole pack with some Light Sand Tamiya Weathering
Powder.
 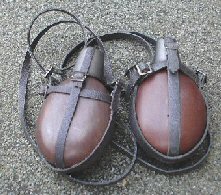
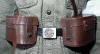
 The water bottles and straps were painted with
some Model Color Matt Medium paint to dull them down, and then I also went over
the straps with the Light Sand Tamiya Weathering Powder. The small medical
pouches above were repainted with a combination of the Burnt Umber No 223 and
247 Raw Umber artists acrylic paint, as I wanted a different colour to the large
pack. These too were then later wiped over with the Dark Tan shoe polish, left
to dry and then polished to a slight shine. I then drybrushed over the them with
some Light Sand Tamiya Weathering Powder. The water bottles and straps were painted with
some Model Color Matt Medium paint to dull them down, and then I also went over
the straps with the Light Sand Tamiya Weathering Powder. The small medical
pouches above were repainted with a combination of the Burnt Umber No 223 and
247 Raw Umber artists acrylic paint, as I wanted a different colour to the large
pack. These too were then later wiped over with the Dark Tan shoe polish, left
to dry and then polished to a slight shine. I then drybrushed over the them with
some Light Sand Tamiya Weathering Powder.
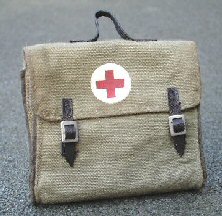
The cloth medical satchel had the straps and
handle painted with the Model Color Matt Medium paint to dull them down, I then
went over the top of the bag with some Mud Tamiya Weathering Powder to add dirt
stains, After that I went over the edges with the Light Sand Tamiya Weathering
Powder to lighten them.
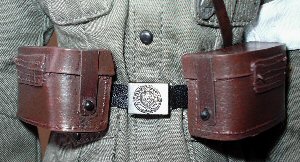
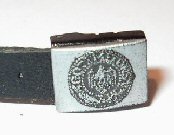
The
belt and buckle were made by Toys City, and I have found that it has the best
detail. To bring this out I gave the buckle a wash of some Black acrylic paint,
and when it was almost dry I wiped over the top of it with a soft tissue. It
took a couple of attempts to do this, and the end result is that the paint is
left in the buckle detail as shown. I then drybrushed over the belt strap with
some Light Sand Tamiya Weathering Powder.
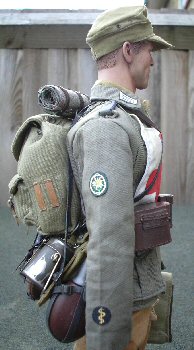
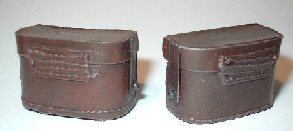
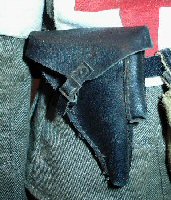
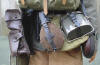
The
pistol holster is from DiD, and it has had the same treatment as my other
'pleather' parts I have used on my other figures. I first painted it with some Model Color 540
Matt Medium to remove the glossy look, I then used some Brown pastel chalk which
I ground up to a powder, and brushed it into the edges and gaps. How I did this
is here.
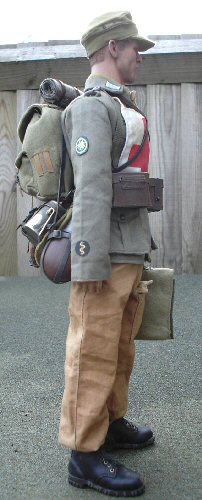
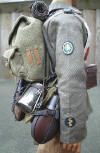
The four pictures below are of the Dragon backpack
that I want to use with this figure, and I have had some help in finding out
that it came with the Soldat 4 Arnold Schone figure. The first of the four is
the new pack, the next three are of the pack after I have used some Light Sand
and Mud Tamiya Weathering Powder on it. The Red Cross emblem is a decal I made,
which I put onto some double sided tape, cut to shape, removed the backing and
then applied to the pack. The straps were also made by me as I did not have any
available here.
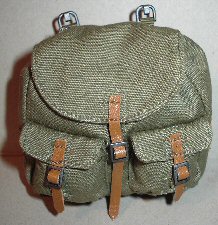 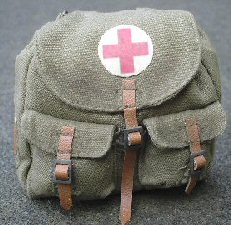
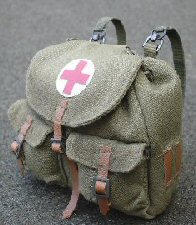
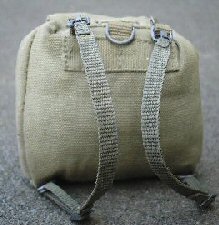
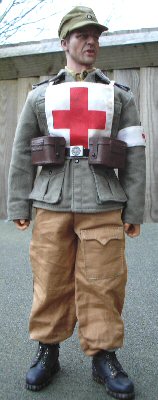
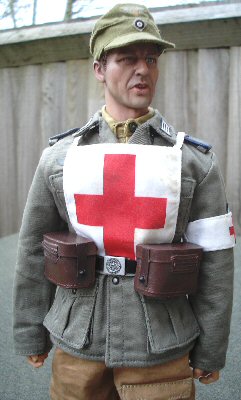
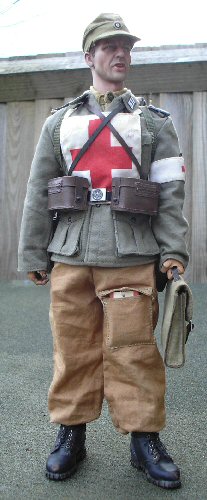
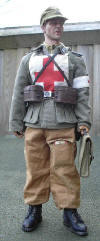
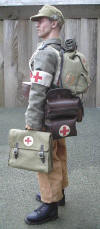
Figure Assembly
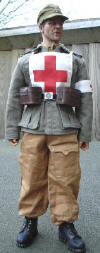

The pictures above are mainly to show how the
figure is progressing, as I wanted to also see how the pouches fit onto the
figure. The next pictures are of the figure with the uniform, boots and a Red
Cross tabard to see how it all goes together. The last picture above on the
right is of the belt kit I have put on this figure.
Various pictures of the
finished figure


I would like to thank RogueJK for his
excellent help, with the picture about the cap badges, backpack and the cap chevron
colour.
Thank you to Heeresbergführer for all of the
superb pictures and the detailed help with my Gebirgsjager figures.
And thank you to pzrwest
for also helping with the cap chevron. |