|

Welcome To My Modern Equipment
Alterations Page Two
4D AKS-74 Assault Rifle 4D SDV Sniper's Rifle
4D AKS-74 Assault Rifle
With my
new kitbashes of some Russian Spetsnaz figures, one thing that has shocked me is
the loose parts price of the DAM and KGB Hobby weapons, especially the AK-74
rifles. And after mentioning it to some other modellers, I was pointed to the 4D
AK-74 model puzzle which is made in 1/6th scale. And with a little bit of work,
they can be made presentable to be used with 1/6th figures. Two
very good reviews of the various sets made by 4D are
here and
here, I also found out about a page on the
bbicn website.
Where they have had some excellent looking results with repainting these models.
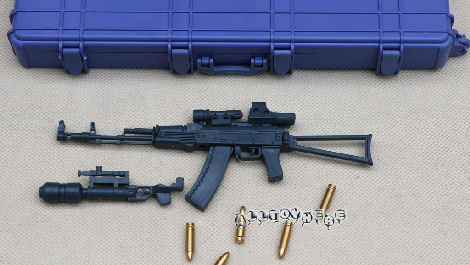
For my figure I bought the AK74 model, and I have re-painted it as below. I have also used this method before on my
KGB Hobby AK-74 rifle.
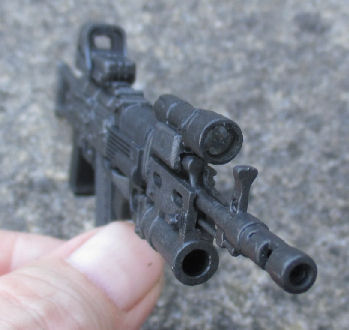
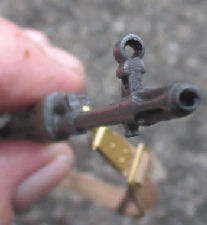
Rifle
Parts
The model came assembled in Picture 1. in a
plastic gun case, and as shown in Picture 2. it can be taken apart to the separate pieces. Which I found did help a lot with the painting and alterations I did.
1.
 2. 2.

Assembled & Re-painted Rifle
3.
 4. 4.
These pictures are of the altered rifle, in picture 3. I have cut off the solid moulded lug on the stock, and I have replaced it with a sling buckle made from a staple.
I also made a hole in the other sling attachment point, so that I could use my needle files to remove the centre part of the solid moulded lug. The acrylic paints I used for this model were made by Citadel (Warhammer)
Abaddon Black & Leadbelcher, the paints were mixed by adding a tiny drop of the Gunmetal paint to the Black. Then when dry I gave the rifle a wash of just the
Black paint to add depth to the recesses. Then when dry I gave it a brush over with some Tamiya Gunmetal weathering powders, the purpose of this is to add
highlights to the raised areas. I also gave what would be the Black plastic parts of the rifle, a drybrush of some Tamiya Coal Black weathering powder to
dull these areas.
5.
 6.
6.
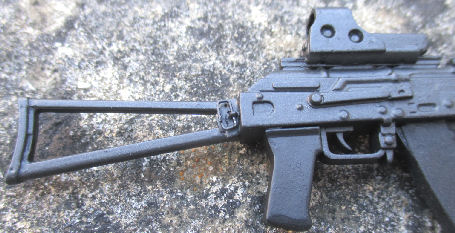
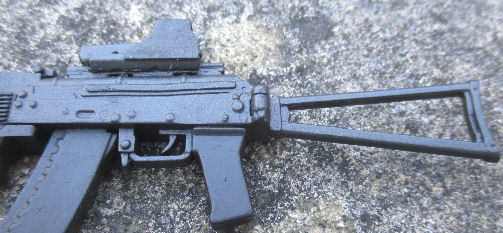
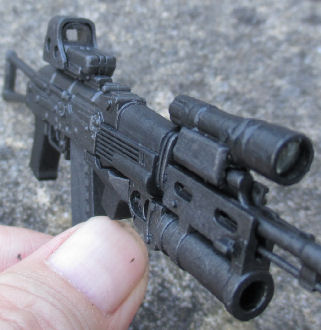
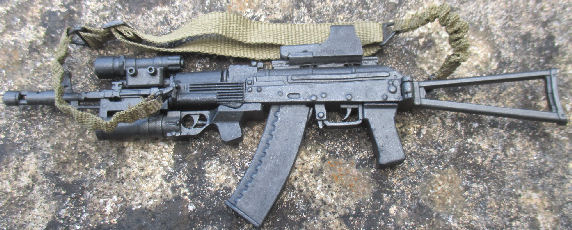 Picture 5.
shows the sight on top of the rifle, into which I have cut two thin pieces of plastic to represent the lens of the sight. I first removed the top cover, then
cut the plastic to a rough shape, glued them in place and when dry I sanded them to the final shape. Picture 6. shows the end
of the flashlight, into which I have fitted a 5mm Clear lens which I found was a nice tight fit. Picture 5.
shows the sight on top of the rifle, into which I have cut two thin pieces of plastic to represent the lens of the sight. I first removed the top cover, then
cut the plastic to a rough shape, glued them in place and when dry I sanded them to the final shape. Picture 6. shows the end
of the flashlight, into which I have fitted a 5mm Clear lens which I found was a nice tight fit.
The picture on the right shows the finished rifle with a sling added. Note: I am not bothered
by the lack of detail on the trigger grip, as this will be hidden by the hand of my figure that will be holding it.
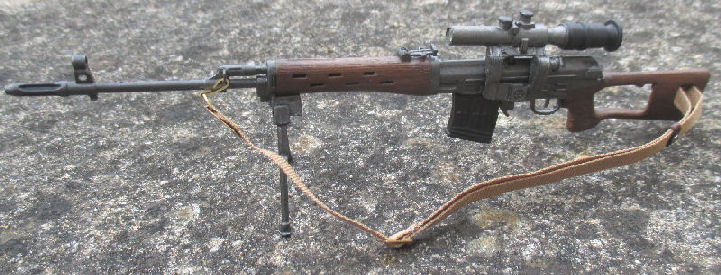
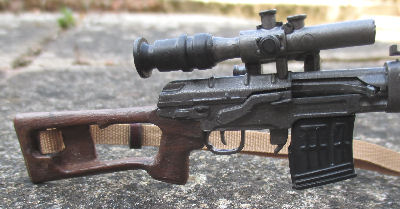
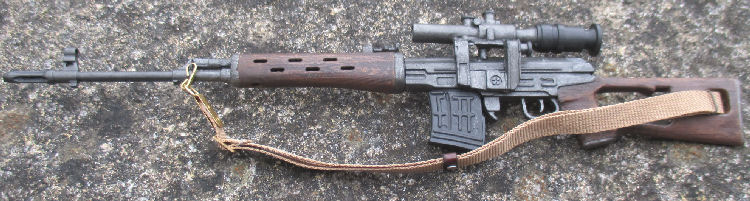
4D SDV Sniper's Rifle
This is a 1/6th model of the Draganov SDV sniper's rifle made by 4D. And below
are the photo's of my model after I have assembled and repainted it. The paint
colours I used for the basic wood colour was
Vallejo Model Color
143 Flat Earth & 183 Natural Wood, which I mixed together to get a wood colour.
In all I think I repainted the wooden parts 3 times, with a slightly different
shade of the mixed paint to get a colour that I was finally happy with.
7.
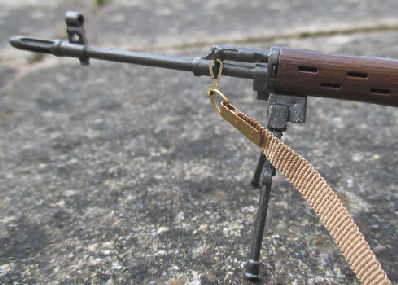
And once this was dry I then used some Cryla 223 Burnt Umber artist's acrylic
paint, which I used almost dry straight from the tube to add a streaky dark
grain to the wood. This was then gently blended in on the other paint with water
to smooth the colour out.
8.

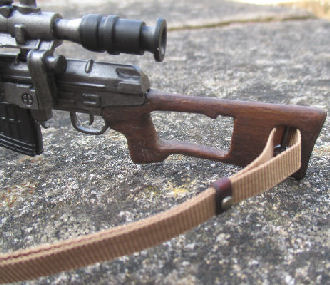
Below is the stock of the rifle with one end of the DAM rifle sling I used with
this model, at the other end is a clip attached to a sling attachment point that
I made from a staple. Which I glued into two holes I made in the rifle to secure
it in place.
9.
 10. 10.
11.
 12.
12.
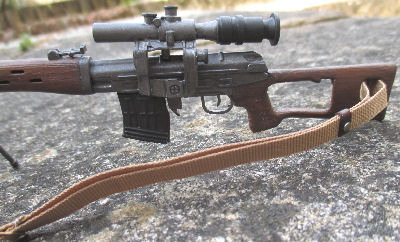
 These photos are of
the metal parts of the rifle after I repainted it with some
Games Workshop paint. The colour again was a combination of paint colours
mixed together, such as acrylic Citadel Abaddon Black, Ironbreaker and
Leadbelcher. I cannot remember what combination I used as again I repainted the
parts twice, to get a colour I was finally happy with. These photos are of
the metal parts of the rifle after I repainted it with some
Games Workshop paint. The colour again was a combination of paint colours
mixed together, such as acrylic Citadel Abaddon Black, Ironbreaker and
Leadbelcher. I cannot remember what combination I used as again I repainted the
parts twice, to get a colour I was finally happy with.
The back parts of the
scope was just painted with the Citadel Abaddon Black paint, along with the top
parts of what I think are the scope adjusters. Once this was all dry, then gave
the metal parts a wash of the Black paint, to add depth to the rifle parts.
Before I gave the parts a drybrush of some Tamiya Gunmetal and Silver weathering
powders to add highlights. The magazine was left unpainted, but I gave it a
drybrush of some Tamiya Soot weathering powders to lose the plastic look it had.
The photo on the
right, shows where I have used my model knife which I twisted inside the end of
the scope to enlarge it slightly. Before I fitted a 4mm Clear plastic lens into
the end of the scope to represent the glass. I got the lens from this store -
Little
Cars.
I also found that the
fore sight and the end of the barrel were made solid, so I again used my model
knife to twist and make a hole in these items. Which I enlarged slightly with a
round needle file.
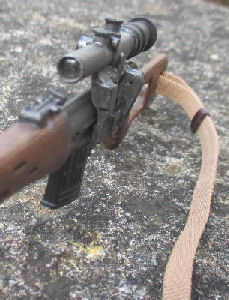
Update:
I have had some advice
given to me regarding the bipod on this rifle, because on the box picture the
bipod is
 supposed to be fitted in
front of the magazine. Instead of as displayed in the assembly instructions,
where the bipod is fitted in Pictures 8. &
9. supposed to be fitted in
front of the magazine. Instead of as displayed in the assembly instructions,
where the bipod is fitted in Pictures 8. &
9.
So rather than make a
new bipod mount for this model, I have taken the easy option and I have removed
the bipod mount, as well as the lug it fitted onto. The two pictures below, show
how after removing the lug I have had to reshape and also repaint some parts of
the rifle.

This section is continued on
Page Three | 