|

Welcome To My Modern Equipment
Alterations Page Seven
DAM FSB Boots Repaint 1 DAM FSB Boots Repaint 2
DAM FSB Boots Repaint 1
I bought the new DAM FSB Luxury
figure recently, and it is a very nice and fully loaded
figure. But the boots, although well made. Just did not look
right to me, as the colour of the leather bothered me.
So I did a search online for any
images of the type of boot, that it is supposed to be. And the
nearest one I could find is in the picture on the right. And
as usual with me I just had to see if I could re-paint the DAM
boots to match the picture here.
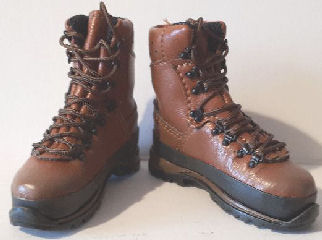
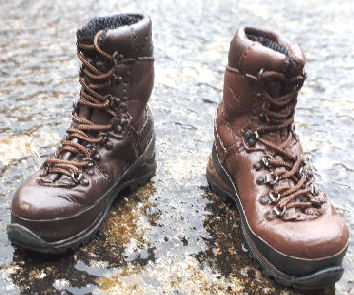
Picture
1. shows an extra pair of the boots as they came
from the figure, that I bought loose to use as an
experiment. To see if I can re-paint them.
Picture
2. shows the main parts of the boot re-painted
with
Citadel Colour Scorched Brown 61-12 acrylic paint. This
took a bit of time to do, as I had to paint as much of the
boot as I could, and then let it dry for about an hour. That
way I have found that the next touch up of the boots with the
paint, it now has something to 'cling' onto. So that I can get
a flat even Brown colour, and all of the original boot colour
is hidden.
I have found that the boot now
has a semi-gloss appearance once it dried off, but I am not
worried about that. As I am going to use some Tamiya
weathering powders to dull the boots down, and also add a
weathered effect to them when I have finished.
1.  2. 2. 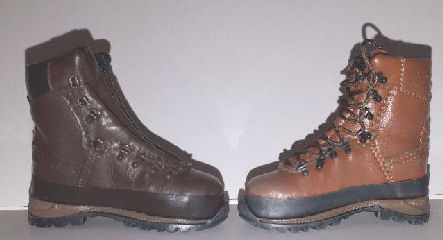
3.
 4.
4. 
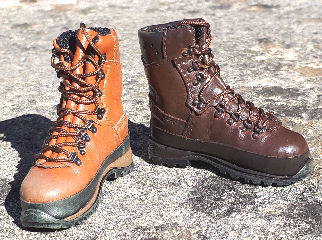
In Picture 3.
I have had to re-paint the ankle pad on the rear top of the boot, and the Black
rubber strip on the side of the boot. The two different Brown colours were each mixed
separately, by trial and error to get a colour to match the picture above
right. I have also re-painted the Light Tan band at the bottom of the boot, with
another different mixed Brown colour.
In Picture 4.
I have used my model knife to scrape at the eyelets of the boot, to get the
metal parts shiny and worn. I have also squeezed the boot together, which helps
to crease it, so that I can really lose the new look of the boot. To help
explain better about the boot changes I have done -
Boot Repaint. I then used some Tamiya Rust weathering powder,
scrubbed into the boot to lose the shine from the paint. On top of this I have
given the boot a very light drybrush of the Tamiya Light Sand weathering powder.
To add a dusty effect and to add slight highlights to the sewn edges. Note: Because
I have only done one boot here to demonstrate how I did this, the hard part now
is trying to match the mixed Brown colours on the other boot.
DAM
FSB Boots
Repaint 2
To add some more variety
to my figures, I have bought another pair of the DAM FSB Luxury figure boots. As
I wanted to repaint another pair of boots, with some other Brown acrylic
paint. So it is a slightly lighter colour, and in between the two boots as shown
in Picture 4. above.
During my search for
1:1 hiking boots, I found a great variety of them, and I found that Tamiya XF-64
Red Brown is the
nearest colour to the one that I want to use to re-paint these boots.
5. 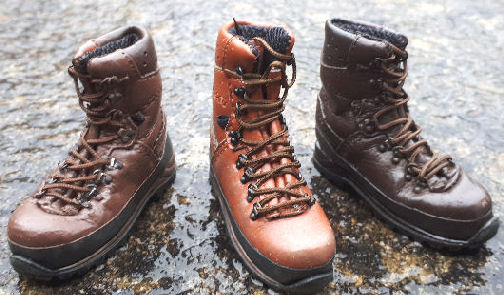 6. 6.
In Picture
5. I am showing from the left, the new
re-painted boot with the Tamiya paint. The centre boot is a new un-painted boot
as made by DAM, the boot on the right is the one I re-painted earlier with the
Citadel paint.
Picture
6. shows how I have just finished
re-painting the main boot pleather material with the Tamiya paint, and the top
ankle pad was re-painted with the Citadel Colour Scorched Brown paint. After it
had dried fully I squeezed the boot together to add the creases. Which helped to
show up the parts that needed to be re-painted again. The strip above the boot sole that
I have re-painted Black. For this boot, I have decided to leave the strip below
this in the original colour that came with the boot.
The boots were like the
others above, I used some Tamiya Rust weathering powder, to dull down the paint.
I then gave them a very light drybrush of the Tamiya Light Sand weathering
powder, to add highlights to the seams.
This section is continued on
Page Eight
| 