|
Welcome
To My Pastel Washes Page.
I have made this page up to hopefully explain how
I do my pastel washes on my figures, as I have just realised that I have not
done this yet because I have various pieces of information spread out on my
other pages, and I have never got around to putting all of the information
together in one place.
Brushes
 Important Note:
Make sure that you keep the brushes that you use for any pastel washes separate
from the other brushes, because as I was reminded by Paul (308). If you
use the same brushes for both the paint and pastels you can cross-contaminate
the pastel wash, with the chemicals (thinners) that you clean the paint brushes
with and like me you can end up ruining the headsculpts. Important Note:
Make sure that you keep the brushes that you use for any pastel washes separate
from the other brushes, because as I was reminded by Paul (308). If you
use the same brushes for both the paint and pastels you can cross-contaminate
the pastel wash, with the chemicals (thinners) that you clean the paint brushes
with and like me you can end up ruining the headsculpts.
Plus it is better if you buy the softest and best
brushes to do this with as it does have an effect on the end result, and I
recommend staying away from the synthetic haired brushes and go for the artists
or modellers type of brushes instead. Synthetic artist paint brushes are good for acrylic
painting such as 1:35th scale, but for the purpose of pastel washes they don't
absorb water, and they tend to be cheaper. Whereas with the natural artist or
modellers paint
brushes they are a good for this task especially the bristle brushes, such as
the squirrel or sable brushes which are both natural but they can be expensive.
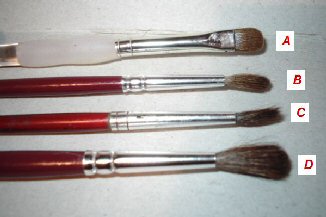
The type of brushes that I use are shown on the
right.
A - is the one
that I use to put the pastel wash onto the headsculpt as I find that the flat
brush is best for getting the wash onto the head.
B &
C - are the one's
that I use for blending the almost dry washes on the head.
D - I use for lightly drybrushing and blending the
dry Flesh coloured pastel chalk on the head.
Pastel Chalk Dust

The chalks that I prefer to use for this are the
soft artists chalk pastels (not the Oil pastels) like the one's made by
Faber Castell, as they can be bought separately which is a lot cheaper than
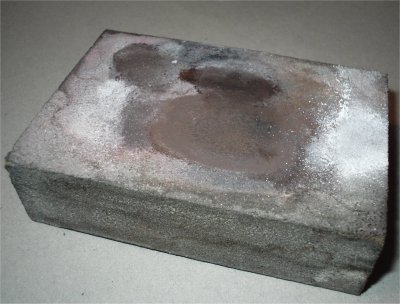
buying a set. To
do the pastel washes I first have to get some dust, and what I use is a foam
sanding pad, and all I do as in the picture above left is gently rub the pastel
chalk onto the pad and then add some water to it. This then gives me the 'mix' I
need to do the pastel wash on the head. For the Brown pastel I use one side, and
for the flesh colour I just turn the pad over.
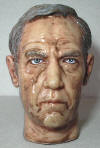
Note: I have
found that by using a Light Brown chalk pastel it adds only a slight tint to the
face as shown right, otherwise the face will become too dark when the
chalk dries completely. Also, I have found that with the different manufacturers
paint that they use on the heads, it is better to use a light pastel chalk to
add the darker colour.
Pastel Chalk Wash
1.
 2. 2. 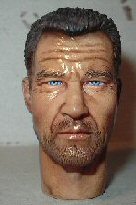 3. 3.  4. 4.  5. 5.
 6. 6.
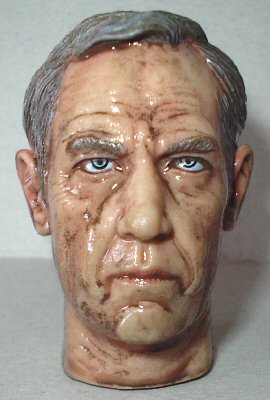
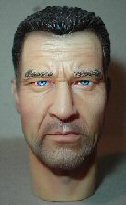
These pictures are of the pastel wash that I gave
the DiD William Bowman head as it comes from out of the box.
1.
The first picture above
shows the head as it came from the boxed figure.
2.
The pastel chalk has been mixed with some water, and just lightly brushed over the
head (A), making sure that I let it run into all the creases of the face and
especially the eyes. Note: The Brown chalk has slightly
darkened the face, and this can be a problem if you use too dark a Brown pastel
chalk.
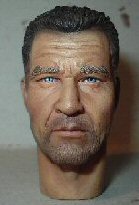
3. Here the head is almost dry,
and the next step is to remove most of the pastel chalk from the head.
Pastel Chalk Removal
4. This picture is of the partially dried chalk
has been wiped off gently with a moist tissue, this is to remove most of the chalk from
the highlights of the head. Note: Try not to rub too hard on the
face when wiping the wash off the head, as this can create a shine on the original paint.
5.
Depending how damp the tissue is, and how much of
the chalk remains in the creases it should start to look like this.
Note: Sometimes I have to go back over the
head again with some water and a touch of the pastel chalk, to get the Brown
colour back into the face creases again. As it dries, I blend the colour into
the face with the dry paint brush (B &
C).
Pastel Chalk Highlights
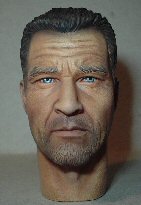
6. This is the
headsculpt after I have left it aside to dry for a few minutes, and I have added
a light drybrush of the Flesh pastel chalks (D).
All the head needs now is a wet fine pointed paintbrush to remove the chalk from
the eyes and lips. When that is dry I put a drop of clear gloss varnish on the
pupils of the eyes to make them shiny, and on the line between the lips. Note: I have found out
by trial and error, that sometimes the lighter pastel chalk can add too much of
a highlight. And it is not until I photograph the headsculpt do I realise it, so
now I do the drybrush, take a picture and see what the effect is like and add or
remove as necessary.
Final Reminder Note:
You can see in the pictures above how the Brown chalks alter the colour of the
paint, so this is why I recommend using a lighter Brown pastel chalk for this
process.
I would like to thank
Paul (308) for his help with my paintbrushes. |