|
Welcome
To My Paratrooper Pathfinder Page.
This page was an idea I have had for some time but
never got around to doing, because of the lack of reference pictures that I
could use for it. So, it always got put back as one of those projects or
kitbashes that I will get around to at sometime in the future. It was not until
I saw the excellent figure done by JTFazz (Ty) on the Sixth Army Forum,
that I realised just how good a US airborne figure looks with the SCR-300 radio.
The work done by JTFazz is here
Radio Man
Kitbash, and after seeing this excellent kitbash I am afraid that I just had
to copy the idea. Mainly because it is a kitbash of a US airborne soldier, and
because it is unusual in that did it happen or didn't it? Plus the fact that JTFazz has a figure like that
and I don't.... Note: This kitbash is in no
way meant to upstage the excellent work, it has just made me get my
lazy backside in gear and make the kitbash that I kept putting off.
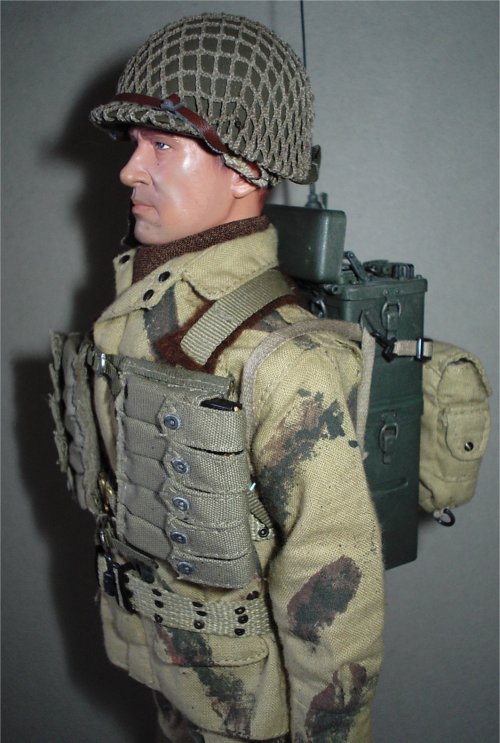
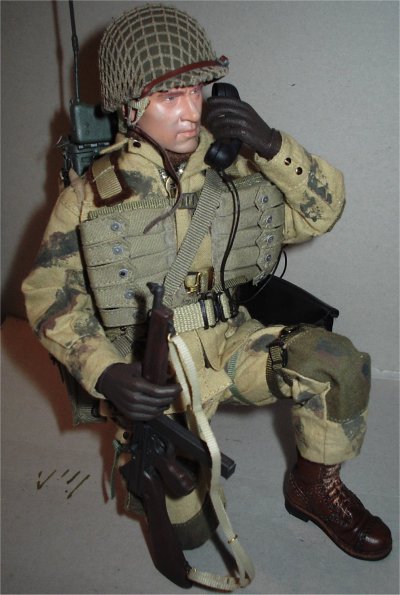
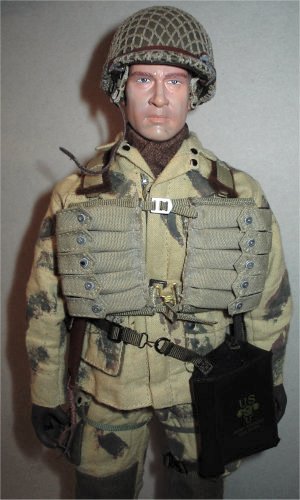
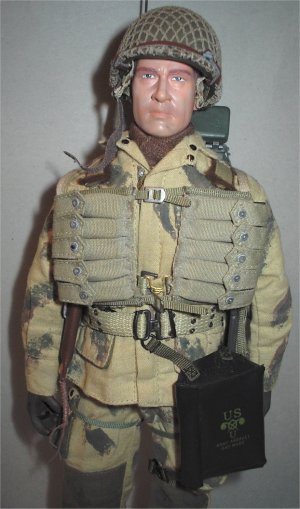
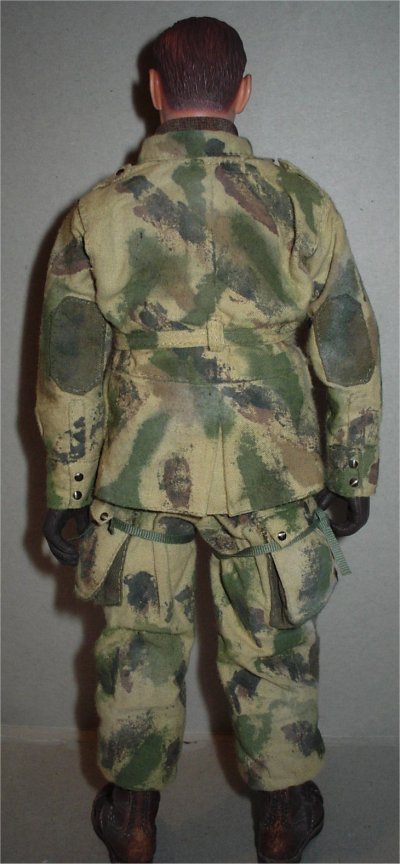
This is the basic figure as shown above the
uniform is from Dragon, but I don't know what figure it came from as it has been
in my spares box for some months now. The webbing straps and belt I think are
also from DML, the boots are from Newline, the radio is from the bbi Sparky
Parsons figure and the musette bag is also from bbi I think. The Thompson
pouches are one's that I made up here on my
Pouches page, and have
been sitting around for ages just waiting for a kitbash like this. The radio
unit is shown on my SCR-300
page, this particular project has been ongoing for about 4 months with detailing
the radio, and it was only after seeing the kitbash by JTFazz that I got myself
to actually finish it off.
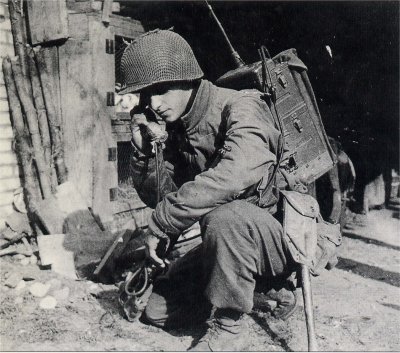
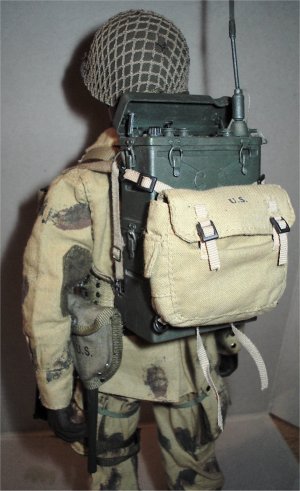
The pictures below left and centre are from the book that came
with the Sparky Parsons figure it shows the radio unit being used
without the packboard, and it was this that got me thinking about how could I
make this? The problem is that if I had the belt for the radio with the
soldier's kit on it, then when he dropped the radio unit he was separate from
his belt kit. So I looked closely at the picture below left and it looks like
the shovel is not attached to the radio belt, so the soldier had to be wearing
his belt kit separately.
 Radio
and Belt Fitting Radio
and Belt Fitting
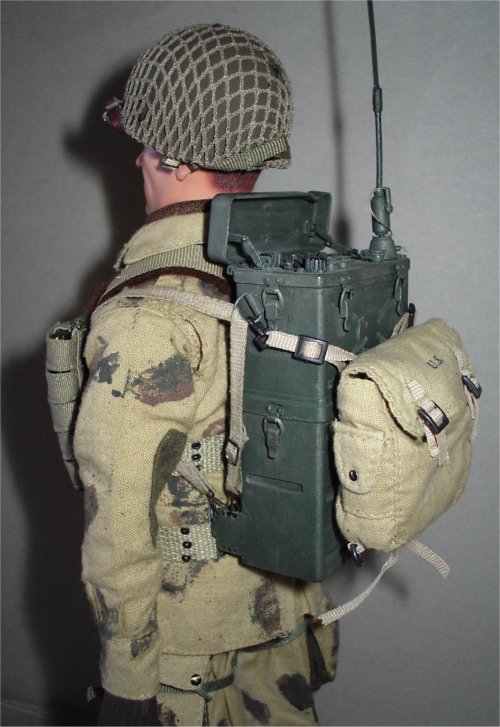
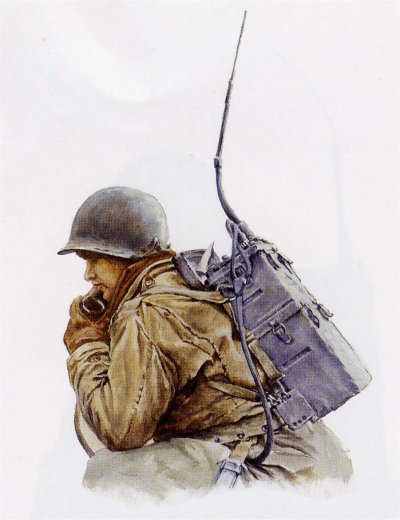
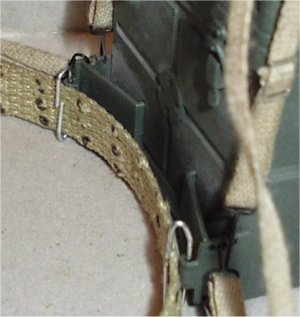
With the picture on the right, it shows how I have attached a canvas ammo belt
to the bottom of the radio unit. To do this I found some thin pieces of wire and
bent them so that the belt can thread through them and they can be hooked onto
the Belt Carrier Brackets on the radio. In the picture above right this was
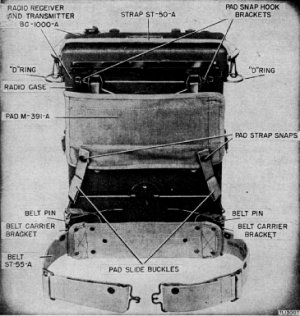
copied from a manual on the SCR-300 radio and this shows the belt attached as I
have done here.
Radio Manual Page -
http://www.scr300.org/index-tifs.html From this site the pages I found
useful are Sections 15 to 18, 55 & 61 to 65.
Two things that I have not included when I fitted
the radio to the belt are the fabric pads as shown above right. The reason for
this is that at the moment I don't have the material to make them, unless I take
material from the packboard itself and cut this up to make these pads, but
looking at the radio on the figure these cannot be seen so I may not even bother
making them.
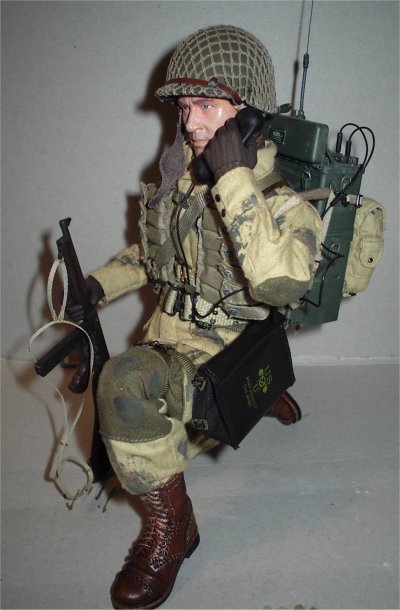
The two pictures below left are of the basic figure with
the belt kit on as I wanted to see what pieces would foul where the radio sits
on the figure's back.
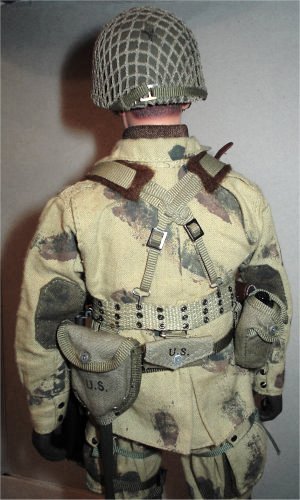
In the two pictures above right I have found that
with some re-arranging and moving of the kit I can
get all of the belt equipment on the figure and the radio fitted as well, in
that the belt for the radio has to go under the water bottle and .45 pistol,
above the shovel, under the bayonet and over the clasp for the gas mask bag. And
now by looking at it I have one very loaded up Pathfinder paratrooper, in fact
making this figure is almost as bad as the Corbin figure.
And now that I know that it all goes together, I
have to totally strip it all back down to a pile of bits so I can repaint all of
the buckles matt black, the belts and webbing a green colour and maybe add some
extra camouflage paint on the uniform, plus add some of the same on the musette
bag and the thompson pouches and pastel wash the headsculpt.
Uniform Camouflage
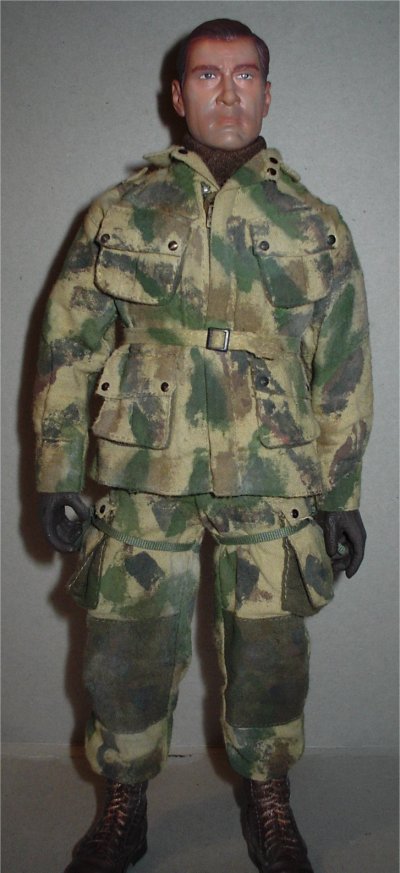
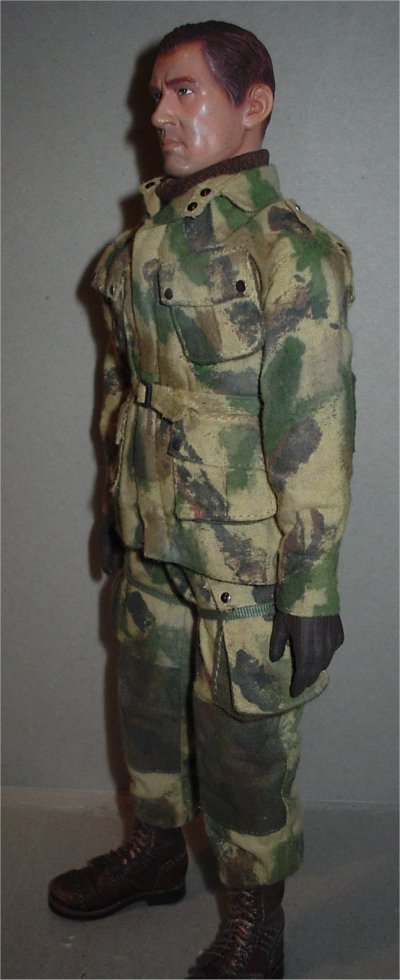
This is the uniform after I have stripped the
figure back down, and while it was like this I began to think that the
camouflage on the uniform needed a little bit adding to it. So I painted some
green stripes and brown patches with Vallejo acrylic paint. The colours I used
were 70823 Luftwaffe Cam Green + some Matt Black added in to darken it slightly,
the brown was 70983 Flat Earth. The paint was just put on in a random fashion to
try to break up the outline of the figure.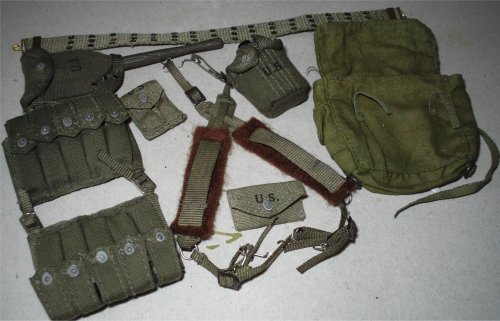
Kit Colours
On the right is some of the kit that I am fitting
to the figure, this has been repainted with various shades of dark green acrylic
paint to represent the various different colours that the cloth equipment were
made from. And I started to think
of all the different shades for the cloth material there are.
So to add some variety to my figure I got my
saucer I use and to the water I added a mixture of various shades of green,
black and brown acrylic paint, painted one piece one colour then weakened the
mixture with more water and painted another. Then I mucked about with the colour
again and repainted some other parts a lighter colour.
One thing I did make sure of is that the
ammunition belt is a different shade to the shoulder webbing, because those
being the same colour from the boxed figures has been annoying me for some time.
Plus the colour for the musette bag as it was I felt was the wrong colour, so
once again I mucked about with the shades and dipped/painted that a green
colour. I also repainted the straps and belt on the radio because again I
wanted them to look different to the belt kit.
Note: Another
item that I have made for this figure are the felt shoulder pads, as I did have
only one set that had these on it and I can't remember ever seeing any of these
for sale anywhere. So I had no alternative but to make them for myself, and they
were easier than I thought they would be.
All I did was I laid the webbing on some brown
felt and made two small cuts in it for the length of the strap as shown above,
then I cut out two rectangles slightly wider than the webbing strap. Once I had
those I cut two slots in each of the pads to thread the webbing through, when I
had done both of them I laid it all flat and trimmed off the ends of the pads to
make sure they looked even.
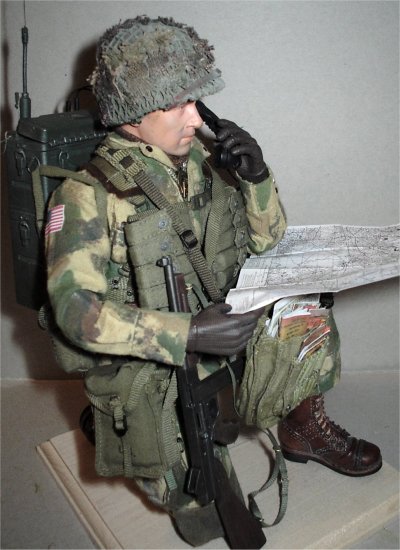

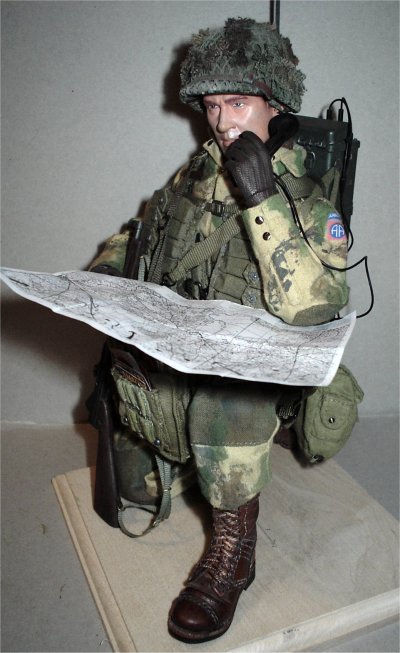
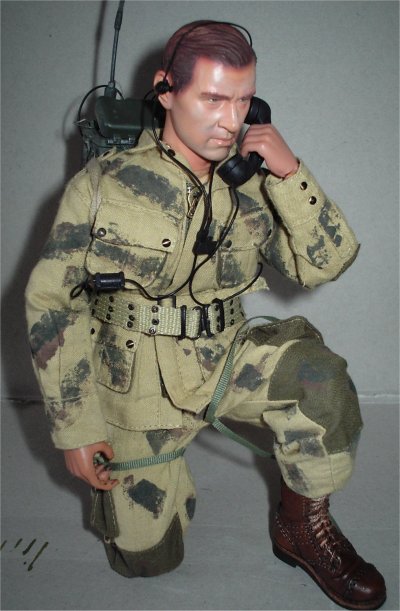
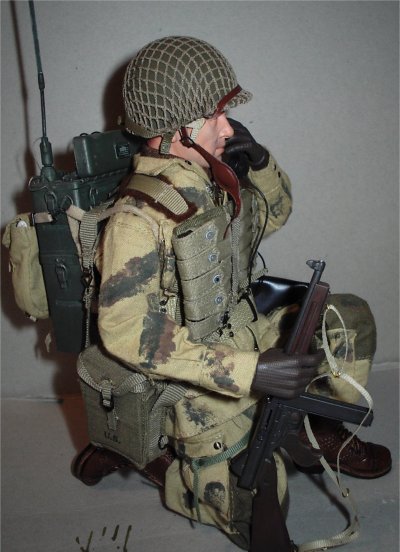
 The
pictures above show the pose that I want to get the figure into, where is
supposed to be taking a call on the radio whilst reading the map, which is being
held open on one edge by his elbow. Also shown is the different shades of the
webbing, straps, packs and equipment on this figure, plus the bbi musette bag
which has also been repainted a green colour. The musette bag has been moved
from the back of the radio, as I have some very excellent help from a fellow
modeller by e-mail called Paul. And he suggested the new positioning it as it is
above, in that the front strap is connected to the front shoulder webbing ring.
With the other strap connected to the webbing clip that connects to the ammo
belt, so that the musette bag now hangs down on the figures side. And I think
that this is an immense improvement on the way I had it before. The
pictures above show the pose that I want to get the figure into, where is
supposed to be taking a call on the radio whilst reading the map, which is being
held open on one edge by his elbow. Also shown is the different shades of the
webbing, straps, packs and equipment on this figure, plus the bbi musette bag
which has also been repainted a green colour. The musette bag has been moved
from the back of the radio, as I have some very excellent help from a fellow
modeller by e-mail called Paul. And he suggested the new positioning it as it is
above, in that the front strap is connected to the front shoulder webbing ring.
With the other strap connected to the webbing clip that connects to the ammo
belt, so that the musette bag now hangs down on the figures side. And I think
that this is an immense improvement on the way I had it before.
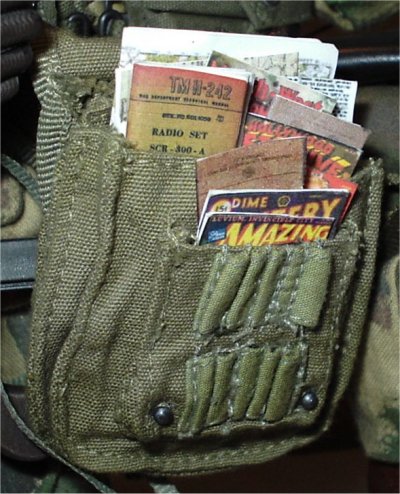
On the right is the DML despatch bag I have used
with my figure, because I thought that a radio operator would have had to have
some maps at least in the bag. It was during this search for the map images on
the internet, I got distracted with some comic book covers that had come up on
of the links. So after doing another search for those I found some from the
1940's - Pin Up
Magazines and Comics. So to make some magazines up I shrunk down the image in Microsoft
Word and then cut it out twice the width of the cover, folded it over so it
became a book. I did it like this because once the cover is in the pouch the
back and inside won't be seen.
I also did the same for the US Army manual covers
that I found as well, it was then that it dawned on me that the best thing that
the radio operator could have in the pouch, is the manual for the SCR-300 radio
itself. So I went to the page about the radio
here, and saved off some of
the pages to my computer which I again shrunk down to make the pages of the book.
I then cut them out and glued them back to back to make a book up, and then used
some glue on the folded edges to hold them together. I also used some of the
written pages inside the other manuals to fill them out.
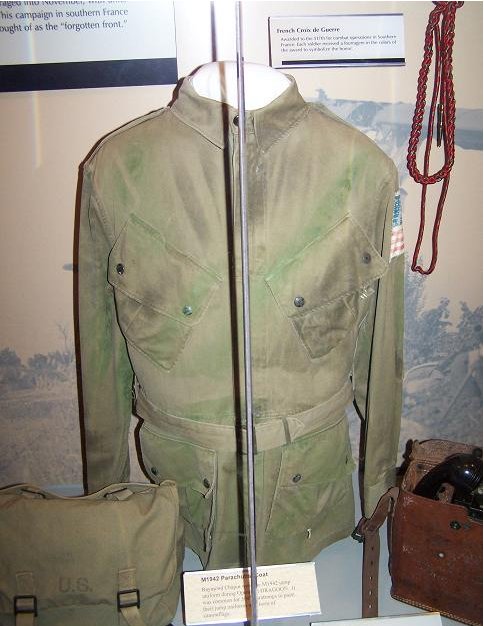
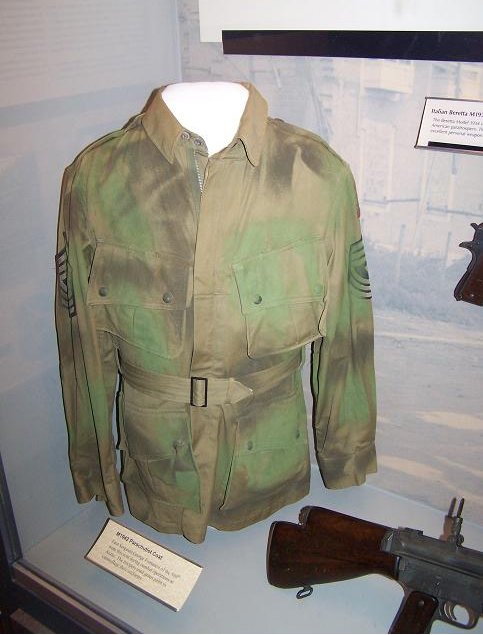
I have just received the two excellent pictures
below from Mike (kirk1168) of these jackets
that are in the Airborne museum in
Fayetteville,
USA. The information that was also very kindly supplied for them is as follows:
The text on the plates describing them said that they were
both painted by the owners, so I'm taking that as meaning that these jackets are
in the condition that they were in when actually used. Sadly, there were no
matching trousers on display.
This one below left was used by trooper of the 509th PIR at Anzio, and the one
on the right was used by a trooper of the 509th PIR for Operation DRAGOON, the
invasion of southern France. The plate stated that the troopers of the 509th
commonly applied paint to camo their uniforms.
| 