|

Welcome To My Spetsnaz 1 Kitbash Figure Page
As I was getting a bit bored, with having mainly one
type of spares to make only German figures. I decided to try
an see if I could leave the hobby alone for a while, but I
have slowly been dragged back to it after looking at the DAM
and KGB Hobby modern Russian figures. As I wanted something to
put together that is totally different from WW2 figures.
Which also hopefully, does not involve building up a large
store of spare parts, some of which may never get
used.
So this figure is based on the
KGB Hobby 001-B boxed set, and on the OSW forum I found a
review
about the sets, along with some very nice figures based on the
sets. The only problem with the sets are, that they do not
come supplied with a body, hands or boots. So I have had to
raid my spares boxes for these parts.
Headsculpt
1.  2. 2.
 3. 3.
 4. 4. 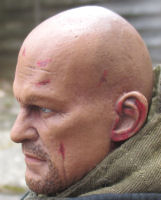 5. 5. 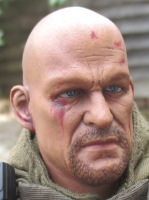
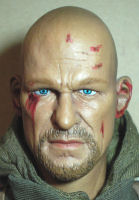
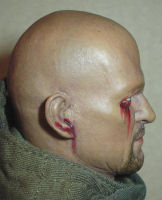
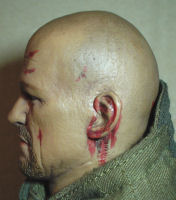
This is the HeadPlay headsculpt I used for this
figure, Pictures 1. 2.
& 3. are of the head
as I bought it. Pictures 4.
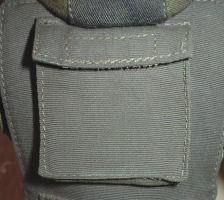
& 5. are
after I gave it a pastel wash, which added some depth to it.
 Body Body
The body I have used for this figure was a Normal
shoulder body made by Very Hot, which I have found is a very
good base for my model. I did a two page review of this body
Body1
& Body2 along
with some other types, to see how they all compare. Plus what
heads can be used with it, so it can give me a bit of variety
as to what body parts I can use.
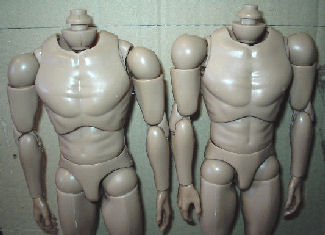
In the picture on the right, it shows the Narrow
shoulder body (B001) on the left, with the other Normal
shoulder body (B002) on the right. I did get confused at one
point as to what body was which, and it was not until I
looked at the picture on the right. Did I realise that the
only difference in the two bodies is the ball joint at the
shoulder. Otherwise both bodies use the same common parts and
joints to make them.
Note: Because I
have done so many trials of various head types on the Very
Hot bodies, I am not sure if the adapter it came with, is the
one I am now using to fit the head onto the body.
Clothing
6.
 7. 7.
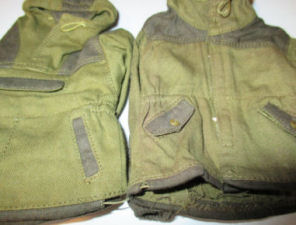
Picture 6. shows
a pair of the KGB Hobby Gorka jackets, the one on the left is
a new one. The one on the right has been washed and I then
gave it a wash of some Brown pastel chalk, I have made
another page to show how I did this on this
page. The result is that the jacket has a darker and
dirtier look to it, plus it has lost the new look of the one
on the left. Picture 7. is
of the 6B5 body Armor from the two box sets I have, the one
on the left is a new one. With the one on the right, after I
have given it a wash of some Brown pastel chalk to change the
colour.
8.
 9. 9. 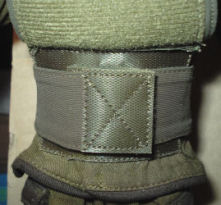 10. 10. 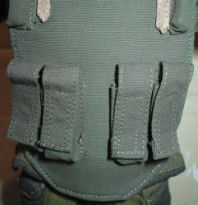 11. 11.
The pictures above show how I have fitted the 6B5
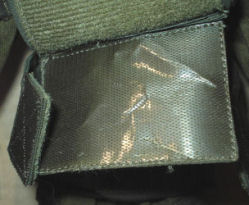
body Armor onto the figure, Picture 8. shows how the front flap has
been lifted up to show the velcro pad. Picture 9.
shows the side straps wrapped around the figure, so the
velcro pads stick together. Picture 10. shows the front flap brought
back down, and then fastened to the main velcro pad. Picture
11. shows the front of the
body armor tightened around the body, with the top straps
held in place with some double sided tape on the under
side.
The pictures on the right show the panel on the back
of the body armor, to help stiffen up the panel. I have put a
thin square of balsa wood inside it. The next picture shows
the panel closed up.
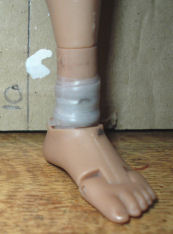
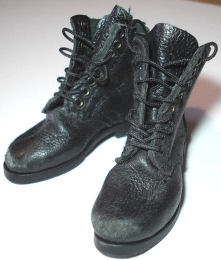
As the set did not come with any boots, I decided to
use a spare pair made by Soldier Story that I had in my spares
boxes. When I trial fitted the boots, I found the ankle
joints were quite weak, so I have had to wrap them as in
Picture 12 I also did the
same to the knees.
12.
 13. 13.
 14. 14.
 15. 15.
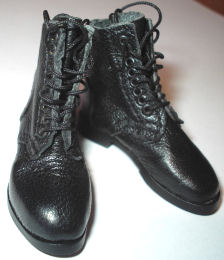
 Picture 13. is
a pair of new boots and as usual, to lose the new look that
they have I firstly repainted them with some Black artists
acrylic paint. When that had dried in Picture
14. I then folded up the boots to add some creases
to them, as well as adding some scuff marks with sandpaper to
the toe caps. Picture 13. is
a pair of new boots and as usual, to lose the new look that
they have I firstly repainted them with some Black artists
acrylic paint. When that had dried in Picture
14. I then folded up the boots to add some creases
to them, as well as adding some scuff marks with sandpaper to
the toe caps.
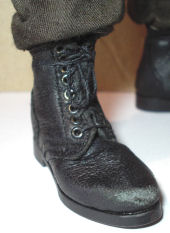
I then gave the boots a drybrush in Picture 15. of some Tamiya Light Sand
weathering powders, to add some highlights to the edges of
the boots and laces. It also shows how the boots are on the
figure, along with how I have bloused the trouser bottoms
into the tops of the boots.
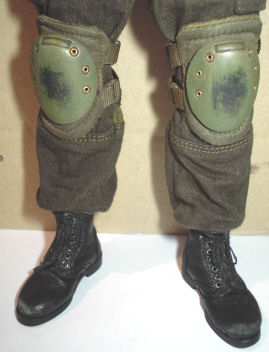
The picture on the right shows the DAM knee pads that
I bought loose to add my figure, these again have had the
same pastel treatment as the other items I have used. I have
also used some sandpaper to add wear marks on the centres of
the knee pads.
Equipment
With the equipment for this figure I have gathered
together a mixture of both DAM and KGB Hobby pieces for this
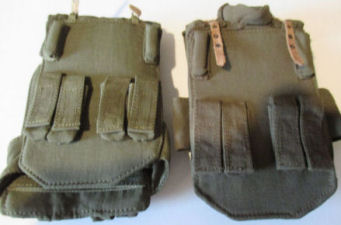
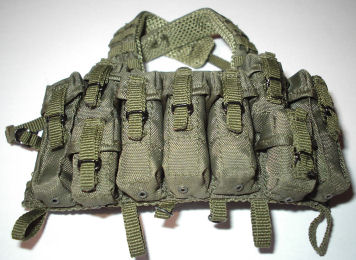
kitbash. Picture 16. is
the DAM lazutchik chest rig, which I bought loose as it came
with the belt loops on it and a belt. So that I could use the
items from KGB Hobby such as in Picture 17. on the belt as well. Note: The KGB set 001-B does not
come with a belt, so this was my reason for using the DAM
chest rig instead.
I have also made another page -
Modern Alterations. To show how I have given them a wash
of the Brown pastel chalks, to both make them look old and
also dirty. So that the whole figure looks like well worn,
and it is far removed from the new look everything had
originally.
16.
 17. 17.
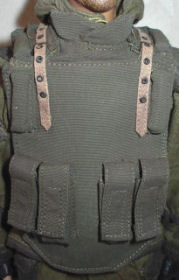
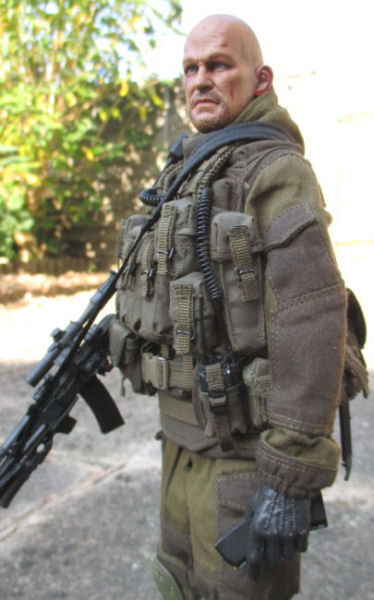
Equipment
Assembly
With this kitbash I have had to do a lot of thinking
about how the equipment goes together on the figure, Picture
19. shows the figure with
the armor vest on top of the Gorka suit. Picture 20.
shows the chest rig that has been fitted over the top of it.
Note: Fitting the chest
rig takes a bit of time, as I have to adjust the plastic
buckles as far as they can go. Without having to adjust the
metal clips, as I have found that they can be weak and break
if handled roughly.
Lazutchik Chest Rig
Fitting
18.
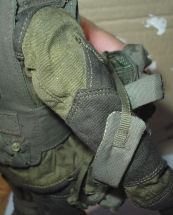 19. 19.
 20. 20.
 21. 21.
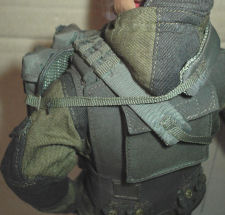
These pictures show the steps I took to get the chest
rig on the figure, Pictures 18. & 19. has the outside one of the
pair of 'X' straps pulled up over one of the arms. Note:
It may be easier to remove the head if possible at
this point, and refit it again afterwards. So that in Picture
20. the inside strap is
against the neck, this then has to be pulled up and over the
head, to end up as shown in Picture 21.
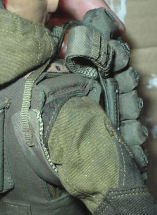
22.
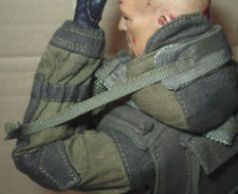 23. 23. 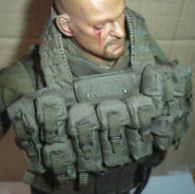 24.
24.  25. 25.
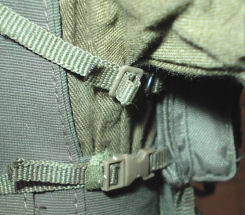 
Then in Picture 22. the thinner part of the
strap has to be gently stretched to allow the arm to be
pushed up to allow the strap to go under the arm. Pictures
23. &24.
show the front of the chest rig in place, which then has to
adjusted so that it sits level on the front of the body. I
also pulled the hood up, so that it sits over the top of the
straps.
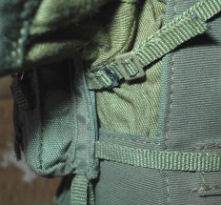
Picture 25. shows
the left rear straps which I have adjusted to take up the
slack, so that the chest rig tightens on the body. The
picture on the right shows the right hand side straps, again
the top one is tightened up. The bottom one is a long strap
that comes across the back to buckle up, which again is
adjusted to make the whole chest rig fit tightly.
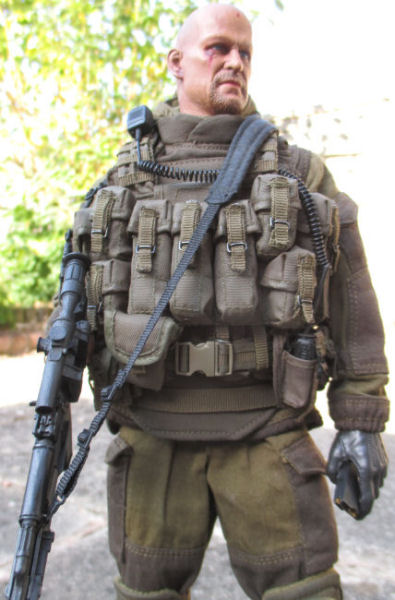
Belt Equipment
Fitting
The picture below shows how I have worked out where
the belt equipment pouches fit onto the belt. This has to be
done by a combination of threading the loops on the back of
the pouches, as well as fitting them through the support loops
on the bottom of the chest rig as well.
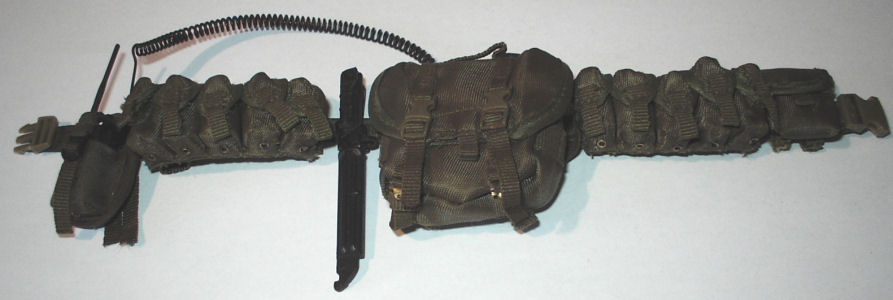
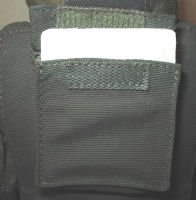
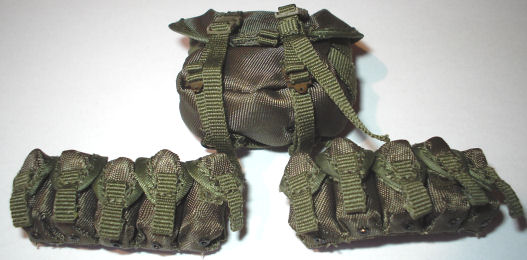
The parts are as follows from the left to right, DAM
radio and pouch. KGB Hobby grenade pouch, DAM bayonet and
scabbard, KGB Hobby backpack, KGB Hobby grenade pouch and a
small KGB Hobby pouch.
26. 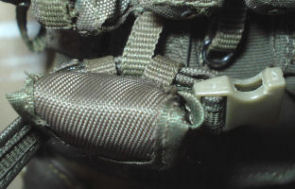 27. 27. 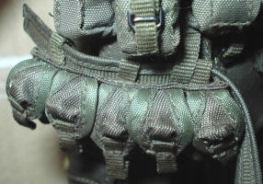 28. 28. 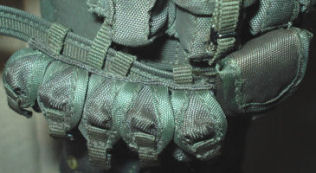
Assembly of the belt equipment is as follows, Picture
26. is the KGB Hobby small
pouch with the belt passed through one of the pouch loops,
the chest rig loop and through the other pouch loop. Picture
27. is one of the KGB
Hobby grenade pouches, the belt is passed through pouch loop,
the chest rig loop and then back through the other two pouch
loops. Picture 28. is the
small pouch and grenade pouch assembled on the belt.
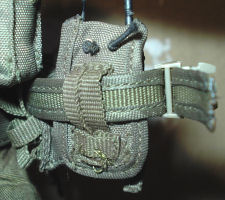
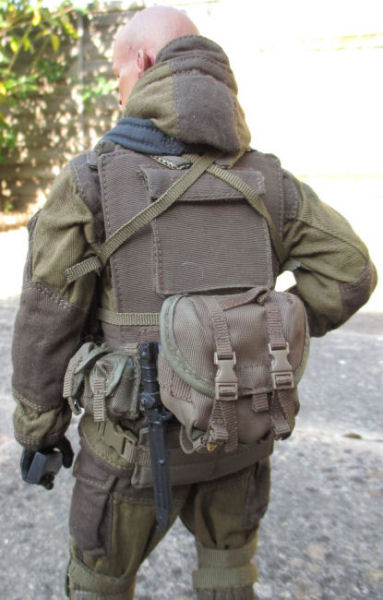
29.  30. 30. 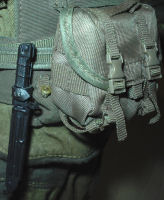 31. 31. 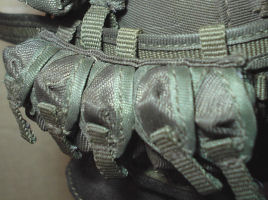
The next item to be fitted on the belt in Picture
29. is the KGB Hobby small
backpack, Picture 30.
shows the small backpack and then the DAM bayonet in place on
the belt. Picture 31.
shows the other KGB Hobby grenade pouch, the belt goes through
two of the pouch loops, the chest rig loop and then trough
the other pouch loop.
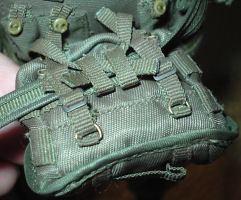
32.
 33. 33.
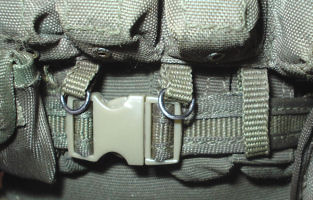
The belt in Picture 32. then goes through the loops
on the DAM radio pouch, where I refitted the buckle. Picture
33. shows the belt passed
through the final chest rig loop, where the belt has been
clipped together after I have adjusted the belt to tighten
it.
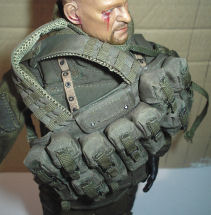
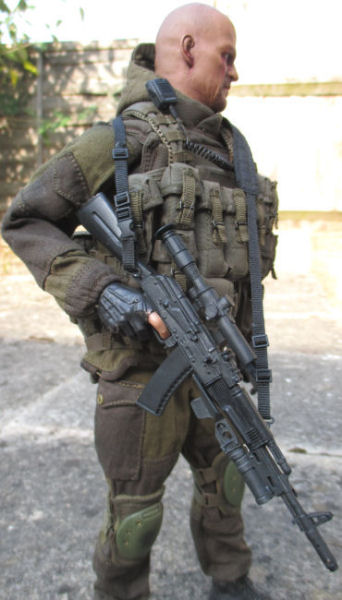
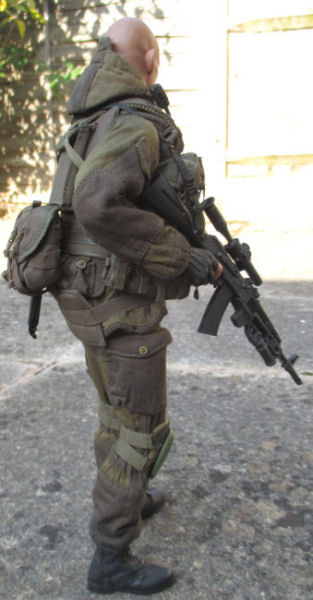
Assembled
Figure
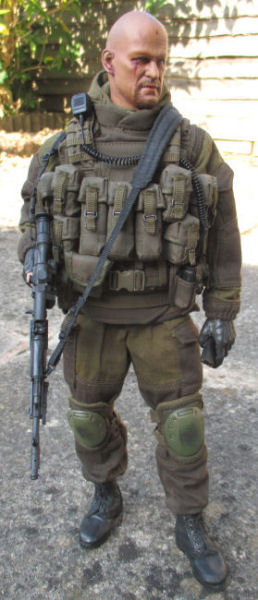 


Thank you to Scimitar for all of the help I
have had with my Spetsnaz figures.
| 