|

Welcome To My Wrist Joints
Alterations Page
I have been meaning to do this for some time with
my figures, but it is one of those things that I have never got around to doing.
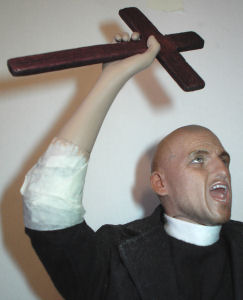
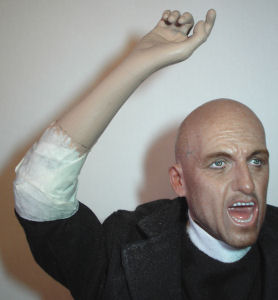
But with my Parson figure, I have finally had to attempt to improve the wrist
joints. As I had no alternative but to have the joint exposed on the arms, because of the way the sleeves creased up. So I had to try to find a way to
try to hide the joint, and that is when the idea came to me of using the Poly
Glue 'Mix' to fill in the gaps.
I have tried
Milliput filler in the past with very little success, because I found that
it was difficult to work with and if the wrist moved I found the material
cracked. So I have had to find an alternative and that was when the idea for the
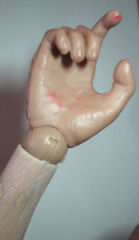
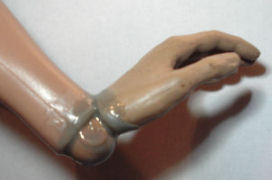
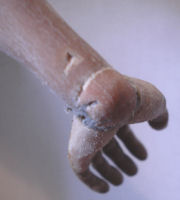
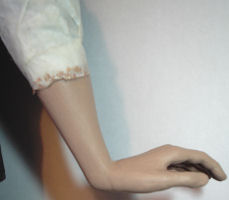
Poly Glue 'Mix' Came about. As shown in the picture on the right this is the
basic Soldier Story wrist joint for my Parson figure, I did try this method with
a Dragon hand but I found that it was a lot of work to get the same final end
result.
I have made a start with this, by firstly by
pulling the sleeve down and covering it with masking tape to protect it from the
glue. I then used the brush in the bottle to apply the 'Mix' making sure that I
also smoothed it down as best as I could. I then set the pose I want for the
hand and I apply the glue 'Mix' into the wrist gaps.
A very good website I found that helps to explain
a little about the different types of glue is
Scalemodelguide.
 Liquid
Poly Glue's Liquid
Poly Glue's
To help explain the types of Poly Glue I am using,
I have taken the details below from my
Tools page.
30
- Humbrol Liquid Poly Glue - This is the main glue I use for any plastic repairs
on my figures and weapons, although I do also use Superglue at times. But I
prefer to use this type on any plastic parts as it 'melts' the parts together
making a stronger bond.
31 - 'Poly Glue Mix' - This pot is a mix of the poly glue and scraps of plastic such as sprue
added to it, the purpose of this is that the glue melts down the plastic over
time to make a liquid plastic. I found out about this many years ago and it
has helped me enormously with my 1/35th and 1/48th scale models, because when it
is brushed onto a joint seam and smoothed down with the normal poly glue. Once
it hardens it becomes part of the model
itself, and I have found that with 1/6th scale weapons if I have broken them in
some way this glue can repair them far better than Superglue ever could.
32 - This
is the new packaging for the Humbrol glue, whereas the other smaller bottles are one's
that I have had around for years.
Please note:
That this will have to be built up in layers to fill all of the gaps, otherwise the
liquid 'Mix' will flow out of the gaps and down the arm. To help speed up part
of the drying process, I have found that if I gently blow onto the wrist joint
it helps to form a 'skin' on top of the 'Mix' to keep it in place.
Filling the Soldier Story right hand
& wrist joint
The bonus of using the 'Mix' is that it is liquid
plastic and when it dries it becomes solid plastic again and it bonds with the
original plastic of the arm to make it all one piece. After about an hour I then
build up the 'Mix' again on top to fill the gaps a bit more, this is again left
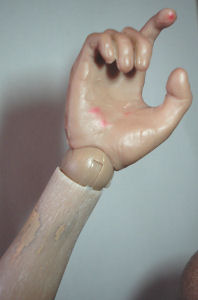
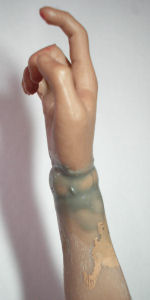
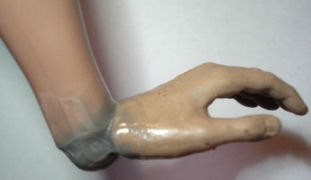
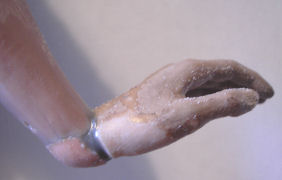
to dry and repeated until the wrist gaps are filled. Pictures 1. &
2. below show the basic un-altered wrist
with the arm that was sanded down after I tried this with a Dragon hand, and it
unfortunately did not work out as I wanted. So I had no alternative but to try
it with the original Soldier Story hand instead.
1.  2.
2.  3. 3. 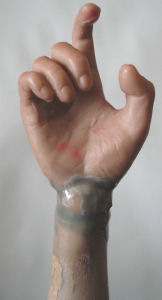 4.
4.  5. 5. 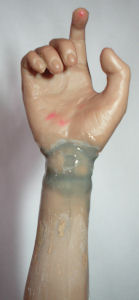
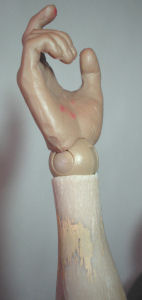
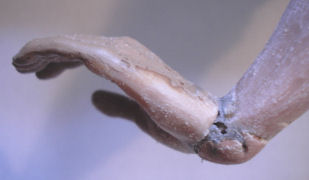
Pictures 3. 4.
& 5. show how over the course of a few hours
I have built up the 'Mix' on the wrist joint, this is then left to dry overnight
to make it fully solid. I then sanded the whole wrist joint to remove the 'ball'
in the centre, so that I have a smooth arm to hand joint. To do this I gently
sanded the wrist joint to see where both the high and low spots are, which may
need to be filled in with more of the 'Mix'. When it is dry I sanded it again to
smooth the joint as best as I can, I then use the normal liquid poly glue to
finally smooth the area to hide all of the gaps in the wrist joint.
Note: Remember
when using the 'Mix' to keep the wrist joint as flat as possible to stop the 'Mix running away from
where you want it. When it is dry I then use the normal liquid Poly
Glue to smooth the wrist joint and the plastic to see where any high or low
spots are. This is again left to dry overnight to make sure that everything is
set before I then use some fine sandpaper to make sure that everything is
smooth.
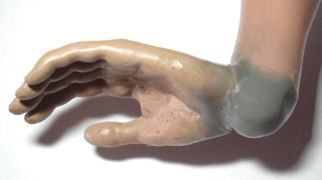
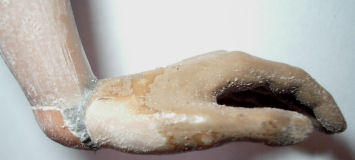
6. 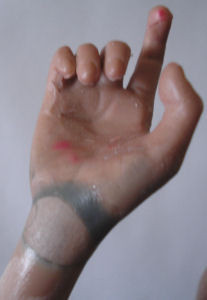 7.
7. 
I did this twice again with a repeat of the
sanding, the filling of the joints and the smoothing with the normal liquid poly
glue. The results of all of this are shown above in Pictures
6. & 7.
where the centre 'ball has been sanded down so that the arm now looks part of
the whole hand and wrist joint.
Filling the Soldier Story left hand
& wrist joint
8.  9.
9.  10. 10. 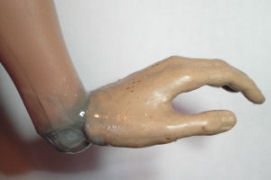
 With the parson figure pose that I wanted, the
figure had to be leaning back onto a log with the wrist at almost a 90 degree
angle. This is where the problem came about with just how much 'Mix' had to be
added to the wrist joint. In Picture 8. I
have started to add the 'Mix' to try to build it up and close the gap, by also
blowing on the wrist joint, it to can help speed up the drying process. With the parson figure pose that I wanted, the
figure had to be leaning back onto a log with the wrist at almost a 90 degree
angle. This is where the problem came about with just how much 'Mix' had to be
added to the wrist joint. In Picture 8. I
have started to add the 'Mix' to try to build it up and close the gap, by also
blowing on the wrist joint, it to can help speed up the drying process.
In Picture
9. I added some more on top, again making
sure that I laid the figure down so that the 'Mix' would stay level and not run
off the joint. This was left to dry for over 24 hours to harden enough so that I
could use the normal Poly glue to smooth the 'Mix' as I did with the other wrist
joint.
In Picture 10.
you can see when the glue has dried that it adds a shine to the wrist joint and
the 'Mix', this was again left overnight to dry fully and in the picture above
right. I have added some more of the 'Mix' to the wrist joint to cover it, when
this is dry I will add some more to the base of the hand so that when I sand the
joint it will all be smoothed into one piece. This is then ready for painting as the arm and
hand now look like they are joined, since by using the normal Poly Glue over the
top of the 'Mix', I have been able to shape the joint so it all looks like one
piece.
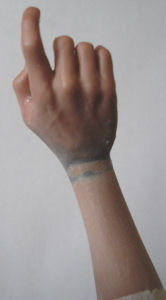
Grinding the wrist joint
11.  12.
12.  13.
13. 
 I
was looking at the wrist joint after I filled it with the 'Mix' and I realised
that the joint looked too big plus the hand looked too long, so I used my model Dremel type drill and a sanding bit. As shown in the above pictures
11. 12 & 13.
I have removed most of the ball on the wrist joint, and at the same time I have slightly narrowed the wrist area to look more natural.
Note: When I used the sanding bit, I tried to stay away from the hand as much as possible, because as it is softer than the wrist joint and it can be
easily damaged. I
was looking at the wrist joint after I filled it with the 'Mix' and I realised
that the joint looked too big plus the hand looked too long, so I used my model Dremel type drill and a sanding bit. As shown in the above pictures
11. 12 & 13.
I have removed most of the ball on the wrist joint, and at the same time I have slightly narrowed the wrist area to look more natural.
Note: When I used the sanding bit, I tried to stay away from the hand as much as possible, because as it is softer than the wrist joint and it can be
easily damaged.
Once I have got the wrist as I wanted it as shown
on the right, I will again add the 'Mix' over the wrist area to fill the holes as I did earlier. This will then be gently sanded to the same condition as in
Picture 6.
Painting the wrist joints
To paint the arm and wrist joint I used some
Daler-Rowney artists acrylic Flesh Tint 578 paint, which I mixed with a very
small bit of Light Brown acrylic paint to darken it slightly. So that both the
arm, wrist and hand are the same colour and almost the same colour as the head.
Picture 14. 15. & 16.
are of the arm after I have finally smoothed and painted it, although it will need another coat of paint as it is a bit patchy at the moment.
14.
 15.
15.
 16.
16.
I will also have to give it a wash of some diluted Brown pastel chalks as it
looks too clean and new at the moment. It will also add some depth into the creases of the hand and
the fingernails as well. |
