|

Welcome
To My Gebirgsjager Officer Page.
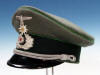
This figure is my kitbash of a German Gebirgsjager
officer, originally it was all based around the cap made by Dragon that I had bought loose as shown below right. But after seeing the superb caps as made by
Onesixthunique, I just had to have a replacement for it instead. The only problem
then was, that the insignia I wanted to use with this figure to me just did not
look right. So I contacted Patrick (Nomad65)
about his insignia that he makes, and I bought from him a superb set which I
have shown below. Note: I am still trying to
work out how and why I got so carried away with this kitbash.
Headsculpt
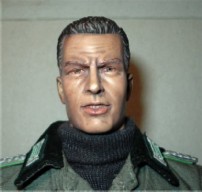
The headsculpt that I decided on for this figure
is a loose Corbin Black one I had. Note:
which was adapted to fit onto a Dragon nude body. This was given a slight repaint to get rid of
the camouflage paint that it had on it. I then as usual gave it a wash of the
Brown pastel chalks I often use. But for some reason with this head the colour
came out slightly more red than I wanted, so after washing that off and trying
again twice. I finally got it to a colour that I was happy with.
I then gave it a dust over with some Flesh pastel
chalks to bring out the highlights, which again I had to do gradually because
when I take the photos of the head, I have found that it can show up a lot of
the dust on the face which can look like it is overdone. So now I take pictures
of the head as I go along, and most of the time doing it this way it stops me
from getting carried away with the pastel chalks.
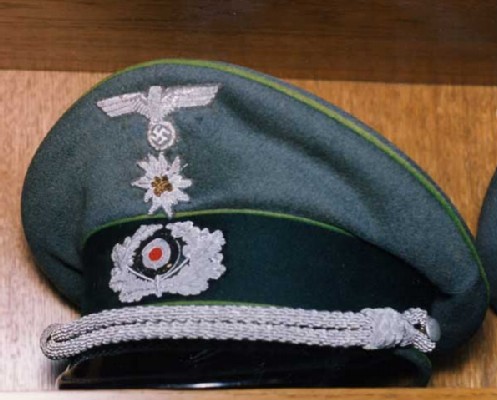
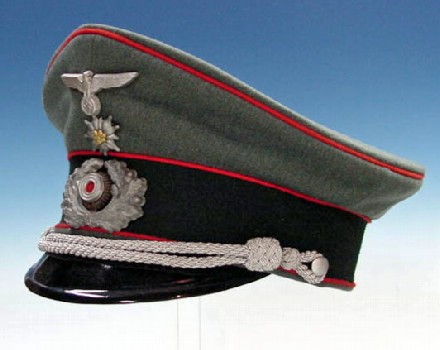
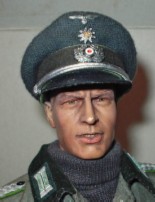
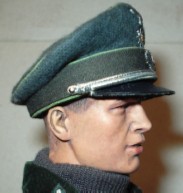
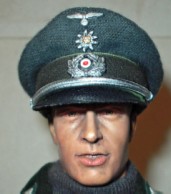
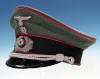
Officers Cap
This was one of the main parts of the whole kitbash that
to me has made the figure so much better, as I have seen the cloth caps as made
by Steve Davies of the company
onesixthunique
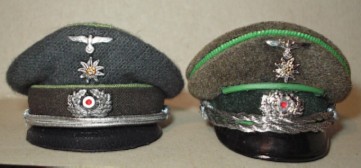
on various forums, but after receiving mine, I realised that they just cannot display just how well the caps are made.
And for a comparison I have the Dragon cap above alongside the one I used with this
kitbash. I was worried about the colour of the cloth, this was mainly because of my
lack of knowledge on this subject, but after an e-mail to Steve about it, he
confirmed that the colour is correct, plus I also had it confirmed by
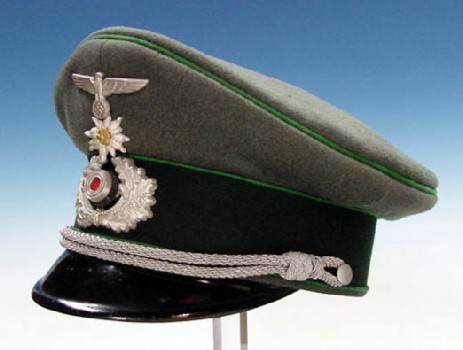
Patrick (Heersbergfuhrer). Because he also very kindly supplied the pictures
of some genuine cap's below to put my fears to rest.


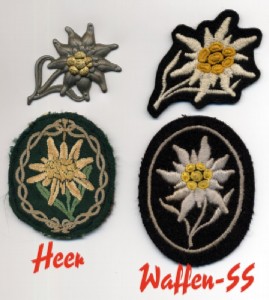
One other thing that was also very kindly supplied
by Patrick to help to clear up my confusion was the last picture above right,
and it shows the differences between the Heer (Wehrmacht) and the SS M43 cloth
cap insignia. This is because as it was explained to me, the Toys City German
mountain set has a Heer sleeve emblem but an SS emblem for the cap.
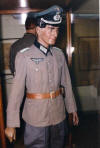
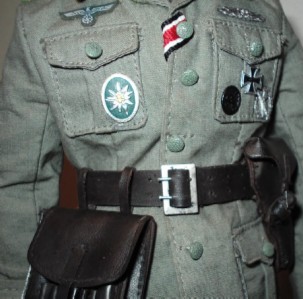
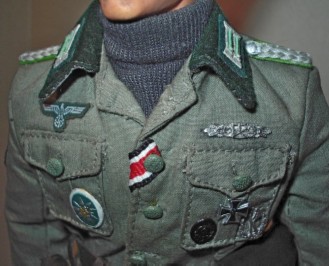
Uniform
For the tunic for this figure I have used a jacket
from the DiD Staffenberg figure (the one without the red piping) that I obtained loose,
with the open collar stitched in place, the main reason for using
this one is that it has the correct turned back cuffs for an officer's tunic.
The only changes that I had to make to it was to very carefully remove the red
backed shoulder boards that it came with, because I wanted to use the green
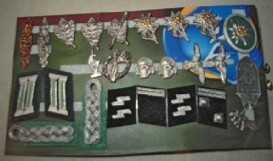
backed Gebirgsjager shoulder boards that I bought from Nomad65 instead.
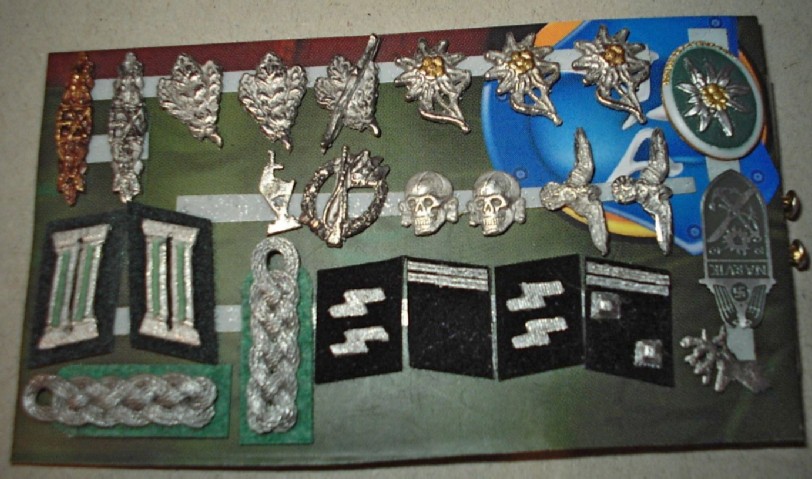
I have
included a Thumbnail shown right of the various insignia's that I bought, I just
wish that I had a better camera to show off just how well detailed these items
are. As they really do add a great deal of detail to the uniform. Especially as
the badges are made of metal, the shoulder boards are woven together, plus the
SS insignia actually stands out slightly from the collar tab to give a very good
relief detail.
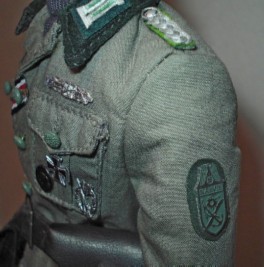
 In the pictures above I have tried my best to
demonstrate how I have used some of the insignia on my figure, also to show how
I applied the
badges to the tunic. I first placed them onto some double sided sticky tape, I then
gently rubbed over the top of them with a pencil to bring out the detail, I then
rubbed it with my finger to get a slight metallic shine to them. I
then carefully cut around them with my model knife, including inside the assault
badge, I peeled off the backing paper
and then stuck them in place on the uniform. Note:
Make sure that if you use this method, that the badge is in the correct
position, because if you try to take it back off again it may leave part of the
sticky tape on the uniform. And it may be difficult to scrape this off the
material In the pictures above I have tried my best to
demonstrate how I have used some of the insignia on my figure, also to show how
I applied the
badges to the tunic. I first placed them onto some double sided sticky tape, I then
gently rubbed over the top of them with a pencil to bring out the detail, I then
rubbed it with my finger to get a slight metallic shine to them. I
then carefully cut around them with my model knife, including inside the assault
badge, I peeled off the backing paper
and then stuck them in place on the uniform. Note:
Make sure that if you use this method, that the badge is in the correct
position, because if you try to take it back off again it may leave part of the
sticky tape on the uniform. And it may be difficult to scrape this off the
material
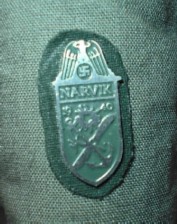
With the Narvik shield on the arm right, I repainted a piece of cotton printer paper with a Dark Grey/Green acrylic
paint mix (slightly darker than the tunic) and once it was dry, I then placed the shield (with the sticky tape on the back)
onto the paper. I then cut the paper around the shield in the shape as shown.
Note: Another
method for this could be to use a thin piece of cotton material stuck onto a
piece of the double sided tape, painted to the colour that you want, and when
it's dry put the shield with the tape on the back (backing strip removed) on top
and then cut to shape around the badge. Then all you have to do is take the
backing tape off the cotton piece and place it on the sleeve.
Information about the badges -
Assault Badge,
Wound Badge,
Close Combat Clasp,
Badges,
Arm Shields,
Wound Badges
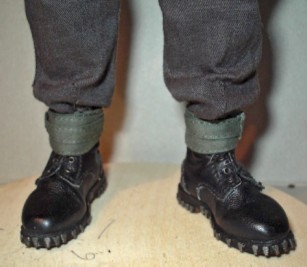
The other items I have used with this figure are a
Dragon roll neck sweater, cloth gloves, Toys City trousers with puttees and a
pair of DiD German mountain boots. The changes to boots consisted of re-painting
them with some Matt Medium acrylic paint to lose the shine on them from the
factory, and I repainted the metal cleats on the boots with some Gunmetal paint.
The puttees were fitted in the same way as my other Gebirgsjager figure.
Note: I feel that a Dragon nude body is
better to use with the Toys City trousers, because the waist belt does up better
plus with it being that little bit shorter, the trousers blouse out better with
the puttees.
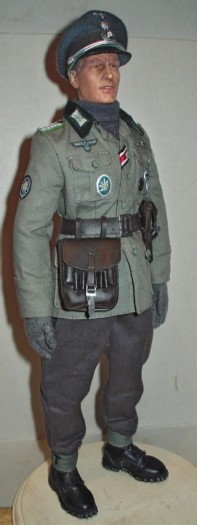
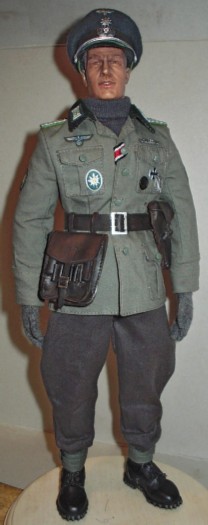
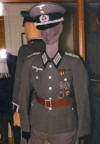
These pictures are of the completed figure, with a
DiD officers belt, a map case with the belt mounting straps replaced since they
were not wide enough to pass the belt through and a pistol holster. All of these
had a Brown pastel chalk rubbed over and then wiped off to make them looked aged
and to also lose the shine.
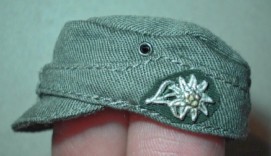
M43 Cap Insignia
Another item that I forgot about was the cap that
I have shown on the right, as this was an experiment I did where again I have
used the green cloth backing under the Heer M43 cap insignia.
I did this because I read somewhere about how some
Gebirgsjager troops did this to the badge, to show off the Edelweiss insignia
better. This was done the same way as the backing for the Narvik shield, the
hardest part of doing this, was the cutting around the Edelweiss badge with my
model knife to remove as much of the double sided tape as possible.
Note: I found that if any tape is sticking
out on the edges afterwards, I just gently pressed it under the insignia edges.
I would like to thank
RogueJK
for his excellent help with my future German figures.
And a special thank you to
Heersbergfuhrer for all of the superb pictures and the
very detailed help with my
mountain figure.
Steve of onesixthunique
for the fantastic cap and all of the help that he supplied to me.
And Patrick
(Nomad65)
for the time he gave to me in answering my questions, and for the very highly
detailed insignia. |