|

Welcome To My Wehrmacht Ski Jager
Figure Base Page
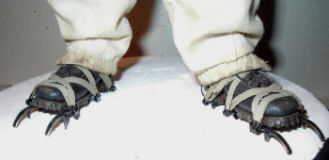
This page is about how I have made a snow base for
my Ski Jager figure, which I mainly made from polystyrene which I found is
easier to work with rather than plaster. As it helps the crampon spikes get a
better grip, which also helps the figure to stand up easier.
Diorama Base
1.
 2. 2. 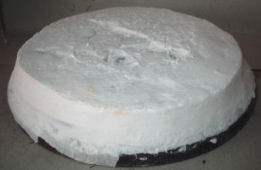 3.
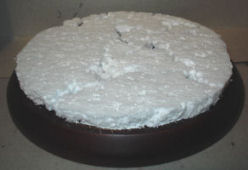
3. 
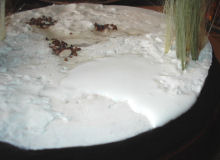
The base for this figure is a circular one and for
the base groundwork in Picture 1. I
am using some pieces of polystyrene to build up a landscape. The benefit of using this in the diorama, is that the
spikes on the crampons can be pushed into the polystyrene to help support the
figure. Picture 2. shows how I have used
some masking tape around the edge of the base to protect it, I then added some
plaster over the edge of the polystyrene to smooth it off and make it level.
Then once it was dry for a couple of hours, I used my model knife to carefully
cut around the edge of the plaster so that I could remove the tape.
I then used a sanding stick to sand it all level,
in Picture 3. I
then painted over the top of the edge of the wooden base with some Mahogany wood
dye, to re-colour any pieces of the base that was damaged as I sanded the
plaster. Note: I had to do this step about
three times to get the flat edge to the groundwork, because I had to add some
more plaster to the edge to fill in the holes where it was not deep enough.
4.  5. 5. 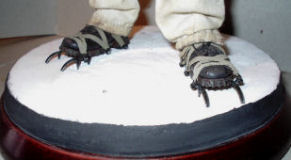 6.
6. 
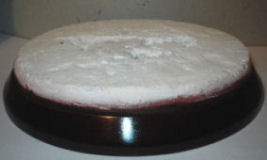
In Picture 4.
above it shows the result after the dye was dry and I rubbed in some Dark Tan
shoe polish on the wooden edge, which I then polished with a soft cloth to get
the shine on the base. With Picture 5.
I have painted the edge of the plaster with some Black acrylic paint, to separate
the sides for the groundwork on the top from the Mahogany colour of the base,
this also helps the White for the snow groundwork to stand out better. Picture 6.
shows how the spikes on the crampons help to keep the figure upright, as the
plaster helps to strengthen the polystyrene I used, which helps to balance the
figure's weight with all of the equipment on it.
7.
 8.
8.
 9.
9.
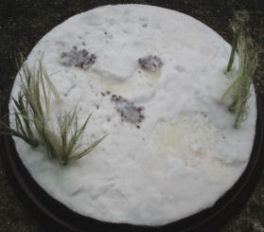
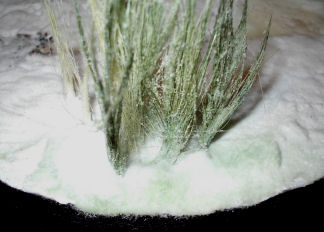
Picture 7.
shows how I have added some stalks of grass material, I bought from a model
railway shop. This was done by making a hole in the groundwork with my pointed
tweezers, the grass was pushed in and I then put some plaster around the hole to
hold it in place.
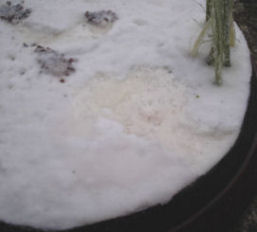
Another item I wanted on the base was something
that looked like ice, so as shown in Picture 8.
it shows the result after I dripped
some neat PVA glue into the base. Which when dry after I left it for 24 hours
has dried slightly clear, to improve this I then painted over the top of the
glue with some Gloss Varnish twice, which has helped to make the ice effects
shiny.
To show how I did this is shown in
Picture 9. and in the picture on the right,
with the ice effect on the edge of the landscape. I carefully added the PVA glue
next to the edge and I propped up the base at a slight angle, so that the glue
slowly seeped towards the edge. As it dried on the edge I pressed against it
with my finger, to make it level with the base edge. To make the ice effect
slightly deeper, I added more PVA glue on top of the other glue, which I spread
about a little with the pointed end of my paintbrush. Again I propped up the end
of the base, so that the new PVA glue flowed over the top to make it all level
as shown above. When it had dried, like the other ice effect I painted over the
top of it with the Gloss Varnish paint to make it all look shiny.
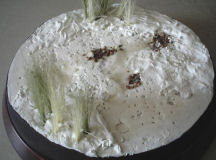
10.
 11. 11.
 12.
12.
 To complete the winter base, I have used some
Woodlands Scenic Snow
on it as shown in these pictures. To get the snow material to stick to the base
I painted on it some diluted PVA glue making sure that I painted it right up to
the edge of the black paint. Then onto that I sprinkled the snow material, as
shown in Picture 10. Picture
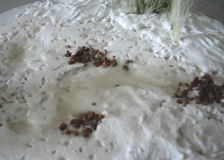
11.
shows how I have applied the snow material around
the edge of the ice areas, this was built up by being applied twice on the top
of the groundwork. So that there is a raised edge between the snow and the ice. To complete the winter base, I have used some
Woodlands Scenic Snow
on it as shown in these pictures. To get the snow material to stick to the base
I painted on it some diluted PVA glue making sure that I painted it right up to
the edge of the black paint. Then onto that I sprinkled the snow material, as
shown in Picture 10. Picture
11.
shows how I have applied the snow material around
the edge of the ice areas, this was built up by being applied twice on the top
of the groundwork. So that there is a raised edge between the snow and the ice.
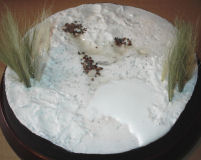
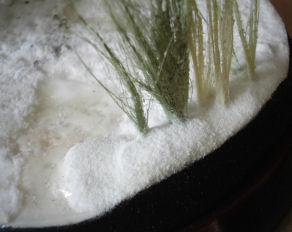
In Picture 12.
as the groundwork dried, the green colour of the rushes I used bled out to stain
the snow material. This was because of the water in the diluted PVA glue I used
to fix the snow material before. So once it was all dry after being left
overnight, as shown on the right I used some neat PVA glue mixed with some
diluted White acrylic paint on top of the groundwork, so that I could apply some
more of the snow material. The last thing I did was to gently paint some diluted
PVA glue onto the rushes, so that I could sprinkle some of the snow material
onto them.
Many thanks to the
85th Gebirgsjager Living History Group
for all of their help.
Thanks to Bob a Job
for his idea about using coffee to change the colour of the snow suit.
And a special thank you to
Heeresbergführer for all of the superb pictures and the
detailed help with my Gebirgsjager figures.
|
