|
Welcome
To My Luftwaffe HE111 Pilot Page.
This page is about how I have made my Luftwaffe
HE11 pilot which was to be based on the Dragon Hans Pifer figure. It is a nice model and the
first boxed figure from Dragon I have bought in a long time. Although to
complete it I have had to also buy some extra parts for it, such as the Newline
pilot's boots, flare gun and belt plus the flying helmet and the oxygen mask.
An interesting fact I have discovered regarding
the Luftwaffe crews was, that they were not 'rotated' out of flying duties like
the allied pilots during the war. In fact the only time they came off these
duties was when they were captured, injured or even killed. So this helps to
explain why they amassed such high 'kill' scores.
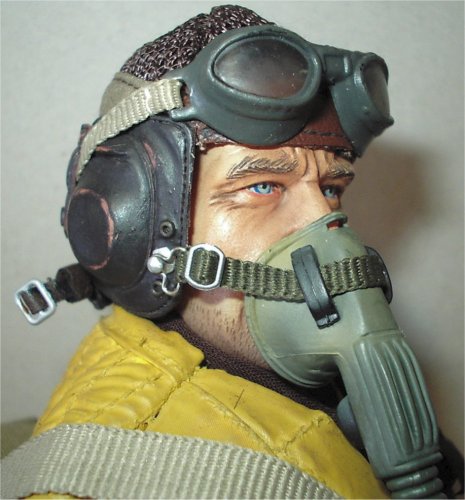
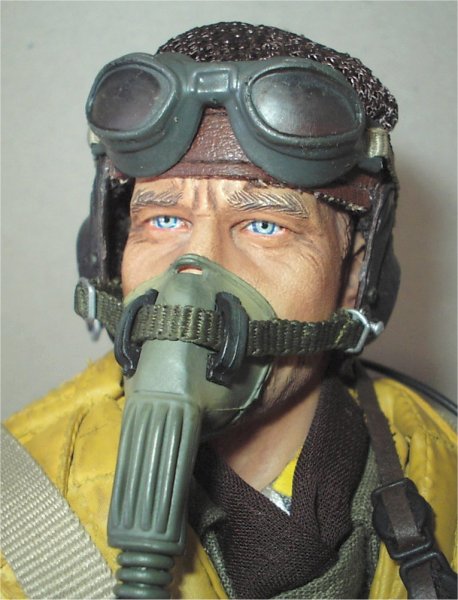
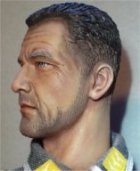
Headsculpt
I have not been able to use the head that came
with the Dragon figure, because I ended up ruining it when I was doing the
pastel wash. So as a replacement I have used a DiD William Bowman figure
instead, and these pictures show the head after
I have given it a pastel wash. Note: I do
find that the pastel technique I use does work better on the DiD heads rather
than the Dragon one's, as I have only ruined I think 12 Dragon heads so far
since I have started doing it.
 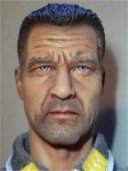

So if I make it look easy about how I get the
heads like this, you should see the 'casualty department' in my cupboard.
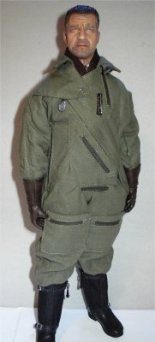
Uniform
The uniform consists from the box of a tunic,
trousers and the flight suit. These are shown in the pictures below and one
thing that I have replaced is the plastic boots, and I have used a pair of the
Newline German pilots boots instead. 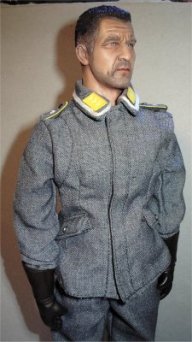
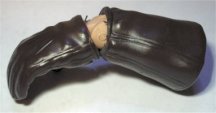
It was during the assembly of the uniform that I
found out I had another problem, and this time it was with the gloved hands.
Because I had used the DiD head and body as a replacement, the peg on the Dragon
hands would not fit into the DiD arm.
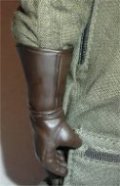
So the only alternative had was to cut each of the
gloves as shown right about halfway round, so that this then exposed the pin
which I removed and then replaced the peg with a DiD one instead. Once I had
done this I then put some super glue on the open seam, folded the glove back in
place and once dry I fitted the gloves to the figure.
 Note: Make
sure when you cut the glove, that it is just under the moulded seam, as that way
when it is re-assembled the cut does not show. Plus, make sure that the glue
does not get onto the folding part of the inner hand joint, also to remove the
pin on the wrist peg see this
page. Note: Make
sure when you cut the glove, that it is just under the moulded seam, as that way
when it is re-assembled the cut does not show. Plus, make sure that the glue
does not get onto the folding part of the inner hand joint, also to remove the
pin on the wrist peg see this
page.
The picture on the right shows how I have tucked
the flight suit sleeve into the top of the glove, to make this easier I have cut
off the black 'popper's' to give me more space. As this I feel these are not
necessary once the sleeve is pushed into the glove.
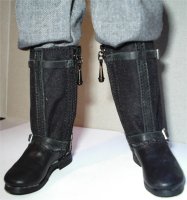
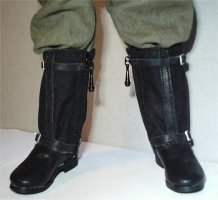
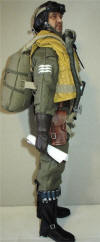
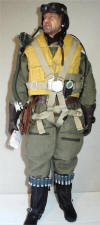
Equipment
With this figure I was not happy with it just
being as it came from the box, and the first things that were replaced were the
boots as I not a fan of the plastic boots, so I obtained a pair of the excellent
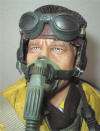
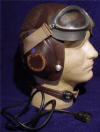
Newline boots. Also, the figure just had to have a flying helmet and the oxygen
mask, plus a flare gun and flares.
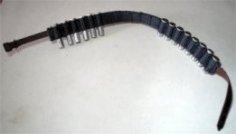 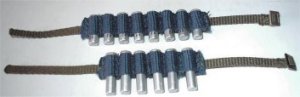
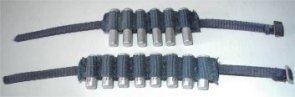 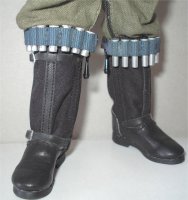
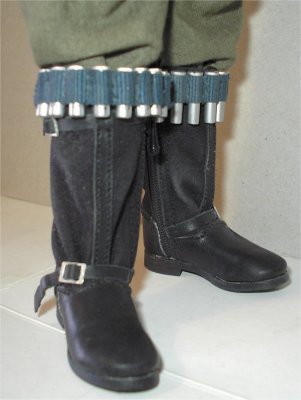
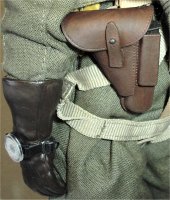
With the flare gun belt I wanted two belts around
the boot tops, instead of just the one around the waist. So I cut the flare
holders off the belt, then I sewed some spare webbing strap onto the back also
adding two spare buckles I had. The straps were then painted with some Blue
acrylic paint to match the holders, and dusted with some grout to match them all
in.
These were then fastened around the tops of the
boots as shown on the right. Other items I have used with this figure are the
bbi Luftwaffe flight helmet from the Otto Schultz figure, which also came with
the flight mask, connection cable and the throat microphone. Plus I am also
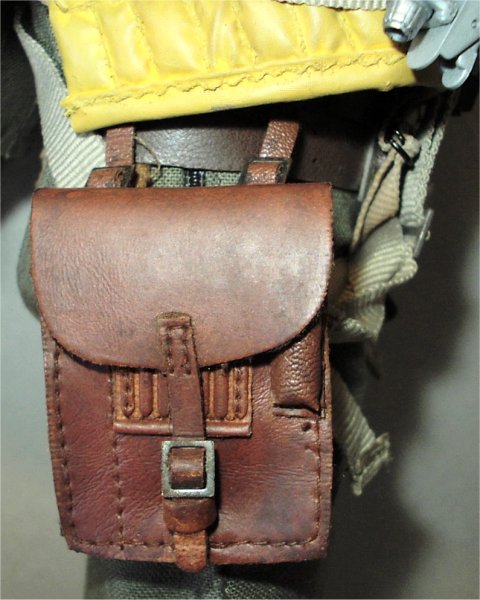
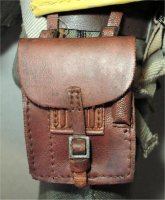
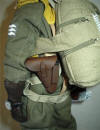
using the belt and pistol from the Dragon Eugen Kroh pilot figure, and the map
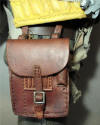
pouch from the DiD Tim Becker figure.
The pistol belt, pistol holster and the map case
were repainted with the Daler-Rowney Burnt Umber acrylic paint. The results of
doing this are shown below right, the pistol holster was also given a drybrush
of the same paint after I mixed some White with it. With the map case because it
is made from a type of vinyl, it has given me a nice aged look it once the paint
has dried.
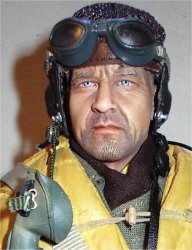
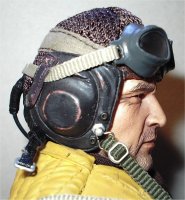
Note:
To get the helmet to fit correctly on the head, I
very carefully removed from the inside the plastic pads that go over the ears.
As they were making the helmet stand out too far from the head.
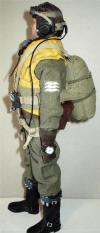
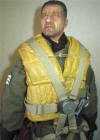
Life Preserver or 'Schwimmweste'
With this it really started to annoy me with the
bright yellow colour as it came from the box, as I expect that in reality they
were never that bright even when brand new. Plus I also wanted it to look like
it has seen some service. So I decided to do something about
it, and I ended up repainting the whole thing with a darker yellow paint from
the Games Workshop Citadel range called 'Bubonic
Brown', numbered 61-15.
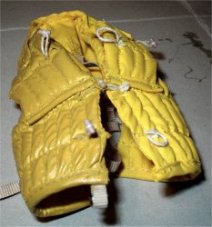
 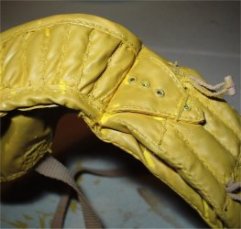
The immediate differences in the colour can be
seen in the pictures above, in that the vest in the first two pictures above has
the paint on the left side and the right is untouched. I used this particular
colour as it was the only matt yellow I have at the moment. The third picture
above right is where I have started to repaint the inside of the vest.
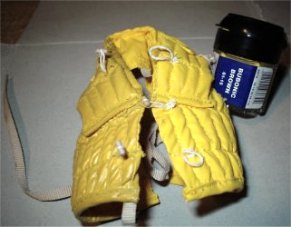
I must say that once I got the front part done, I
got to the stage of wondering why had I done this? Because once I had finished
it and left it to dry for about 30 minutes, I then discovered that due to the
creases in it, I had missed quite a bit of the inner folds and the edges. As
shown in the picture on the right, so I loosened off all the straps and both
twisted and folded the vest to show up where I had missed with the paint.
Note: This
took longer to do than the original paint work, as I had to let it dry and then
check it again about three times in all to see if there were still any missed
parts.
The straps and front fastening tags were then repainted with some Model
Color paint USA Tan-Earth numbered 70874, as I did not want to leave these in
the plain colour
that they were. The final part done was I rubbed a knife blade
over the metal eyelets, to get the silver colour back again.
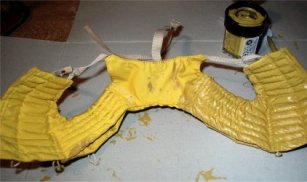
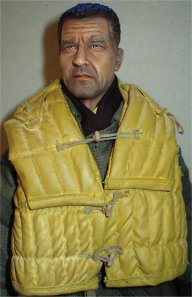 In the picture on the right, the vest has been
given a dust over of some grout powder to lose the plastic look that the vest
developed after I had repainted it. This did help a little, but after having an
idea put forward by Dubar, I used some Yellow pastel chalks to give it
another light dusting. This has helped a lot with losing the plastic look, plus
it has helped to bring out some of the tops of 'ribs' as a highlight. In the picture on the right, the vest has been
given a dust over of some grout powder to lose the plastic look that the vest
developed after I had repainted it. This did help a little, but after having an
idea put forward by Dubar, I used some Yellow pastel chalks to give it
another light dusting. This has helped a lot with losing the plastic look, plus
it has helped to bring out some of the tops of 'ribs' as a highlight.
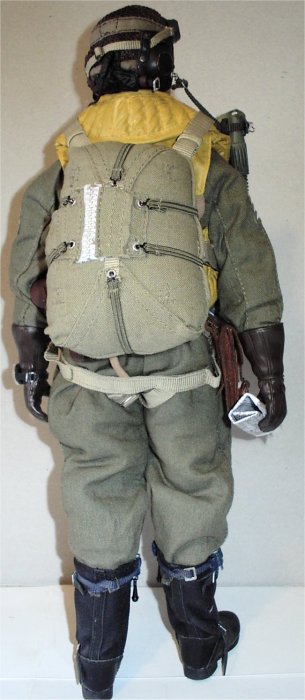
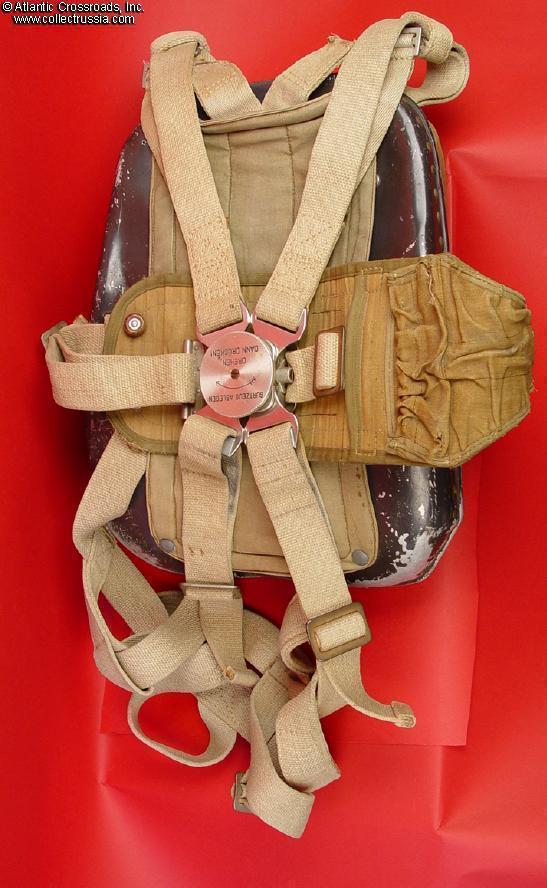
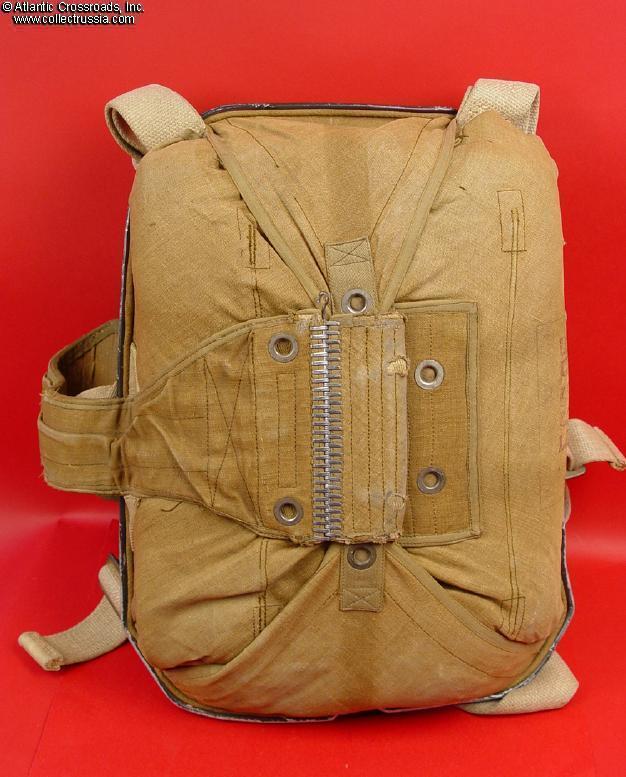
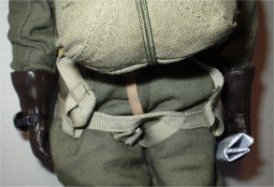
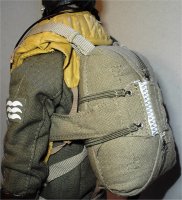
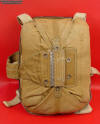
Parachute & Assembly
With this parachute I was hoping that I would be
able to use it as it is, without having to alter the parachute lock as I have
done on my
Parachute Repair.pdf. But I am afraid that after numerous attempts to try to
get the straps fastened onto the little pips, with this figure I have had to
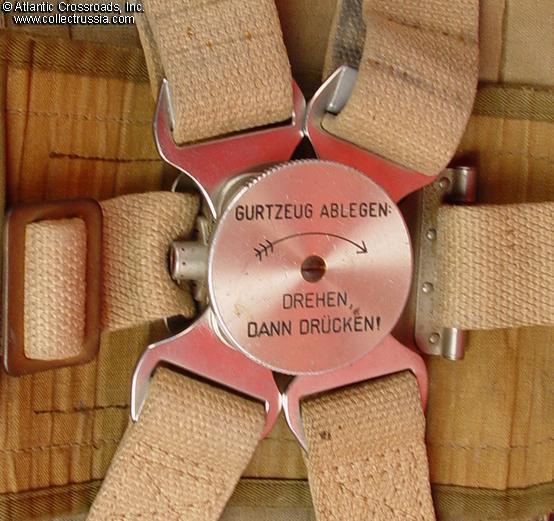
again resort to the alterations to the parachute lock.
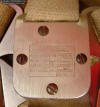
Important Note: I have
also realised, that the wording on the front part of the parachute lock has
started to rub off due to my handling of it, whilst I was trying to connect up
the straps. So this has annoyed me that now I have a lock with no wording on it,
so I strongly recommend that the front lock is painted with a clear varnish to
protect it before handling.
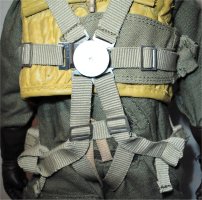
I will try my best to explain how I have assembled
the parachute onto the figure, you first need to lay the 'X' part of the straps
against the back of the figure, then the parachute pack is then laid on top of
this. So that the two long straps go over the shoulders, and the 'seat' strap
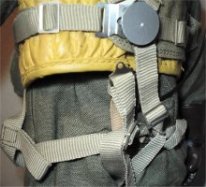
sits on the bottom of the figure as shown below left. Then the two lowest buckle
straps go through the loops as shown below middle, with the buckles facing
inwards. Then the other loop of strap is brought up through the legs of the
figure, the buckle straps are fed through that and then folded up so the buckles
now face outwards and they are then connected to the main centre parachute lock,
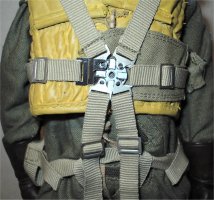
as shown below middle and right.
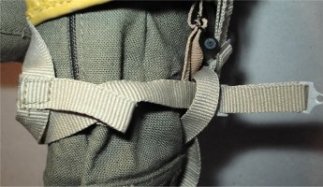
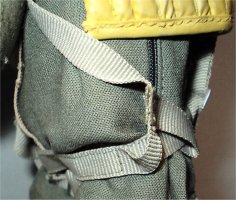
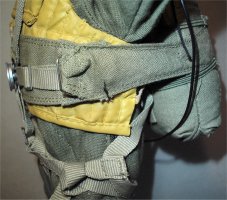
In the pictures below, the left one shows the side
of the parachute straps and the seat strap that the are connected to the centre
lock brought forward, when they are adjusted to make the parachute sit right.
The middle picture shows the lower front straps threaded through the loop
between the figure's legs. The picture on the right below, shows the top, bottom
and side straps connected and adjusted into the centre lock.
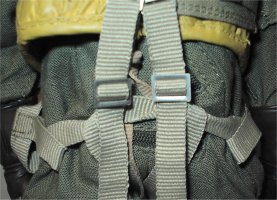
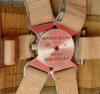
The picture below shows how I have altered the
back part of the
centre lock again, so that I can get the straps all connected
up. Because unless I am doing something wrong, I cannot see how the tiny pips
are supposed to hold both buckle strap connections together on the left hand
side. The middle picture below shows all of the straps connected and the now
blank centre lock front piece in place. The picture below right shows the other
side of the parachute with the release handle.
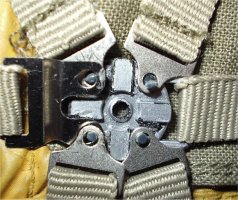
Note: Another
problem that has developed is that the outer part of the centre lock is now
loose, and it will not stay in place as shown above. So rather than glue it in
position, I cut a thin strip of double sided tape and wrapped the metal peg with
it, and I then pushed the front part of the lock into position.
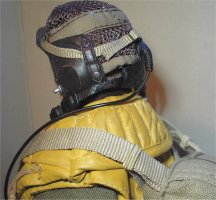
Finished Figure


Luftwaffe parachute & summer
flying helmet reference
pictures

Many thanks go to Dubar for his
idea about using the pastel chalks on the 'Schwimmweste'
Chris W for all of his help
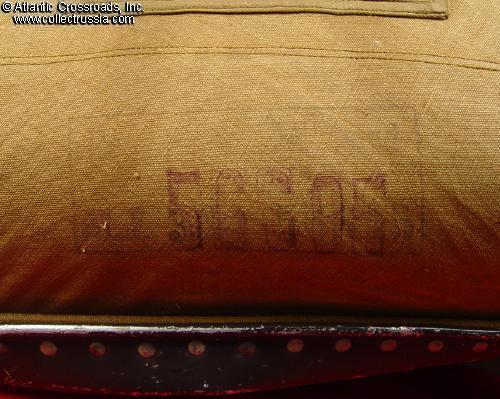
with pointing me towards the
Collect Russia website for the parachute images above.
And to Collect Russia for his very kind permission in allowing me to use his images here.
Clint from the
C. E.
Daniels Collection website, for his very kind permission in allowing me to use
the picture of the flying helmet. |